Safely Upgrade Your Mazdaspeed Turbo

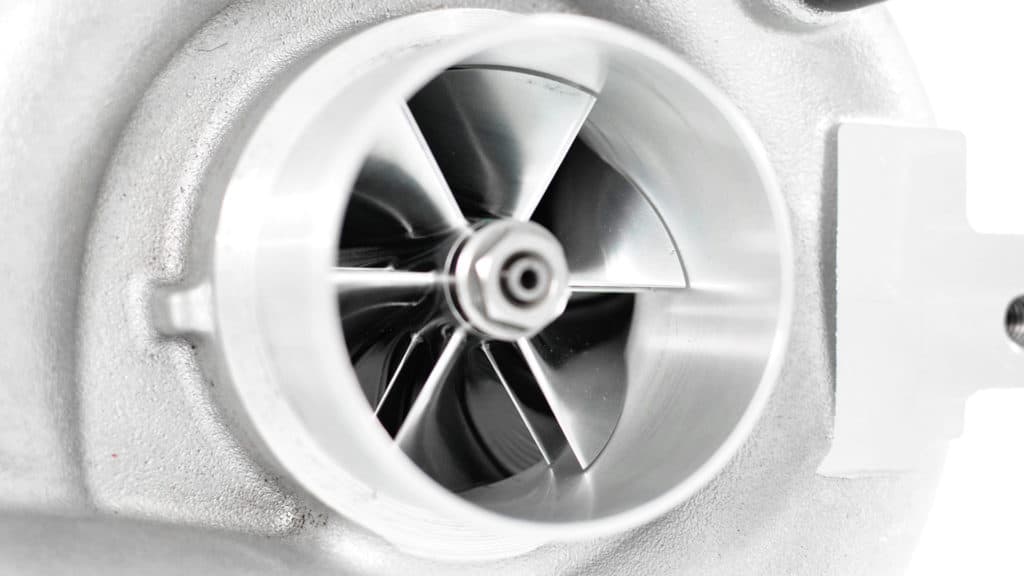
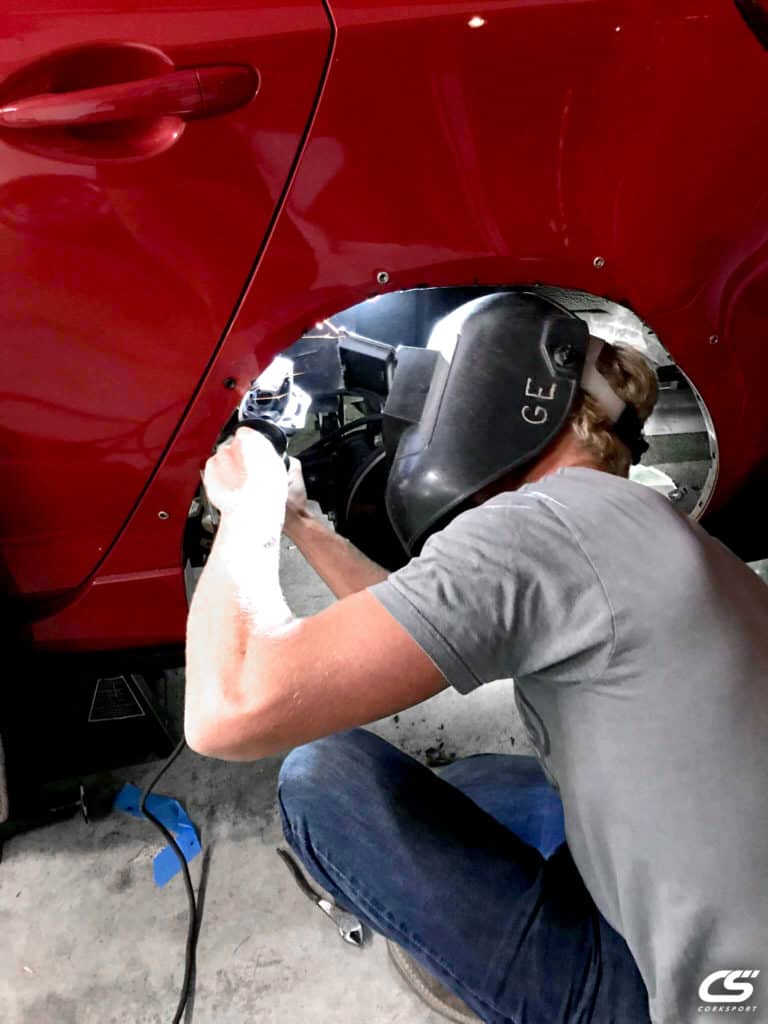
It doesn’t take long for those building power to use up the stock Mazdaspeed K04 turbo. They are prone to fail, especially when you start shoving that extra air through it. A common question is, “My Mazdaspeed is smoking, is my turbo bad?”

First things first. There is a BIG difference between replacing a bad turbo and upgrading Mazdaspeed K04 to a more efficient one for more power. If you want to replace it, go with OEM and just plug and play, you’re good to go, wash your hands, and get on with your life. This will have your car up and running pretty quickly. However, your maximum power output will be limited and you will eventually have the same problem – the Mazdaspeed KO4 turbo will fail.

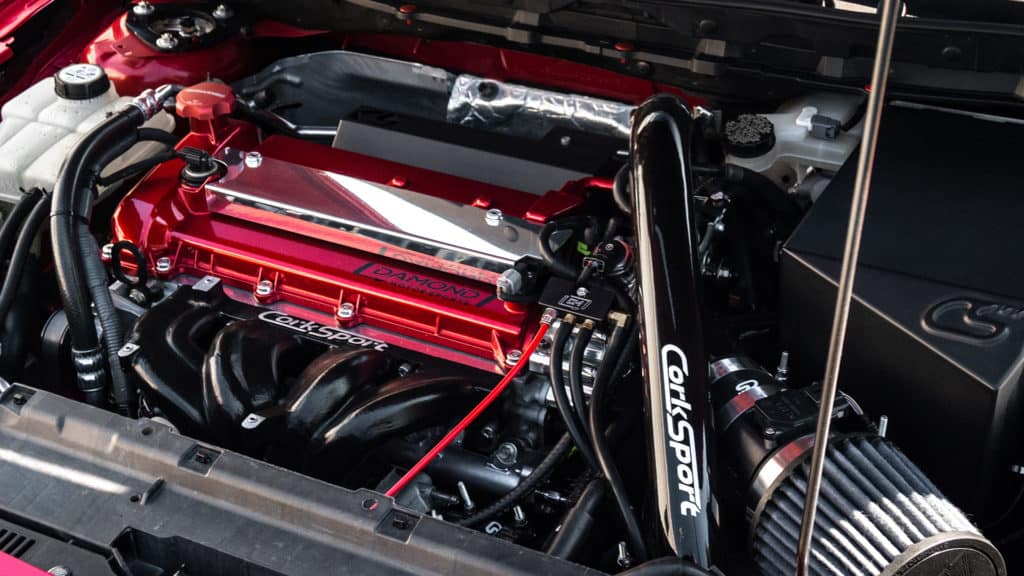
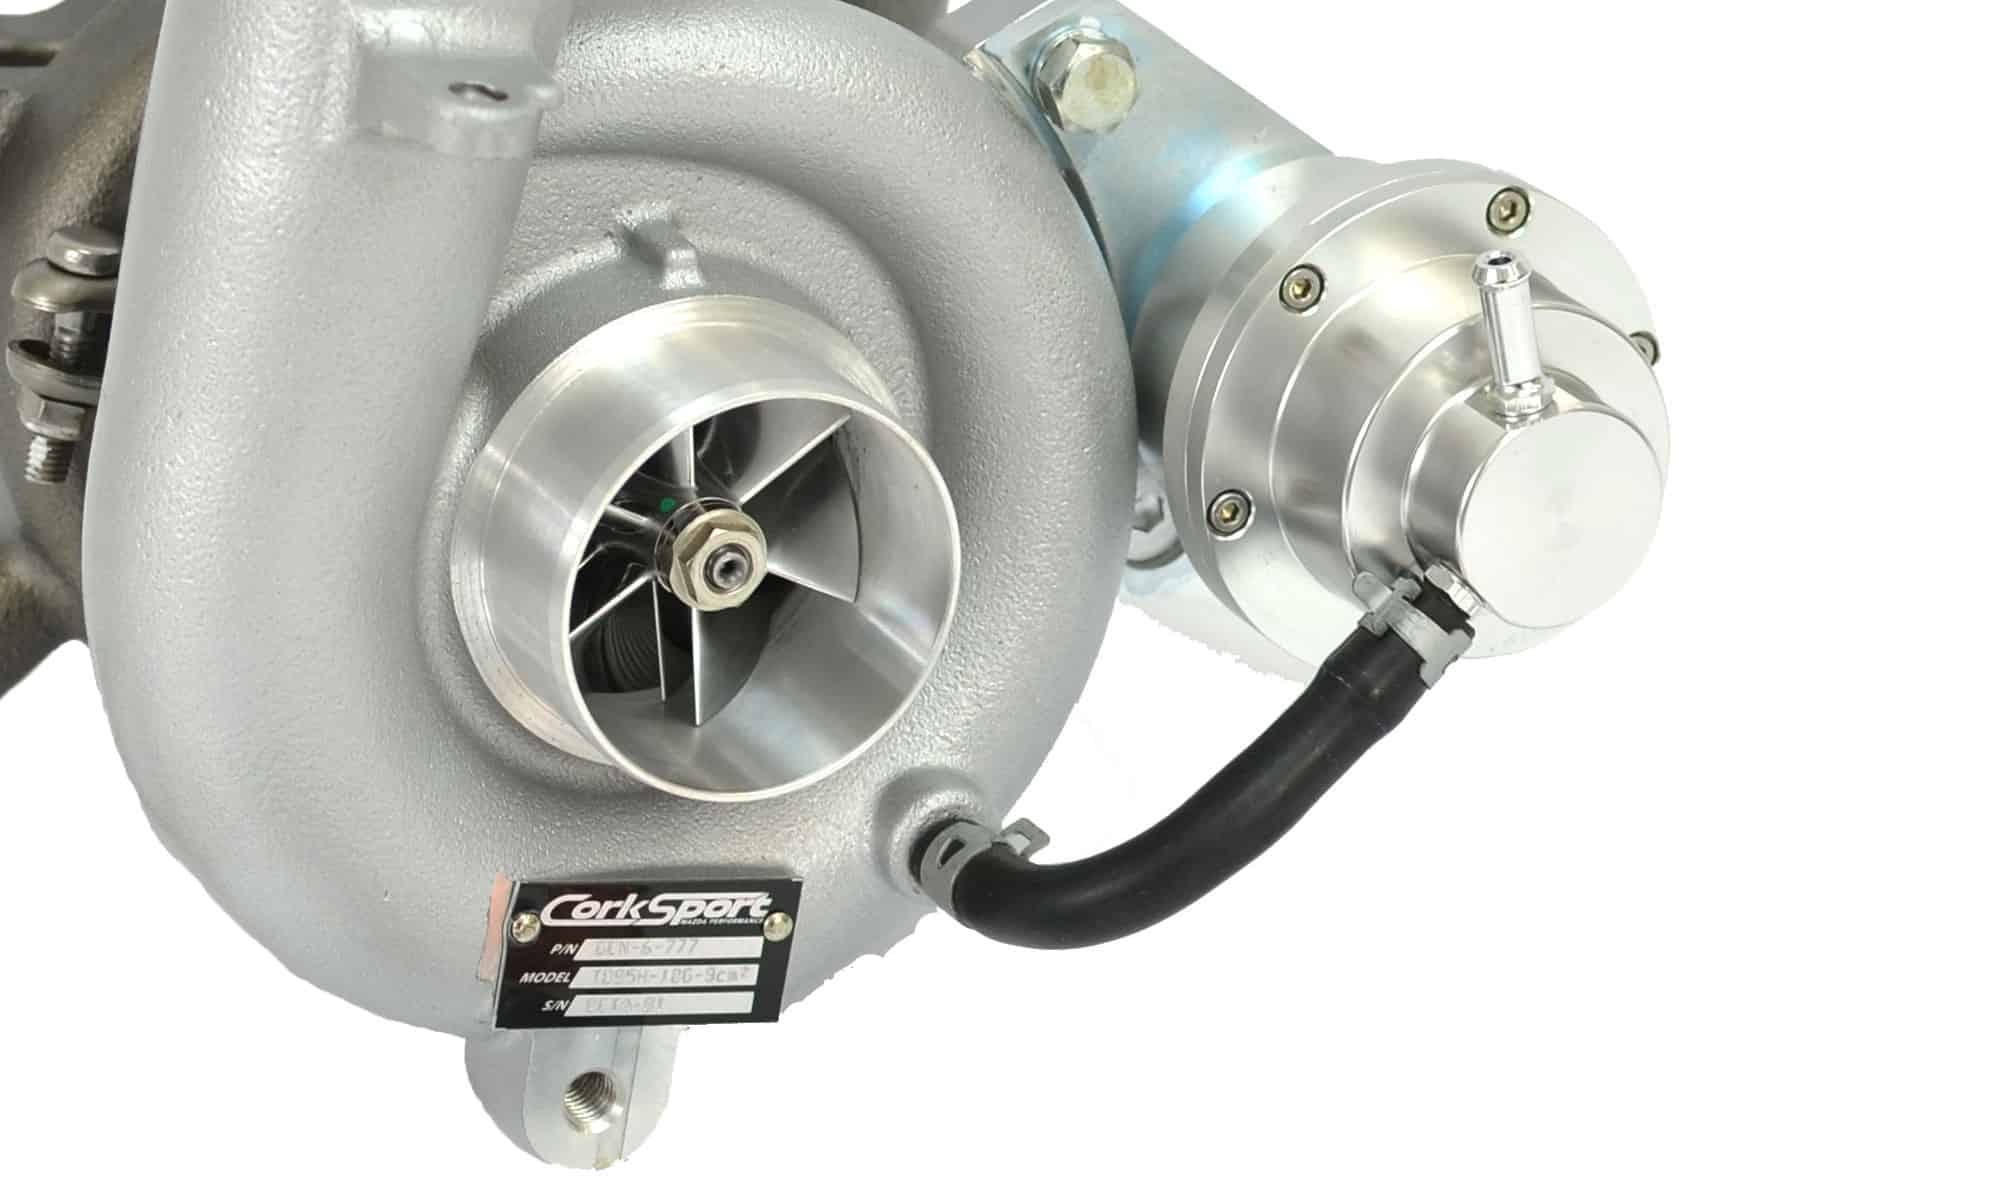
If you are saying to yourself, “It’s time to upgrade the K04 Turbo…I NEED more power in my life!” Then this blog is for you. Below, we lay out the basics needed to successfully install a CorkSport Mazdaspeed Turbo, highlighting the required supporting modifications to keep your Mazdaspeed safe. As a bonus, we keep our installation instructions on each of our product pages, so you can preview how easy the installation will be for your experience level.

Mazdaspeed Turbo Upgrade for the K04 BNR

Here it is, the list is comprised of the BARE essentials to run the 18G CorkSport turbo.
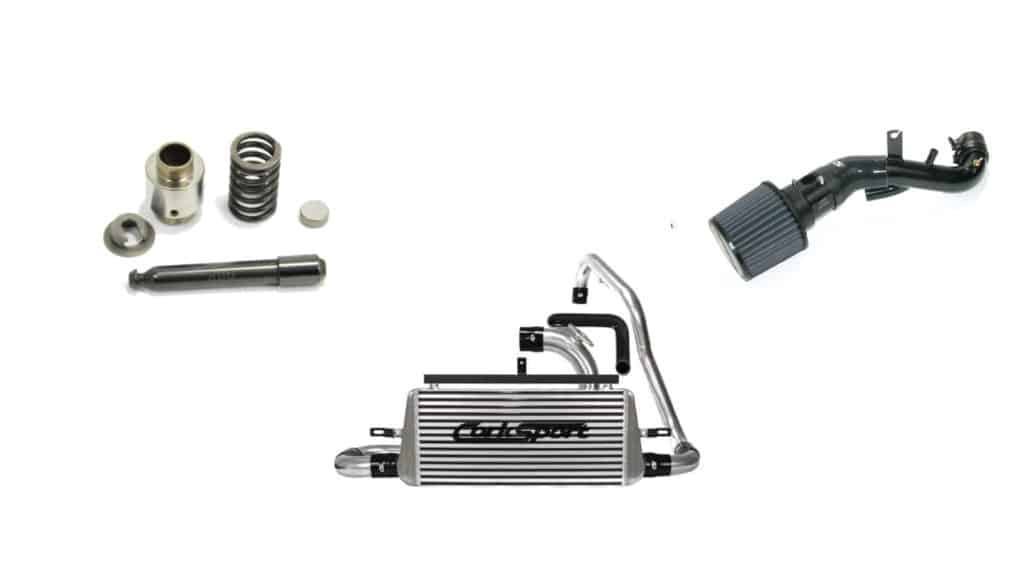
HPFP INTERNALS

Giving you 50% more efficiency with your fueling system, as well as, a strong base to build power for your Mazdaspeed. The CorkSport Max Flow Fuel Pump Internals are built to directly replace your stock fuel pump internals and perform with immediate improvements.

CorkSport fuel pump vs. competitors

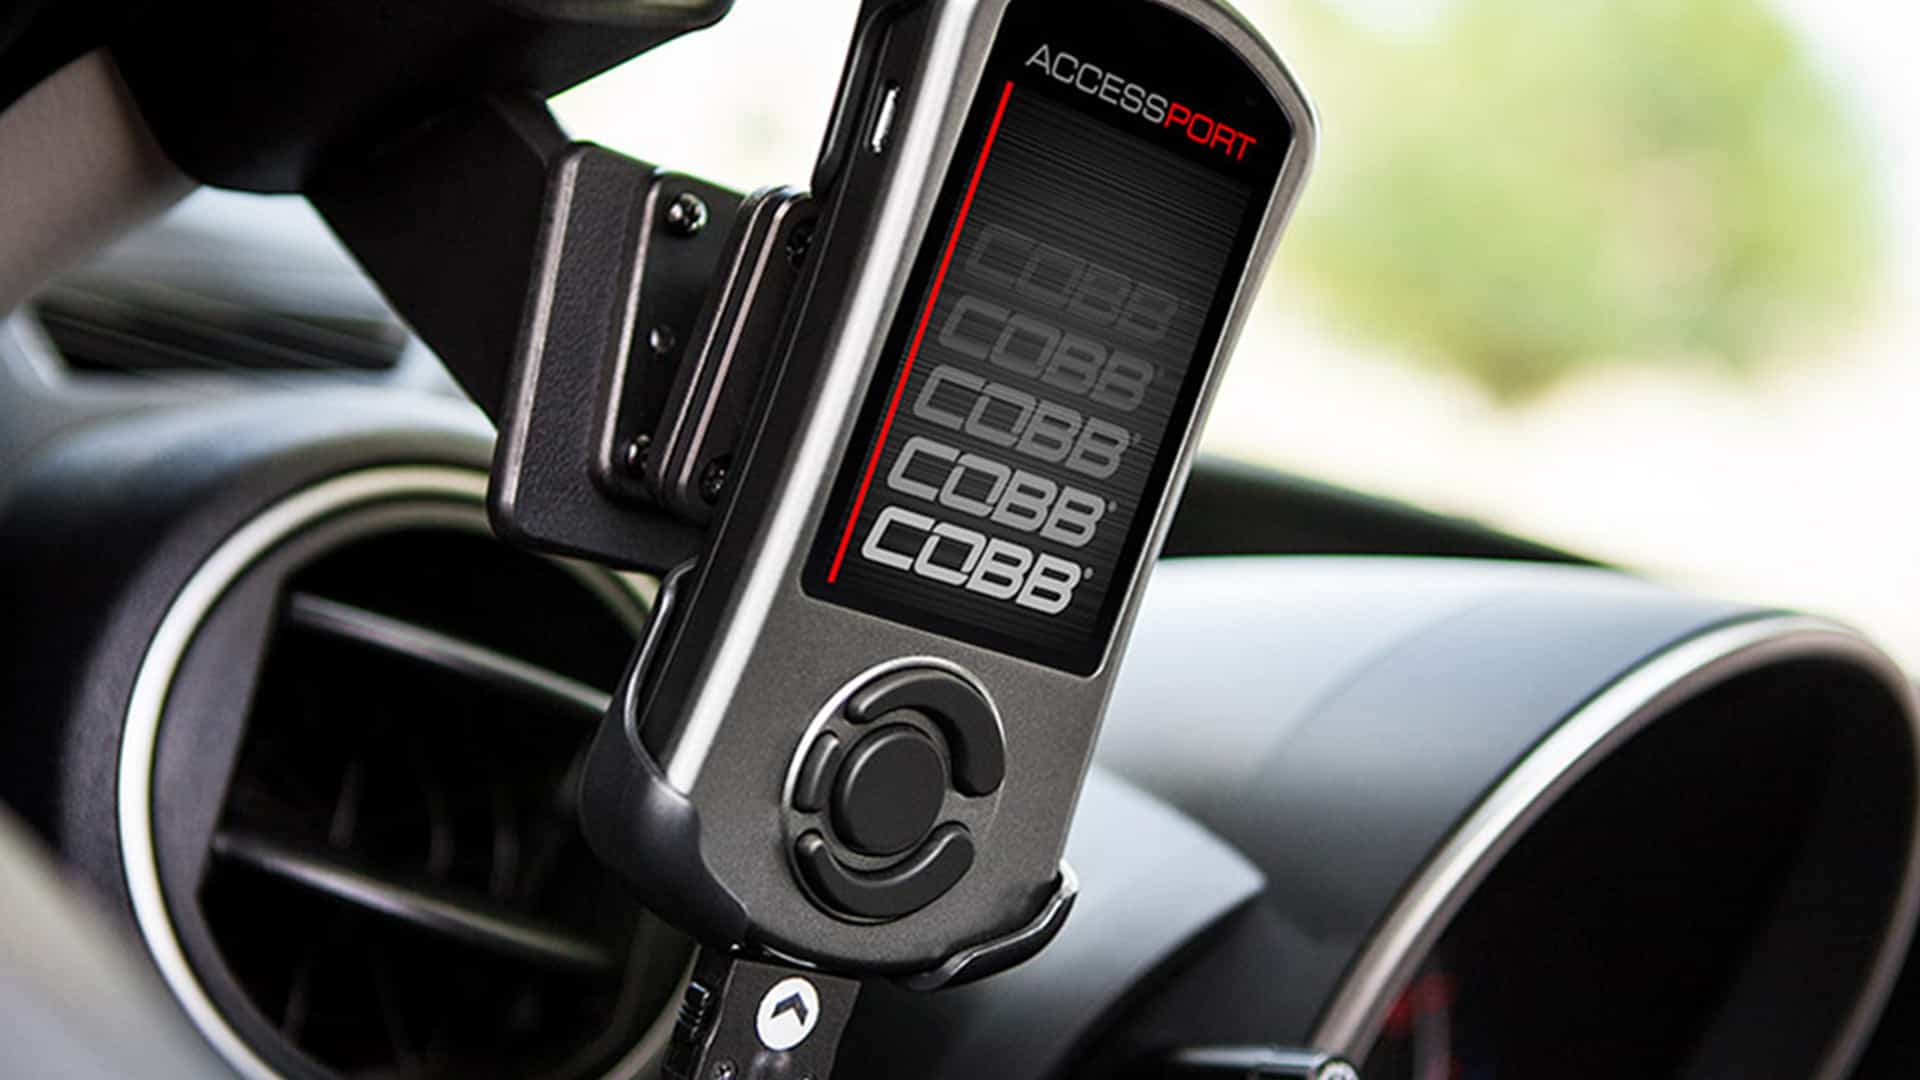
ACCESSPORT (or VERSATUNE if you have a CX-7)

The Cobb Accessport will give you the basis for tuning, and since this is required with the CorkSport turbo – you’ll want to make sure you have this in hand and ready for when you install your turbo.

These are the basic foundations of our Mazdaspeeds, without these two items you cannot operate your Mazda after installing an upgraded turbo.  You will need your Mazdaspeed tuned, and your tuner is going to say the same thing.

That’s it, that’s all you need to run the CorkSport Mazdaspeed turbo safely. With this proper foundation, you can put yourself in a position for efficiency, or more power.

Mazdaspeed turbo upgarde and installed on a Mazdaspeed 3

Now the question is do you want to make it go fast and harness the power that this turbo is built for? Keep reading and we’ll provide some other awesome upgrades that are the next step once you have your turbo installed and running.  Oh, and if you are looking for a proven path to make 400WHP, check out our Chasing 400 WHP Blog here!

2013 Mazdaspeed 3 Engine bay with TMIC, SRI and Turbo inlet pipe, CST4

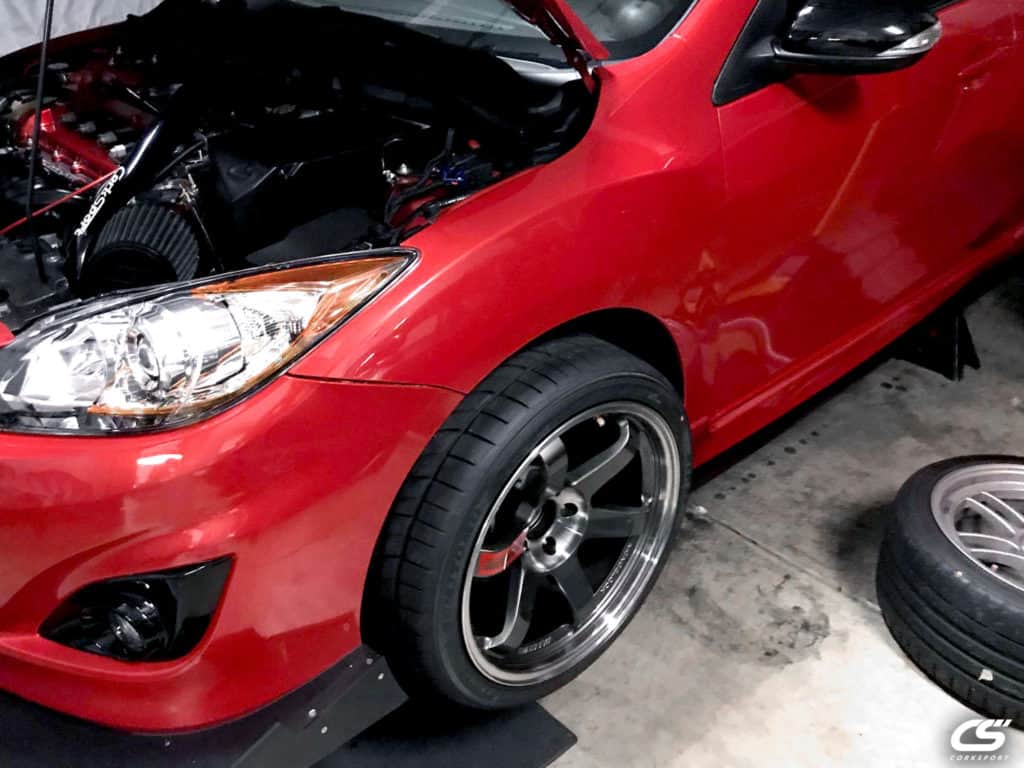
CorkSport Upgraded 3.5” Intake

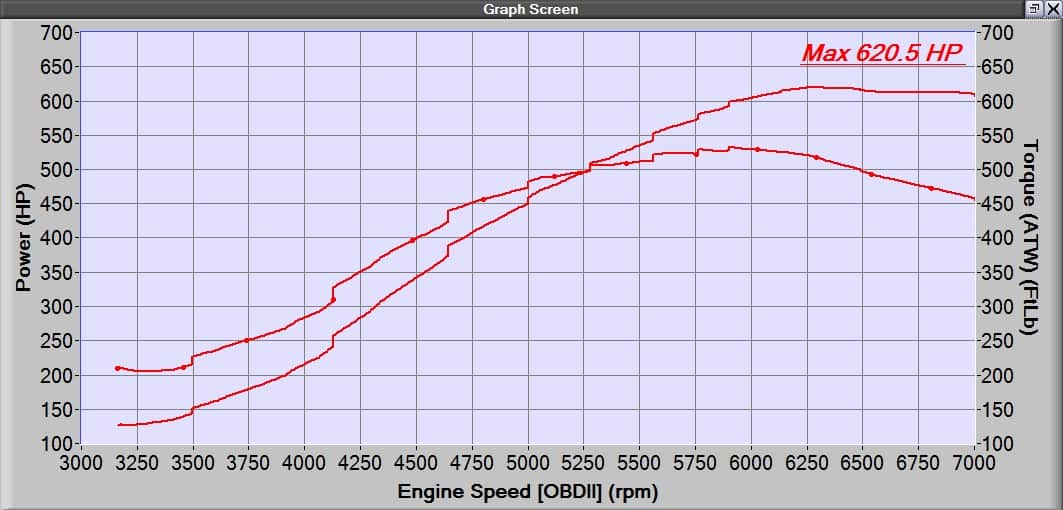
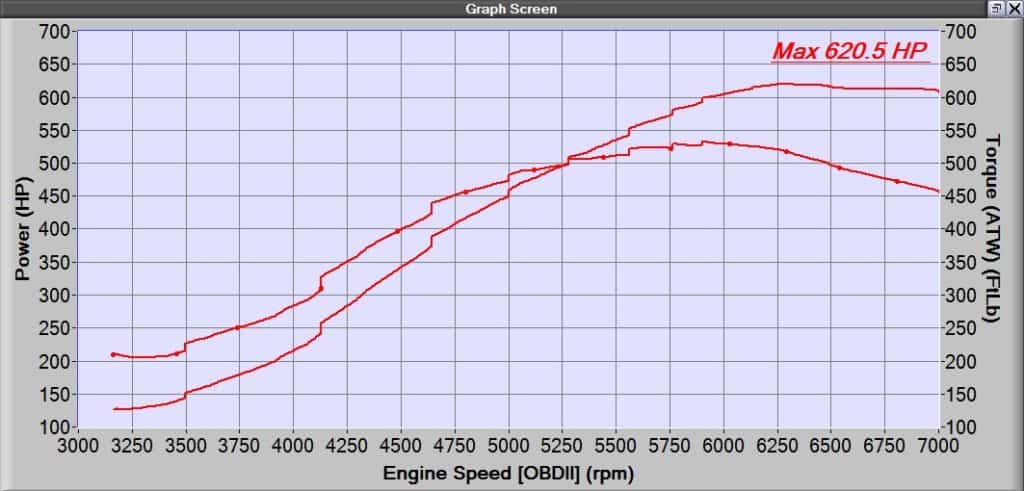
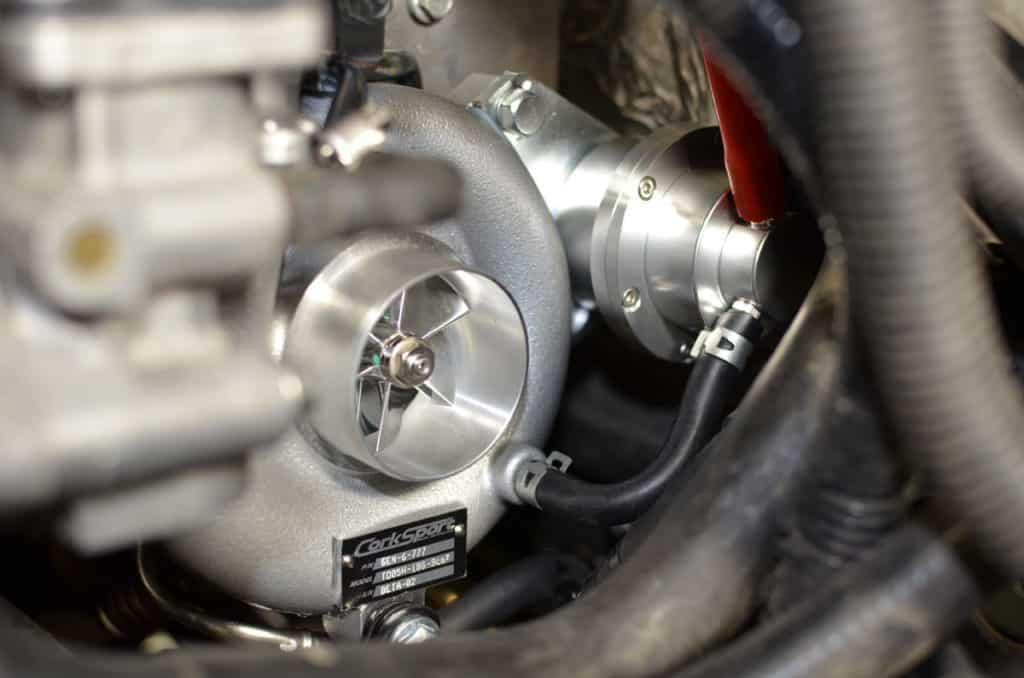
The CorkSport turbo is rated for up to 450WHP with the right set up. Unless you are going for the MOON and shooting for over 700WHP a 3.5” intake will be more than sufficient for this turbo. Giving you some extra airflow to increase your power range, and harness what your Mazdaspeed3 is capable of. Note: Will require additional tuning!

Mazdaspeed 3 Turbo Back Exhaust

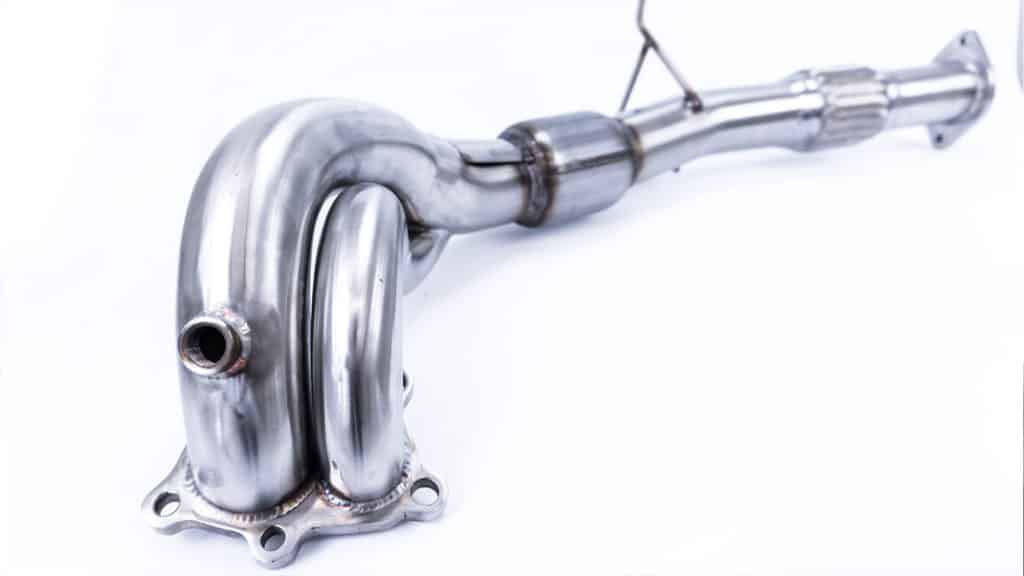
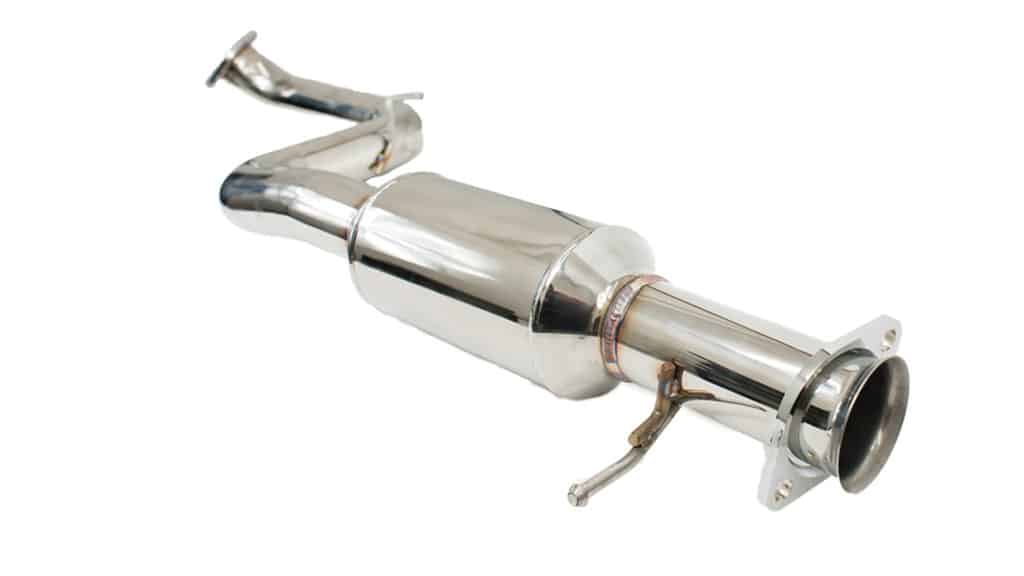
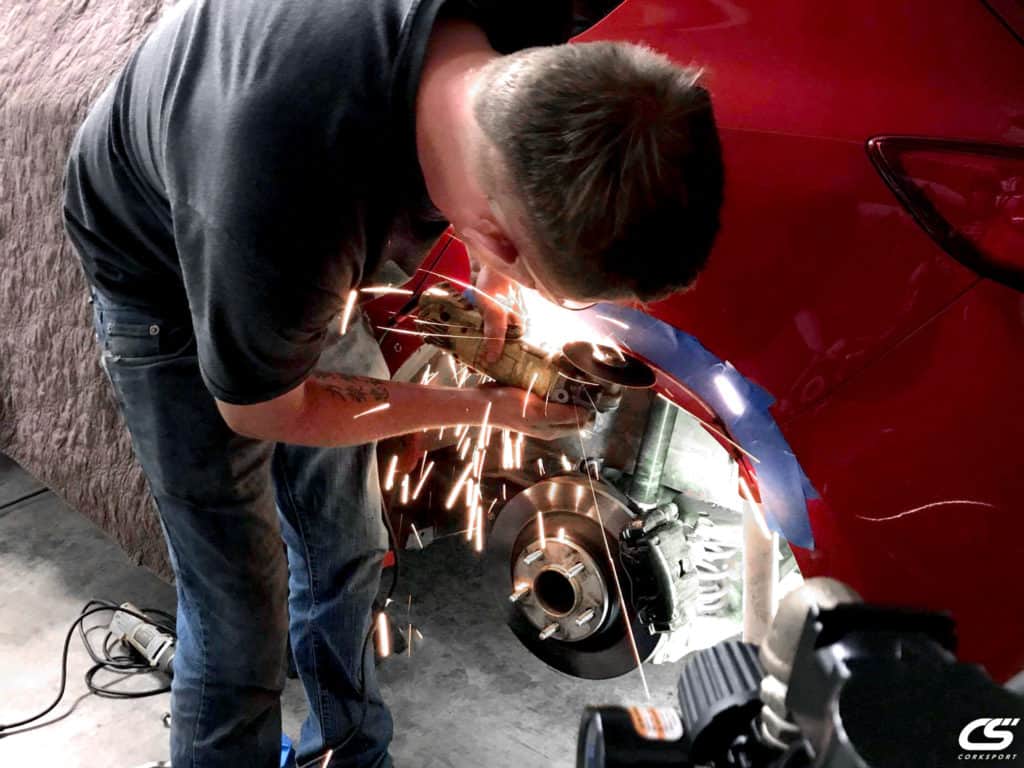
CorkSport Mazdaspeed Downpipe

Doesn’t matter if you go with a high-flow catalyst or opt-in for one without, the choice is yours. However, if you want to utilize its flow you are going to have to upgrade to a bigger diameter. Our 80mm one does really well, plus it sounds GREAT.  Note: Will require additional tuning!

The CorkSport Cat Back Exhaust System gives your new 2016 Miata the power it needs without the annoying drone.

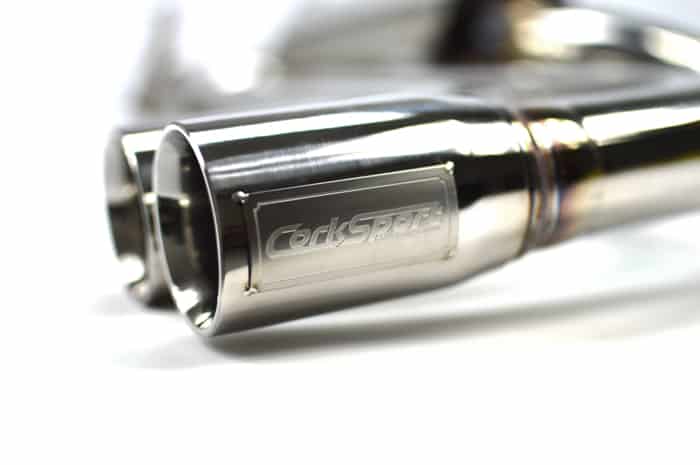
CorkSport Cat-Back Exhaust

It’s no secret that car engines are just big air pumps, the faster you can shove air into the engine and how fast you can expel it efficiently is what it takes to make more power. No need to run the stock 63.5mm exhaust when you can run our 80mm (like to wake up the neighbors every morning, go with our non-resonated, you can’t beat the cold start)

Top Mount intercooler or the Mazdaspeed

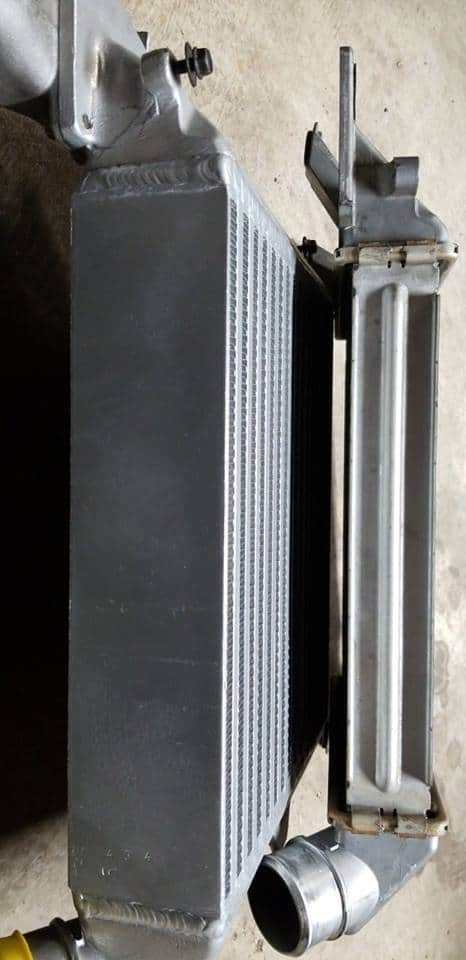
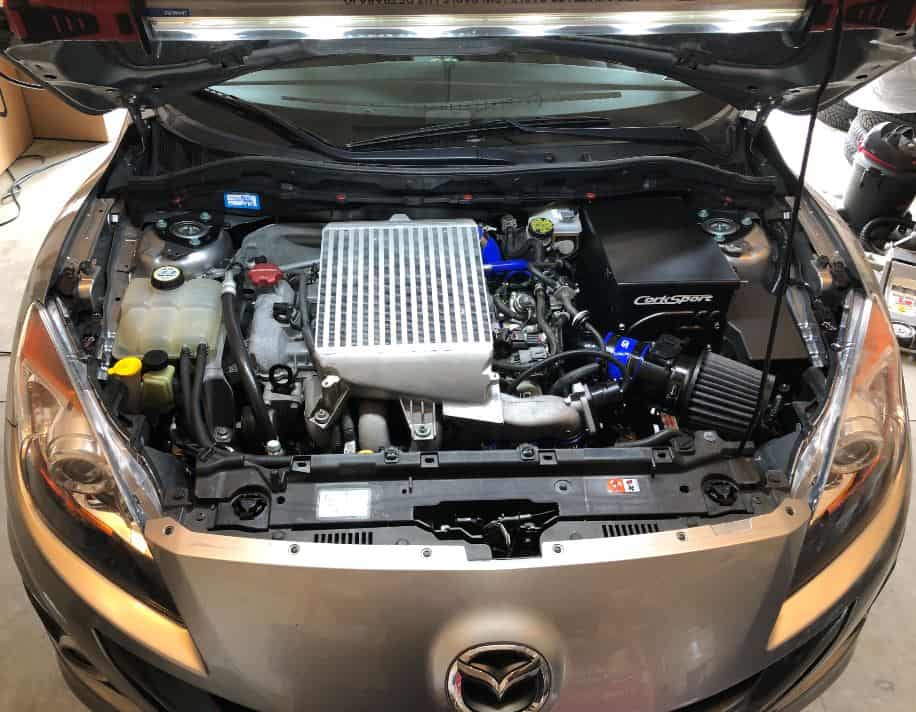
CorkSport Top Mount Intercooler

If your power goal is 450whp or less you can get away with just upgrading your TMIC and be on your way and they look great in your engine bay.  Note: Will require additional tuning!

If you have the 2nd gen you can really utilize that hood scoop from the factory.  Not only that but you can even see a noticeable performance gain with our larger hood scoop and a TMIC set up.

When it comes to your Mazdaspeed we know you want to create safe power and harness the true potential of your ride. Be sure to build upon the proper foundation and head in the right direction for your build. Our techs are available for any questions you have and are ready to assist with planning your Mazdaspeed build path! Any questions – give us a call directly – (360)260-2675, email to sales@corksport.com or leave a comment and we’ll get back to you!

Connect with us

You may also like

Stay up-to-date on the latest news and product updates from CorkSport.

* indicates required

Tuning – What Are Your Options

Pretty much since I joined this platform, I’ve noticed a pattern of people asking the same questions about tuning their Mazdaspeed. There is a lot of information out there, but it’s not always consolidated or easy to find. So, in an effort to assist newcomers, this will be a write up explaining the ins and outs of tuning; when you need it, OTS vs. Pro Tunes, and how you can proceed.

*There are other options for tuning the vehicle besides the Cobb
Accessport, such as Versa Tuner. But, for the ease of explanation throughout this blog, I will be referencing the AP*

What Is Tuning & Why Do You Need It?

Mazdaspeed 3 Engine with Front intake, SRI, batter box, heat shield

Without getting too elaborate for this specific blog, “Tuning” is just the remapping of the tables in the ECU from OE specs to something different. It is a key aspect of your car’s engine health and the easiest way to make more HP. You can even tune a bone stock car and will typically see gains, especially when they are boosted from the factory. Bolt-on parts free up even more headroom in airflow, and when tuned accordingly you make even more power. The relationship between bolt-on parts and a tune is a beautiful thing, and hopefully, by the end of this blog, you will understand how they work together.

“So when should I get a tune?”

I’m so very glad you asked that! Well, let’s look at it like this… Mazda spent a long time getting their factory tune for the Speed 3 as good as possible. But they dialed it in around one set up, and one set up ONLY. That’s 100% OEM parts. In this form, the ECU knows what to expect, how everything should respond, and most importantly when something is wrong. It doesn’t have a mind of its own though, it only knows what it’s been told. So, if other parts in the system are replaced, and the ECU isn’t told how to react to that, things start to get a little weird.

CorkSport High Pressure fuel pump internals, short ram intake with turbo inlet pipe, and front mount intercooler

The ECU has an ability to adjust itself within reason for variations in fuel, oxygen content, etc. But in a perfect world, it shouldn’t have to adjust itself at all. Tuning for the mods you do will not only let you have more fun, but it will get it as close to this perfect world as possible.

Minor things like an intake upgrade (Retaining stock MAF) BPV, or Catback usually won’t throw off the ECU enough to cause problems or CEL’s but it’s obviously not ideal. That being said, its best to get an Acessport or another means of tuning your Mazdaspeed prior to putting on bolt-on parts.

Mazdaspeed Exhaust system

So here is a basic FAQ

“I want to add a turbo back exhaust, but I don’t want to get an AP and tune the car. Can I do that?”
– No, you are not able to do this for two reasons.

  • Deleting the factory cats opens a huge restriction. Without a tune, the car will risk overboosting.
  • Without high-pressure fuel pump internals you also risk running lean and blowing the engine. Even if you have the internals with no tune, the drivability of the car can suffer because of how it affects the turbo.

“Can I get an intake with no tune?”

If its factory size, then you can usually get away with it. The turbo isn’t trying to make more boost, and the MAF housing should be accurate to the OE. If it’s a larger one like our 3” or 3.5” then no, you cannot.

However, I always recommend tuning the car.

“Can I get a catback with no tune?”

Yes, you will be OK, the catback is not monitored by any sensors, and you’re not deleting any cats.

“Can I change my intercooler without a tune or fuel pump internals

You should not. Just like the cats on the downpipe, the factory intercooler is a restriction. The ECU currently is tuned to fight this restriction to make a specific boost level at a specific RPM. If you remove this restriction, and you don’t tell the ECU, you risk over boosting. Over boosting mixed with no fuel pump internals can be a risky combo for running lean as well.  

“Can I upgrade my turbo without tuning the car?”

  • Definitely not, any turbo that moves more air than the factory one automatically needs a tune. The ECU is tuned to coincide with the factory compressor map. If you don’t want to tune for a turbo, make sure you get a factory replacement. These are just some of the common questions we get, but if you have more specific scenarios you can always email or call us! On to the next section.

OTS maps vs a Pro-Tune

I remember when I first got my hands on an Accessport. Trying to make sure I selected the right map and learning how to read all the parameters. I know a lot of newbies that are just getting an AP probably are asking themselves which OTS tune is the right one to use, and when should they get a Pro-Tune and how.

It’s no news to anyone that’s been in the community for a minute that the Cobb OTS maps are not the best Long-Term Solution. The reason for this is because they are:

(A) Very conservative, and not letting you get the full potential you can.
(B) Meant for a large population of cars, and aren’t really dialed in. Essentially, they are just rough around the edges.

However, OTS maps do serve a purpose. For someone who is planning on doing their basic bolt-ons in stages over the course of a few months then it works out well. These maps can be viewed as basic stepping stones “Stage 1, Stage 1+, Stage 2, Stage 3, Etc” that allow you to put on your first bolt-ons and flash the corresponding tune. So, as you are putting on your fuel pump internals, intake, downpipe, Intercooler, you can flash those readily available maps.


In a nutshell, the OTS Maps work great during the transitional phase of your modding Journey. But, once you know you are done with your bolt-ons for a bit, that’s when you want a map that is 100% dialed in, and specific for YOUR car. The difference between a custom tune and the Cobb OTS maps are truly astonishing, and you’ll see once you’re there.

Something to also note….

If your K04 ‘Sploded and you are looking at a larger turbo, an OTS is no longer an option, it’s off the table. Cobb made those OTS maps solely for a factory turbo’d Mazdaspeed. If you buy a bigger turbo like ours, a Pro-Tune is needed (along with fuel pump internals)

“Don’t I have to get the car on a dyno in order to get a Pro-Tune? There’s no Mazdaspeed tuners in my city!!!!”

If you’re not one of the lucky ones that live by a Mazdaspeed tuner, then fear not. The days of having to get it on the dyno to get a tune or over. With the Accessport, Maps are sent/downloaded over email.

To Start the process, you need to:

  1. Buy the tune
  2. Give them your full engine Mod List
  3. The tuner will instruct you on taking your Data Logs
  4. Over the course of a few weeks, you will go back and forth with new tune revisions and the car usually gets smoother and faster with each revision.

By the end of this process, you will have a dialed-in tune and a smooth-running car. But, please note that if you add another part to the car or change parts. You may need to get a revision tune done to account for the new mod. Talk to your tuner about this and get their thoughts.

Mazdaspeed K04 Turbo Upgrade

Recap

I hope that this helped some of you to better understand the processes you should take, and to wrap it up we will hit some of my main points.

  1. The first mods you should get for your Mazdaspeed if you plan to mod it is the upgraded fuel pump internals and an Accessport
  2. If you just want to run an SRI and a catback, you can get away with it, but a tune is Recommended.
  3. You should NOT run a downpipe without HPFPs or a tune.
  4. OTS maps are great during a transitional time with your car while bolting on parts. After this, you should get a Pro-Tune
  5. You shouldn’t run a larger turbo on the stock map or on an OTS map. Communicate with a tuner before the installation and have a new base map ready. We have both a 3.5 Bar MAP Sensor and 4.5 Map Sensor.
  6. Pro-tuners can tune you, even when they aren’t local.

To conclude this blog, it’s important to know how critical the proper tune on the car can be. It can make or break the engine, literally.

If any of you still have questions, you can always give us a call, and remember to have fun as you begin your journey down the path to making power, and giving WRX’s the L.


Happy Boosting,
Brett@CS

Connect with us

Brett’s Build Part 4

“Hey Bro, what flares are those?” A common question asked, not that I blame anyone for their curiosity.

This is a very niche platform in the grand scheme of things. So we don’t really get lots of options when it comes to widebodies or flares etc. Those of us who have been crazy enough to chop into our ¼ panels had to trust what we think will look good, cross our fingers, and just send it. Some of us get lucky, some of us don’t. I wasn’t in it alone though, I had help from a few friends, and some inspiration. So, here’s the story on how I flared my Mazdaspeed 3.

My good friend Brian over at BMSPEC has a well-known Mazda 3, named “Circuit Heart” Which just recently has gone into retirement. He was one of the first to ever put flares on the Gen 2 Mazda 3 body, and for years I said I wanted that look. When He decided to let go of his old Volks, I had the opportunity to take possession. With his direction, I ordered fair lady Z flares from that were originally meant for a 240Z.  

I asked my local Nator Buddy Aaron Maves if he was down to help me chop up my Mazda and lend me a spot in his garage. Ironically enough, he was a stoked to be a part of the project, probably more than me. Once my flares came in, I got them dropped off at the body shop to be paint matched and started hashing out a plan. Since I work all day long, and flares are a rather tedious process this was going to be a strictly after work job and it ended up taking quite some time to get done. But the wait, blood, sweat, and tears were worth it.

Here is a little step by step process we took to get it done. If you are looking to ever do this to your Mazda, it may either motivate you or deter you away.


Step 1. – Test Fitting

This part is very critical, and one of the most difficult. You have to Mock up the flare to be as perfect as possible. Usually, since the flares we try to use on our Mazda’s, they don’t exactly want to line up where we want, and we need to motivate them a bit to do so.  Painters’ tape by itself will not be enough to hold it where you need. The way I got around this is by using 3M Double Sided VHB tape on the back of where the bolts will go, paired with the painter’s tape. Since these flares weren’t made for this Mazdaspeed3,  I started out on my front driver side fender.  Once I got it where I knew I wanted it, I opened up pandora’s box. I drilled my pilot holes into the fender, no going back now. That’s not even the worst part, because now I had to make all 4 corners symmetrical (No pressure or anything).

Matching every corner is not an easy task, and also something that is often messed up. All I can say is triple check everything, and then do it again. We had to find reference points on the Speed3 itself to measure from. The ground below could be slightly inconsistent. Not only because the floor may not be perfectly level, but because the floor jacks may be slightly different as well. Choose about 4 points to measure from so you can get an accurate X/Y axis measurement to link to the other side. You’ll want the fronts to be identical, and the rears to be identical.


Step 2 – Rivnuts


Now that we have drilled pilot holes in all 4 corners. We opened them up enough to accept the riv-nuts. This will be the threaded inserts that allow you to bolt the flare to the Mazda. We had to open the hole up slowly, stepping up the size of the bit each pass. Doing this prevents the thin metal from fraying and making sharp edges around the hole. You want the riv-nut to sit as flush as possible, so the flare sits close to the body.

In this particular case, I used ¼ – 20 sized bolts, so I opened op the flare with a ¼ hole and bolted the flare on for a final fitment check.


Step 3 – Cutting

The most intense part of the process now begins. My buddy Devin Sorter who is a fabricator/welder came through to help with this. He’s very skilled with a cut off wheel, and I knew I could trust him to make some solid cuts that are symmetrical and clean.

With the flares mounted up, we drew the line for the cuts. Remember you not only have to give yourself enough clearance for the bumps on top, but for steering in the front as well. During this process, part of the bumper clip will have to be removed as well. This isn’t a problem though since the flare itself acts as a support and keeps the bumper from sagging, even with the splitter on the front.


Step 4 – Sealing the rear ¼ Panels

Since the ¼ panels in the back aren’t just 1 layer like the front, when you cut into them there is now a gap between the layers that are left open. Even though my Mazdaspeed isn’t driven in the rain, it still leaves the car open and vulnerable to getting moisture in there and eventually causing corrosion. To prevent this, you need to stitch weld the panels together and then reseal it. Once the welding was complete, we used silicone to seal it all in and protect it from the elements. We also put some weather stripping on after the fact to prevent any harsh rubbing on the wheel in case the Mazda bottomed out or the tire somehow traveled up high enough.

At this point, the Mazdaspeed3 was done, and I bolted on the flares. The gasket you use between the flare and the body is up to you, there are lots of options out there.


Thanks for checking this out and stay tuned for part 5!

Stay up-to-date on the latest news and product updates from CorkSport.

* indicates required

The Ultimate Mazda Performance Guide

A few years ago, CorkSport’s resident racecar driver – Derrick Ambrose – released a book titled The Ultimate Mazda Performance Guide.

The wildly popular book provides beginner and intermediate Mazda/Mazdaspeed owners a solid guide that outlines how, why and when to modify their ride.  Now that the platform is a little older, these second-hand models are more attainable for first-time car buyers and Mazdaspeed Owners specifically are hungry to transform their ride into a +400 WHP BEAST!

With so many new enthusiasts joining the Mazdaspeed platform, we have been flooded with inquisitive calls and see an increasing number of new owners post up questions about turbos,  High Pressure Fuel Pump Internals, axle back vs cat back vs turbo back exhausts, and what can I do to make 400 WHP or even 600 WHP?

Many of these new Mazda enthusiasts are joining CorkSport’s premier 7th Gear Membership to take advantage of the free swag package, free shipping in the lower 48 states and immense benefits from the troll free and exclusive 7th Gear Facebook Group – Where beginners can ask questions without getting clobbered!

So, whether you’re just starting out with a new to you Mazdaspeed3 or Mazdaspeed6, or you’ve hit the ground running with a new MX-5, Mazda3 or Mazda6 (turbo diesel!?). Our Mazda performance Guide will help answer some basic questions as well as set you on your path to get the most out of your ride.

Previous Interview with Derrick:

CorkSport: What made you decide to write a book about Mazda Performance and why?

Derrick: I really just wanted to give some of the new Mazda enthusiasts some of the knowledge that I have gained about Mazda’s from my involvement with them since the mid 90’s. Many people are just now buying their first Mazdaspeed and don’t really know where to begin. I wanted to help ease them into what they really need to know. It can be quite scary for some to jump into modifying or go into the forums or Facebook groups and not know anything.

CorkSport: We know all about the forums and responses to Newbs on Facebook haha.

Derrick: Exactly, the purpose of the book was to help give people a path and empower them with information that may take a lot of years or a lot of searching to find. I didn’t want it to just be about selling CorkSport parts, we actually mention, and feature, many non-CorkSport parts in the book. That being said, I’m very proud of CorkSport and what we have done to help the Mazda community.

CorkSport: So who is this book really for?

Derrick: I wrote this guide for the beginner to the intermediate Mazda enthusiast that really wants to learn more and really get the most bang for their buck. I wanted to answer some of the most common questions I’ve seen on the forums and in person about aftermarket performance and where to start. If you have changed your turbo or are cross-weighing your coil-overs, you are probably past this book in terms of technical ability. I did, however, include many sources for additional information, contacts and even a brief history of Mazda itself; which is a topic I may even write another book on for the true Mazda fanatic.

CorkSport: I see, what do you think was the most challenging thing about creating a book?

Derrick: Everything, (laughs). When you have no idea what you’re doing as an ‘author’, it takes a LOT more time than you could ever imagine. I was lucky to have a lot of help from some truly amazing people and am very grateful to all of them. Writing a book is a much bigger endeavor than I would have every thought, but having an actual piece of history afterward is truly a special moment. Having that glossy cover in my hands, seeing the ISBN on the back and knowing that I will be in the Library of Congress forever is just an amazing feeling. It’s weird how just making a book can make you feel patriotic, but it really did.

CorkSport: Well hopefully we can talk you into signing a few for us and we look forward to helping to make the next one. Thanks for letting us get a little more insight into this great addition to the Mazdaspeed community.

Derrick: Thanks, I hope everyone enjoys it as much as I did making it. If just one person gets the mod bug I did when I was younger because of this book then I will be happy.

600hp Mazdaspeed 3 Build Path – CorkSport Barett’s 2009 Mazdaspeed

If you haven’t heard already, the CorkSport Dyno Day and Summer Event was a blast with food, friends, raffles, a Show-N-Shine, and the continuous string of dyno runs.  The highlight of the dyno runs came when one of the CorkSport Engineers, Barett, put his car on the rollers.  With a few minutes of warm up and anticipation building, it was finally time to see what the “CorkSport Speed” could do. 

600+ WHP Mazdaspeed 3 on Dyno

Getting past the ecstatic crowd to see the dyno screen showed an impressive 620whp/530wtq.  Now, whether you were at the show or not, you may be wondering what Barett’s setup is to support these numbers.  It’s not a short list but is simpler than you would expect. 

In this blog, we are going to layout the WHOLE build to show you how your Mazdaspeed can make 600+whp.  

Dynograph data of Maszdaspeed 3 625 WHP

The engine was built by CorkSport in preparation for setting up the Dankai Engine ProgramIt features Manley Connecting Rods and Platinum Pistons, head work very similar to the Dankai 2 Built Longblock, along with the CS BSD (balance shaft delete) and CorkSport Camshafts.  Holding the block together are L19 head studs and ARP 2000 main studs.  

To get the air in and out of the engine efficiently we have an assortment of bolt-on parts and some prototype parts because what kind of CorkSport R&D car wouldn’t have some prototype performance parts on it?  To break this down in the simplest way possible we have laid out a full build list:

600hp Mazdaspeed 3 Build List:

  • CorkSport Built Engine:
    • Manley Pistons – 0.5mm overbore @ 88mm
    • Manley H-Beam Connecting Rods
    • CS Balance Shaft Delete
    • Dankai 2” Ported Headed: Single Runner Intake, Bowl Work, Combustion Chamber Touch Up, Exhaust Porting
    • CS Camshafts
    • Stock Valve Springs (We would recommend upgrading these and plan to do so ourselves)

Now, this isn’t the complete list, but it does lay out most of the essential parts to get your Mazdaspeed 3 over 600whp.  You might have picked out a couple “prototype” mentions in that list above…well we can share a bit on the new CorkSport Mazdaspeed Turbo.  You’ve seen the power it can make…and it still has some more left in it up top, now check it out some sexy billet and massive turbine.

Mazdaspeed 3 Turbo for making 600 WHP
Mazdaspeed 3 Turbo Turbine Closeup for 600+ WHP

Lastly, none of this power would be possible without the fuel to support it.  As you may know already, the OE direct injection fuel system taps out around 380whp on an efficient build so how do we make another 240whp?  Auxiliary fueling is the key my friends, and we recently posted a blog to help you explore Methanol Auxiliary Fueling that I invite you to read.  To stay focused on Barett’s 600+whp build we have made an auxiliary fueling build list below:

Upgrade Your Turbo with the CST4

Methanol Auxiliary Fueling 600hp Mazdaspeed Build List:

  • AEM Boost Based Pump Controller
  • Snow Performance 5 Gallon Cell Trunk Mounted w/CS Prototype Mounting Bracket
  • AEM 80 micron in-line filter pre-pump
  • ProMeth 220psi Pump (Essential for flowing this volume of methanol)
  • Snow Performance Solenoid
  • Devil’s Own 1in/4out distribution block
  • 4x Devil’s Own 90degree nozzle holders
  • 4x ProMeth Compact Check Valves (Essential for proper AFR control between shifts)
  • 4x Devil’s Own D07 Nozzles (One per intake manifold runner; each flowing ~10gph)

Despite that this auxiliary fuel setup is providing the fuel required to support just over 600whp; it is at the ragged edge of what can be supported.  Looking at the dyno graph further up you can see torque decline after 6000rpm and horsepower go flat. This is due to the auxiliary fuel system reaching its maximum fueling capacity and thus forcing us to reduce boost pressure as engine RPM goes past 6000rpm.  

At this power level, true port injection auxiliary fueling is the correct step to take.  Lucky for you guys and gals, we are currently exploring this path with our product R&D. We plan to give you guys and gals a full breakdown of our experience and how we built a full port injection auxiliary fuel system that can support over 600whp.  

AND…I forgot to mention one very critical aspect of this entire build.  Professional Tuning! This specific build was E-Tuned on the CorkSport in-house dyno by Dale Owen of Gem Tuning.  E-Tuning is a great way to set up your car with the tuner that is the best suited for your platform and vehicle build because it doesn’t require the tuner and the vehicle to be in the same place at the same time.  

Hang tight for more on the PI Auxiliary Fueling and thanks for tuning in with CorkSport Performance.

-Barett @ CS