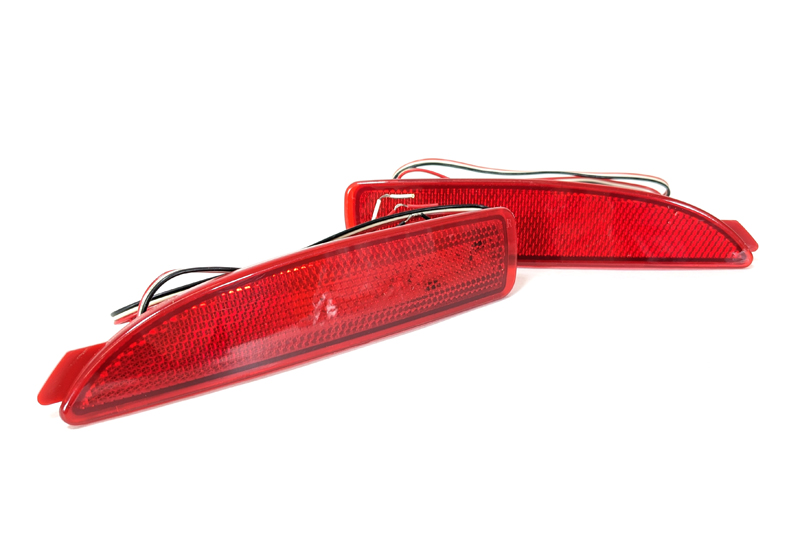
Introducing the new LED rear bumper lights for the 3rd Generation Mazda 3 and 6! The LED bumper lights are a great way to enhance the visibility, safety, and appearance of your Mazda. If you have added our LED interior lights to your Mazda 3 – you already know how much brighter and safer LEDs can be.
The new Mazda 3 LED marker lights are designed to fit like OEM with a very easy DIY install, you can now get rid of the old and faded OEM bumper reflector and replace it with a clear and bright LED light! Currently, we have fitment for the 2014-2016 Mazda 3 Hatchback, the 2017-2018 Hatchback/Mazda 3 Sedan (both use the same lights), and the 2014-2017 Mazda 6.
2014-2016 Mazda 3 Hatchback with LED Light UpgradeMazda 3 Sedan with LED Light Upgrade – 2017-2018 Hatchback use the same LEDs
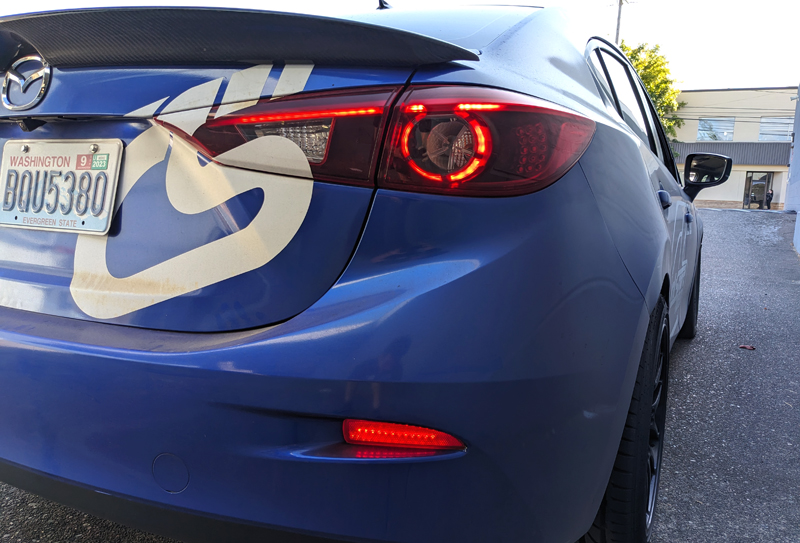
Sedan fitment comes in the red lens option only and depending on your wiring setup, you can add braking OR turn signal functionality to the LED lights.
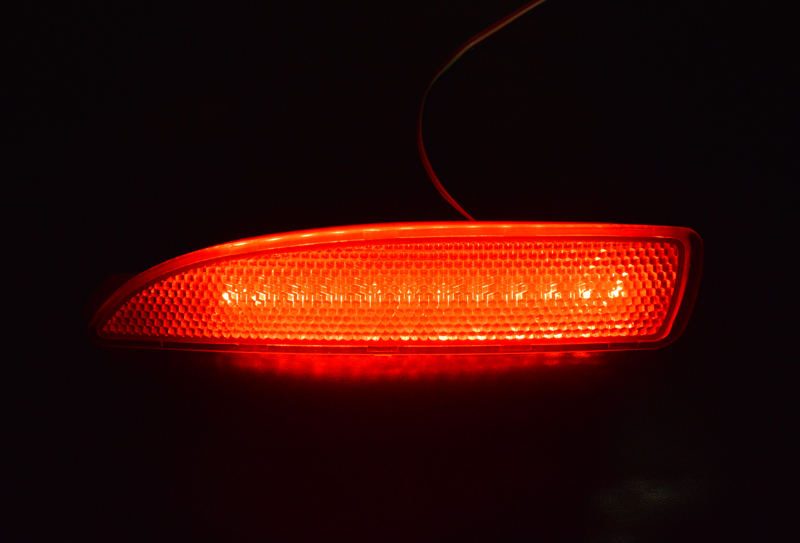
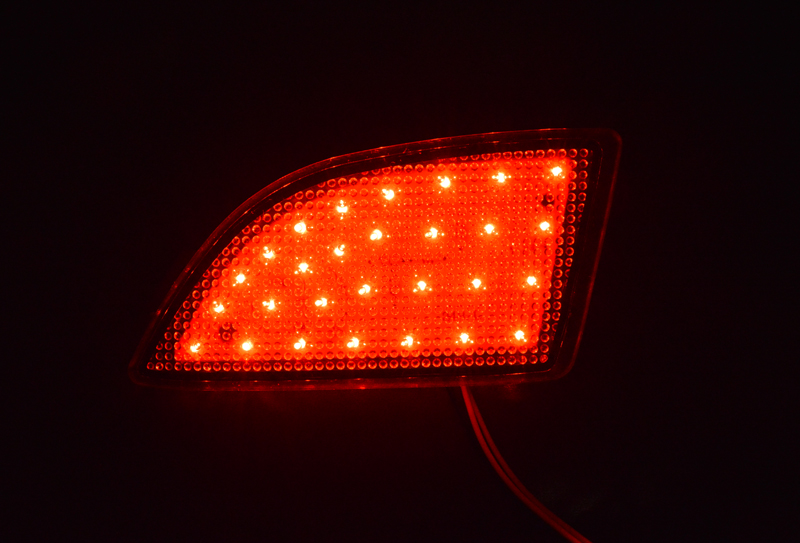
Here is the sedan running light brightness:
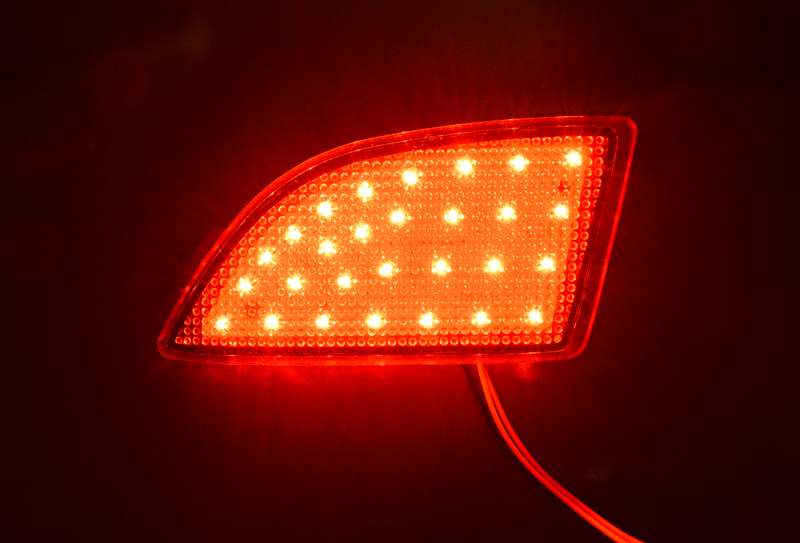
And here is the sedan brightness if you wire it for turn signal or brake light functionality:
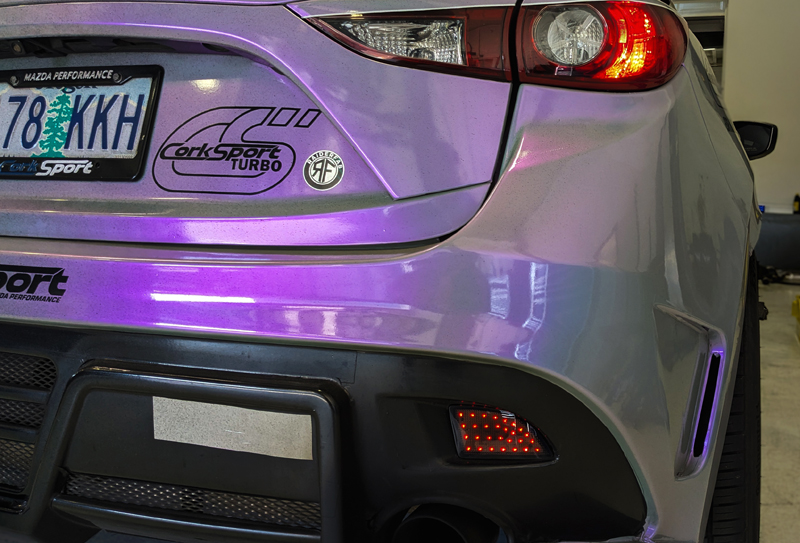
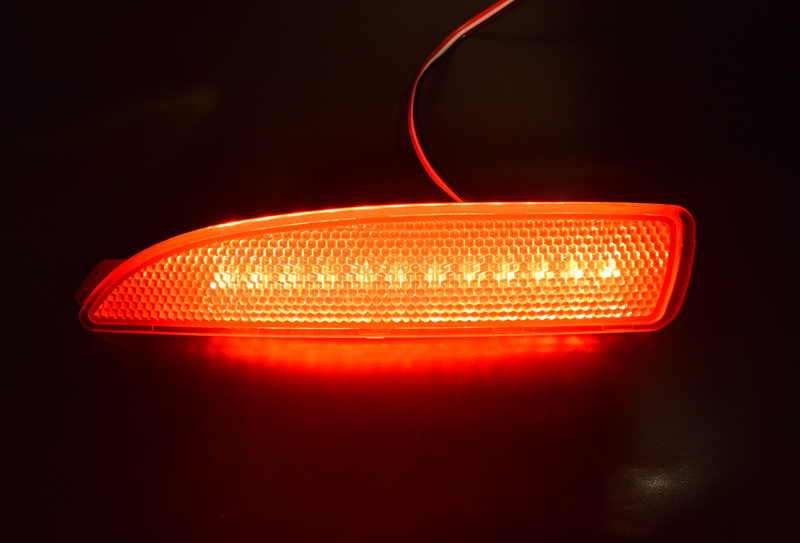
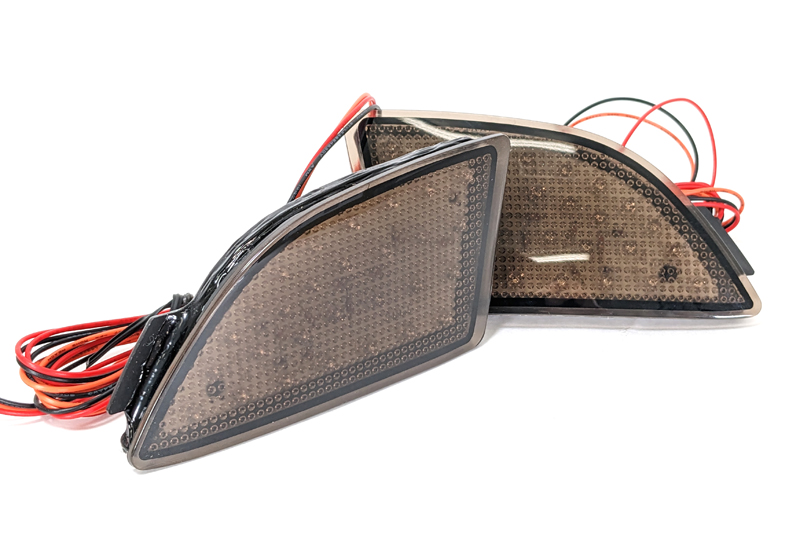
Now moving over to the hatchback fans we have two color options! The standard red lens and a “smoke” color tint lens for a more stealthy appearance.
Here is the hatchback running light brightness:
And here is the hatchback brightness if you wire it for turn signal or brake light functionality.
As you can see, the LED bumper lights are a much needed improvement for both vehicles. They produce a crisp and clear light that can be seen from a distance and in low-light conditions, look fantastic, and improve your safety and signaling! It’s an awesome win-win for the Mazda enthusiast.
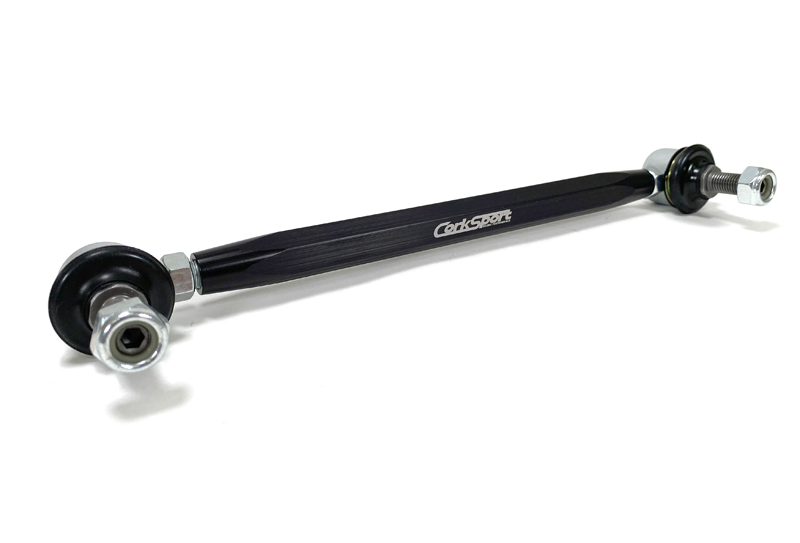
Do you need to replace your swaybar end links and want an upgrade at the same time or are looking to adjust your sway bar to better match the factory position on your lowered car? That’s where the Performance Adjustable End Links come in and they are now available for the following models: 2019+ Mazda 3, 2014-2018 Mazda 3, 2021+ CX-30, 2022+ CX-50, 2014+ Mazda 6, 2013+ CX-5, 2016+ CX-9, and 2006-2007 Mazdaspeed 6. Depending on your specific application, both front and rear end links are available. The new CS Adjustable End Links build off of the wildly popular kit available for the Mazdaspeed 3 and carry over all the same benefits which are discussed below.
Why You Need End Links
Getting straight to the main advantage of the CS end links is their variable length. The CS end links offer ~18mm or 0.70in of adjustability. This results in an end link that can be up to 9mm longer or 9mm shorter when compared to the stock part.
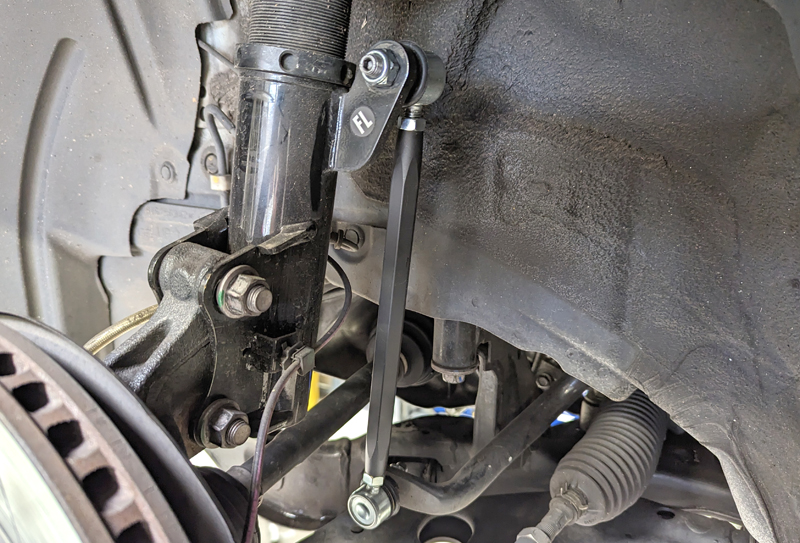
If your car is lowered, our end links allow you to account for the change in sway bar position that occurs when you lower your car so it can be placed closer to its original position. When the sway bar is not positioned in the OE location it can lead to sway bar preload or binding which can have negative effects on handling. This also means that if you are planning on adding a lift they can help in the same way.
Quality Matters
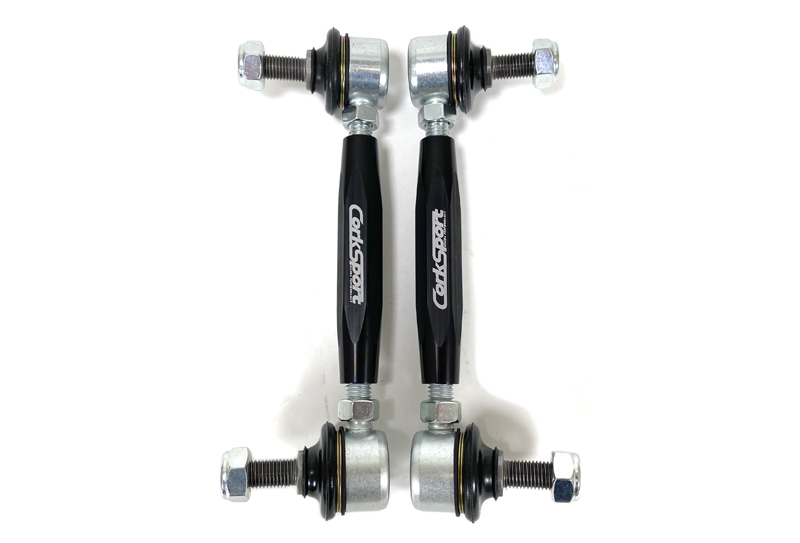
The construction of the end links also maintains the same high quality as found in the current end links for the MazdaSpeed 3. The center section is CNC machined out of 2011-T3 5/8in hex aluminum to provide a large increase in size over the OE part while being easily adjusted to your specified length with a wrench. After machining, the center section then gets anodized in black to provide a finish that will help protect it from corrosion.
The included ball joints feature a sealed design to reduce the chance of water or other foreign material from gaining access to the joint. This allows the ball joint to provide a longer service life so that it won’t require any additional maintenance compared to the OE end links.
With the long new list of applications, you should have no problem finding a set of CS adjustable end links that will fit your Mazda. Be sure to head over to the product listing for your specific model for more info and pictures. As always, reach out if you have any questions about the end links for your setup.
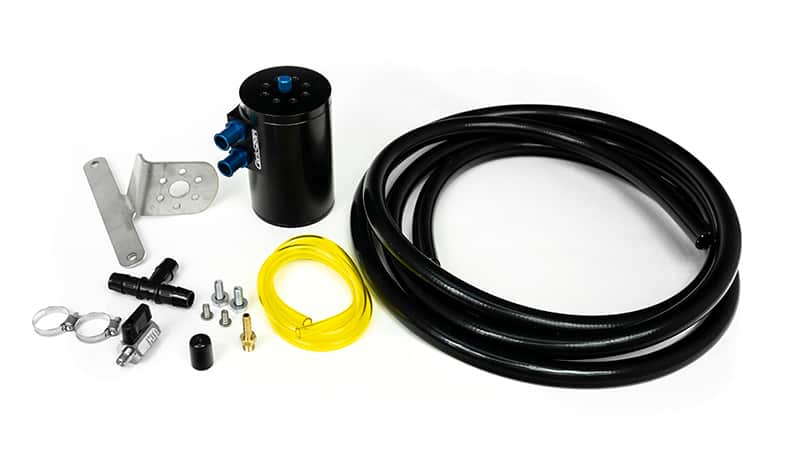
Let’s talk Oil Catch Cans! While not the most exciting performance part for your turbo Mazda 3; when properly applied they can be a keystone to improving the health and longevity of your engine’s life. With that being said, they are worth a discussion in more detail about why an oil catch can (OCC) is needed and what the benefits are. As with any performance modification, there are many different ways to achieve the end goal, but not all are created equal.
Let’s break down the CorkSport Oil Catch Can system so you can learn and understand why we utilize an OCC the way we do. While we did break this down a bit back in 2019 here, we want to take it a step further now.
Improving the System
First, let’s provide you with some context. What is the system on the car/engine that the OCC Kit is working to improve? All modern engines utilize a Pressure Control Ventilation (PCV) system to regulate and control the internal pressure of the crankcase. This is not to be confused with the pressure inside the combustion chamber.
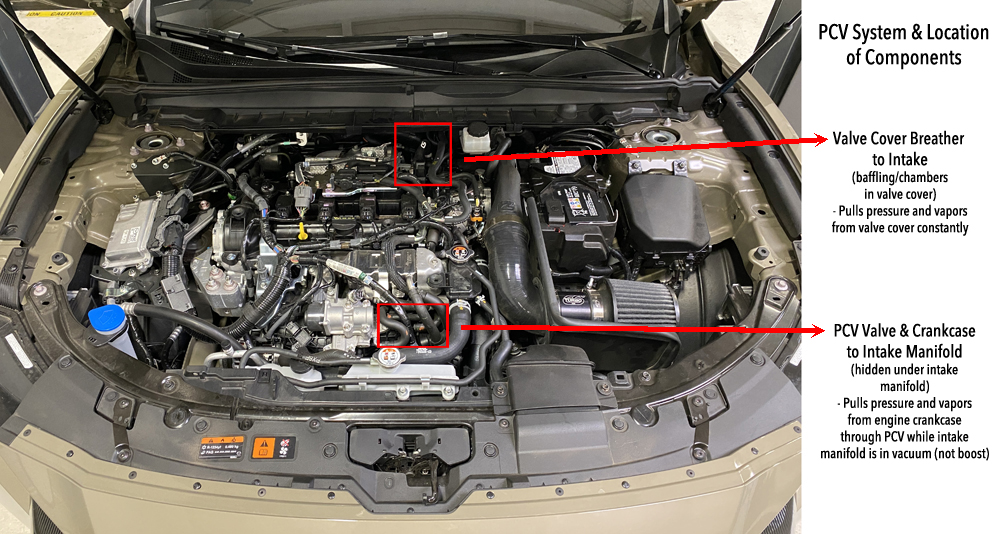
As you can see in the image above, there are two major components of the PCV system on the engine. Typically there is a breather vent integrated into the valve cover that will vent/route directly into the intake system. On turbocharged engines this vents upstream of the turbocharger compressor inlet.
The second part is a “cover” on the front side of the engine block typically hidden under the intake manifold. This cover has built-in baffles/chambers and a PCV valve. The PCV valve is a basic one-way check valve that allows pressure to flow out of the engine crankcase and into the intake manifold directly.
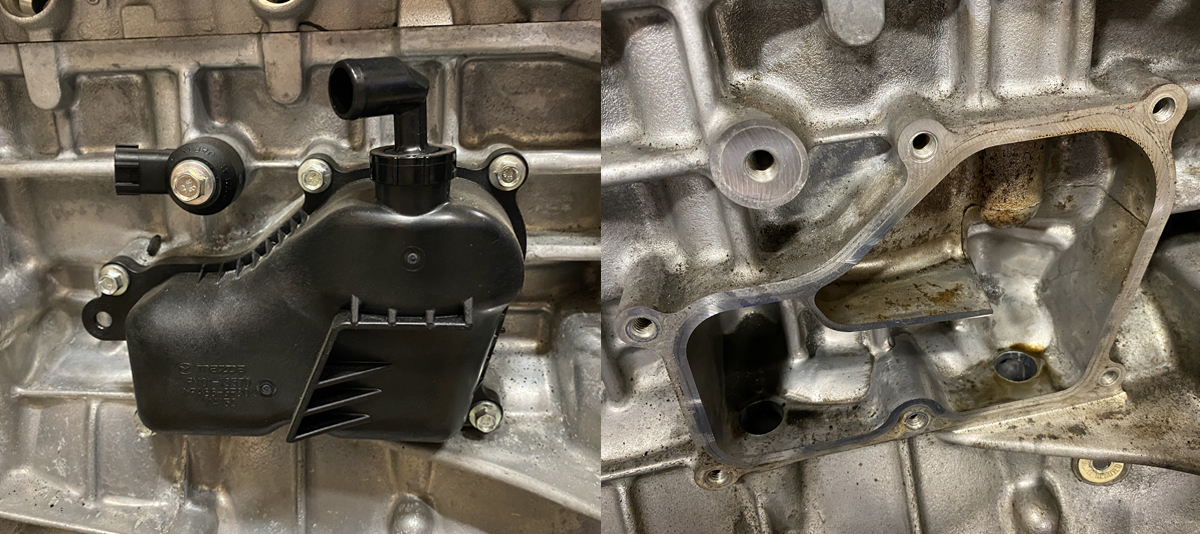
Left Side: Here is an example of a SkyActiv-G 2.5L PCV Cover with the PCV Valve at the top.
Right Side: Here is an example of the baffling on the engine block inside the PCV Cover.
The Goal
So what’s the point/goal of the PCV system? Two main reasons:
Reducing the pressure buildup inside the engine crankcase. This improves the durability/longevity of the engine and improves engine efficiency.
Emissions control. The pressure buildup inside the crankcase comes from the combustion process in the cylinders. The rings on the pistons do not have a perfect seal, thus some combustion gasses and fuel are able to push past the piston rings and into the crankcase. This is called “blow by”. This blow by and fuel getting past the piston rings worsens during cold start and eventually results in dilution of the engine oil due to the excess fuel.
We invite you to check out the Engineering Explained video about this specific topic. He does a great job explaining and showing this exact system and issues with it. https://youtu.be/uVd-ZS5bnyY?t=337
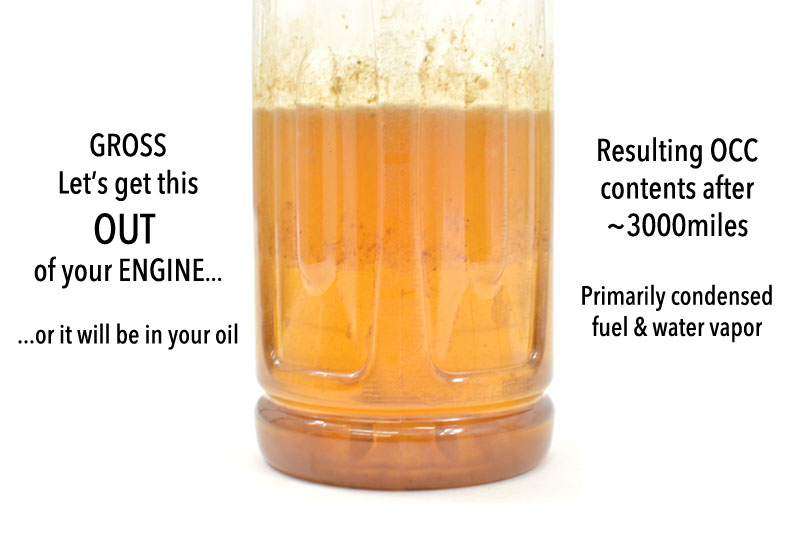
Here you can see the captured fuel and water vapors of a CorkSport OCC installed for ~3000 miles on a 2018 Mazda 6 2.5T. This engine only had 500 miles at the time and had an average commute of 15 miles & 20 minutes of mixed traffic and speeds.
Had there not been an OCC installed, this vapor would have been directly ingested into the intake system at the turbo compressor inlet and the intake manifold. Over enough time, this builds up on the surfaces of the intake system, turbocharger, intercooler system and intake valves…diminishing performance and fuel economy.
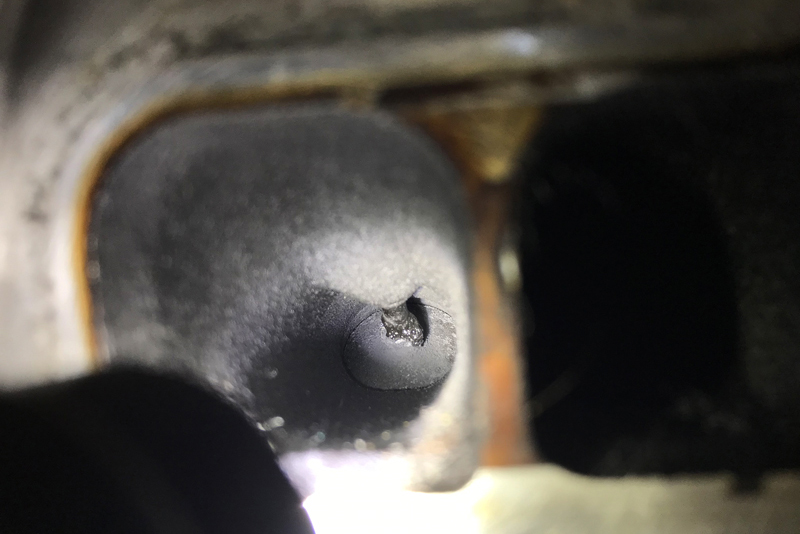
Sadly, while Gasoline Direct Injection (GDI) technology has provided some exceptional improvements in power and fuel economy, there are still negatives to the overall system. Dirty intake valves and fuel dilution are the main concerns.
Here is an example of direct intake valves…
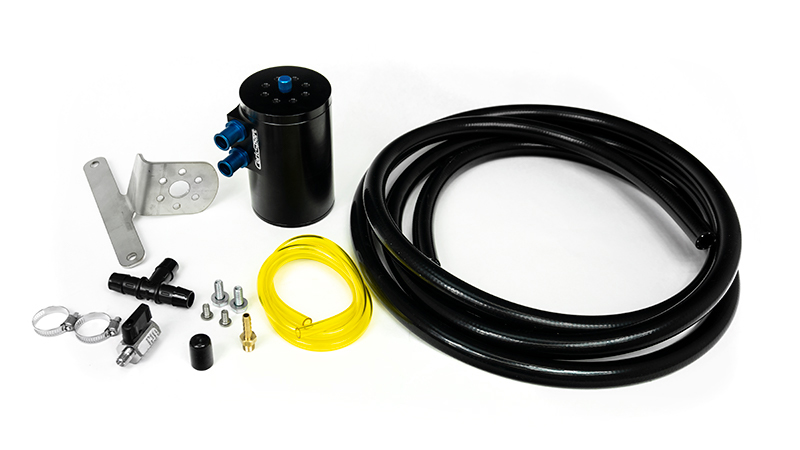
Now let’s talk about what makes the CorkSport OCC System unique vs the current options available.
It’s a complete system, not a half system. Meaning the CorkSport OCC incorporates the valve cover breather AND the PCV cover on the front of the block.
Dual Chamber Design: this separates the incoming vapor from the valve cover and PCV cover to the lower chamber to condense and be drained later. The air then passes through a baffle to the upper chamber and then exits to the intake system.
Constant Vacuum: Due to the design, the CS OCC has a constant vacuum pulling pressure and vapor from the crankcase. This is important to note because with the OEM system, the PCV Cover and valve close while in boost…which is when most blow by is happening. With the CS design, you are pulling more vacuum through the OCC while in boost.
Low Mounting: While this seems trivial it’s important from a physics standpoint. The fuel in the oil turns into vapor once the engine and oil are up to temperature. Then the OCC can draw the vapor out of the engine. Once this happens the vapor will start to condense back into a liquid; most of it will make it to the OCC itself but some will condense in the hose. We want the hose to drain into the OCC, not the engine.
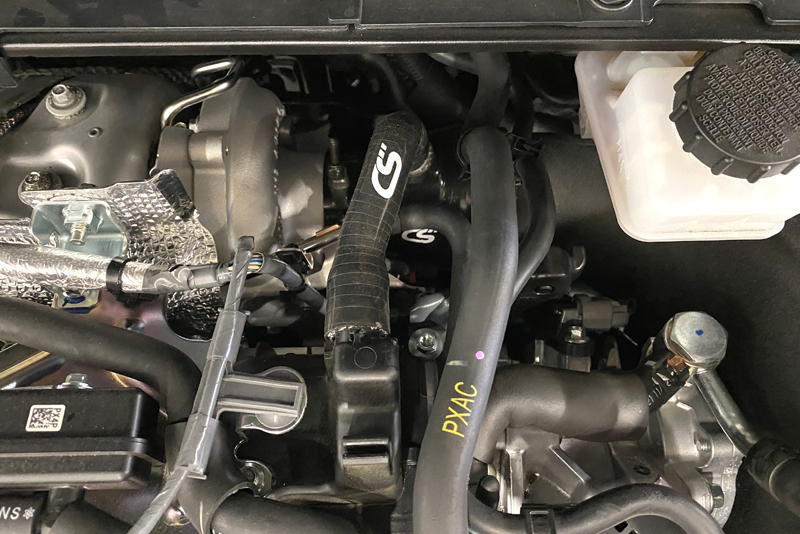
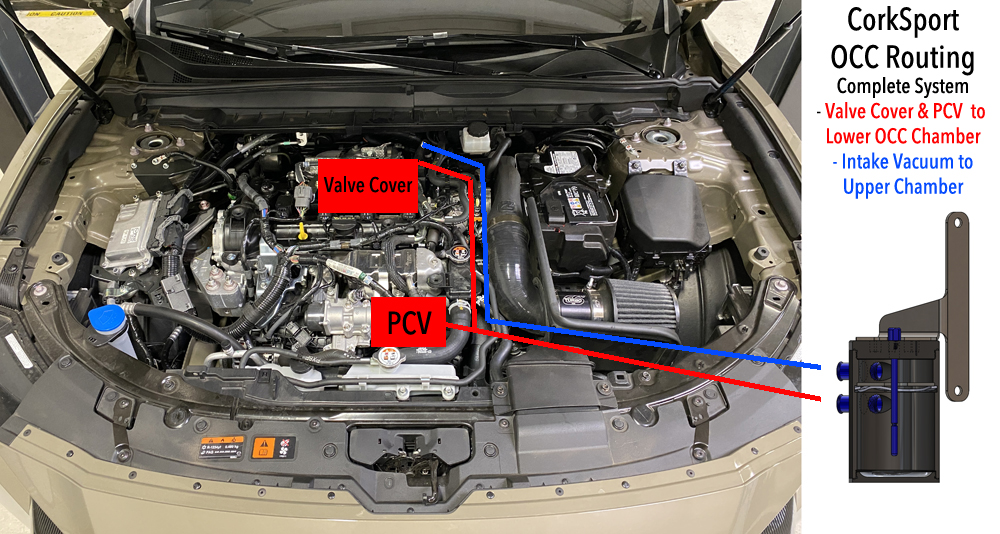
Here you can see the general routing of the CorkSport oil catch can over a CX50 engine bay (routing is the same for all turbo 2.5L SkyG models). The red lines are the routing from the valve cover breather and the PCV. They “T” together and then enter the lower chamber of the OCC. The blue line is the clean air exiting the OCC and being drawn into the intake system just before the turbo compressor inlet.
Let’s wrap this up! GDI Tech is great but has some issues. In factory form, the OEM PCV system works but could be better…enter the CorkSport Oil Catch Can Kit.
By changing the routing and adding a proper tank to catch the oil, fuel, water vapors that collect inside the engine you are effectively helping your engine breathe better. Reducing the amount of particulates and vapor entering the intake system reduces the overall build-up on the intake valves and other various components.
With the optional drain valve system, you can easily service the OCC when you perform you regular oil changes. While not sexy, it is essential and your Mazda will love you for it.
We hope you have enjoyed this tech blog and we hope it has helped you learn more about your beloved Mazda. Check out the Oil Catch Can for more details and to get yours today!
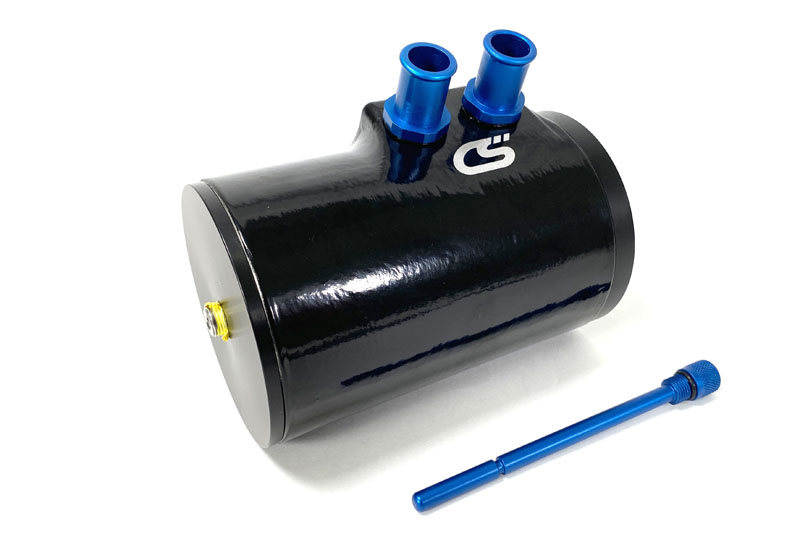
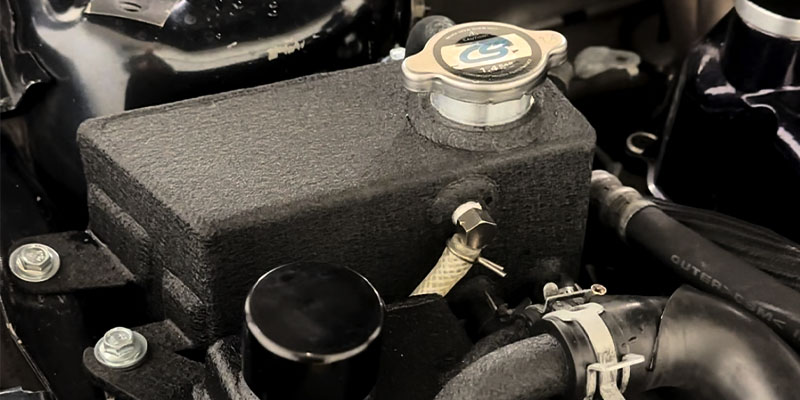
Let’s face it, the first-gen Mazdaspeed3 platform is aging, and with that age comes ugly, yellow plastic tanks. We’ve even seen tanks crack and fail, causing coolant leaks, headaches, and eye sores for owners. It’s time we changed that.
CorkSport has developed a solution in the form of an aluminum replacement for these tired plastic tanks that fit and function just like OEM! Our tanks also come coated in a beautiful black powder coat that will look right at home with any color in any engine bay. Our tanks are robust and will stand the test of time for years to come.
But why aluminum? Why do we even have a tank, to begin with? What does it do?Let’s start by going over how a cooling system works.
TW: It’s about to get a little nerdy!
Understanding Heat Transfer in Cooling Systems
Think about a hot summer’s day. You’re sweating from a hard day of wrenching on the Mazda in the garage and desperately need a cool down, so you place a cold, wet, refreshing towel around your neck. Initially, when you place that cool towel around your neck, you only feel the cold in one place: around your neck. But pretty soon, you feel the cold spread throughout your body and begin cooling down.
This feeling, however, is misleading as there is no such thing as “cold.” There is only heat and a lack of heat. What’s happening is the heat that you feel on your body is being transferred into the cool towel, and the blood that passes through your neck is cooled as a result. As this blood with less heat (i.e., “cooled”) circulates around your body, you feel the effect of that towel all throughout until all of your blood is cooled, and you begin to feel better! You’ll notice after some time that the towel is no longer cool because it has absorbed the heat from your body and the surrounding air. Remember: heat moves from hot to cold and wants to spread until an equilibrium is met.
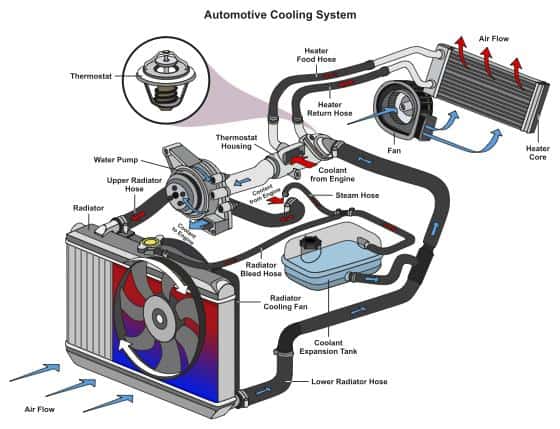
How Automotive Cooling Systems Work
Automotive cooling systems work on the same principle. Replace that towel with a radiator, your blood with automotive coolant, and the engine as a heat source, and now you have an automotive cooling system! As the cold coolant passes through the engine, it absorbs the heat generated by the combustion cycle and friction in the cylinders. Some of this hot coolant is then passed through your HVAC system, where some of this heat can be used to heat the cabin (this is how your heater works), and the rest is passed to the radiator for cooling. Once cooled by moving air, it is then passed again into the engine, where it works to cool it down. Then the cycle continues. This is the same basis of how Turbo front mount intercoolers operate. For more information on these systems, check out our Front Mount Intercoolers.
So where does the tank come in?
Naturally, as things heat up, they expand. Coolant is no exception to this rule, and this is usually combated with an expansion tank to capture any excess volume. What makes the MazdaSpeed 3 cooling system unique is that the expansion tank is incorporated into the main flow path of the coolant, with the expansion volume built into the reservoir design. This design of combining the expansion tank with a reservoir simplifies the system without the need for additional tanks or hoses. This can also be compared visually with the fill point of the cooling system. On most vehicles, it is located on top of the radiator, but on the Speed3, it is located on the tank directly. This means that the tank itself is pressurized when the system is hot, which introduces a challenge with material selection.
Mazdaspeed’s Need For A Better Tank
Since the OEM tank is made of plastic, it is more vulnerable to degradation over time. Once the tank has deteriorated enough, it cannot withstand the pressure changes and high-temperature cycles of the coolant system. It will eventually fail, leading to many owners complaining of cracks and leaks. The TIG welded aluminum construction and powder coating of our tanks mean that they are substantially more resilient than the OEM tanks and will last for years to come.
Power Steering Tank
The 2007-2009 Mazdaspeed 3 power steering tank is much simpler as its only function is to hold fluid, and the system is only slightly pressurized, meaning no expansion volume has to be built into the tank design and the temperatures are much lower. However, the OEM tank is still made of the same ugly plastic as the coolant tank and has the same disadvantages. While this tank does not see the same failure rate as the coolant tank, we decided to take the opportunity anyway to fully complete the look of the engine bay and provide our customers with a comprehensive solution to replace all of the aging plastic tanks to improve the appearance of the engine bay vastly.
Fitment and Design
We understand that universal tanks are such a pain. We have experienced this with some of our cars and have had to design and fabricate custom brackets to make them fit. This is a headache, not to mention having to cut or move OEM hoses or custom-make our own. Retaining OEM fit and function is the easiest and most effective design for installation, and that is exactly what we have done for our tanks!
If you want to purchase one (or both) of our Aluminum Tanks for your Mazdaspeed 3, today is the day!
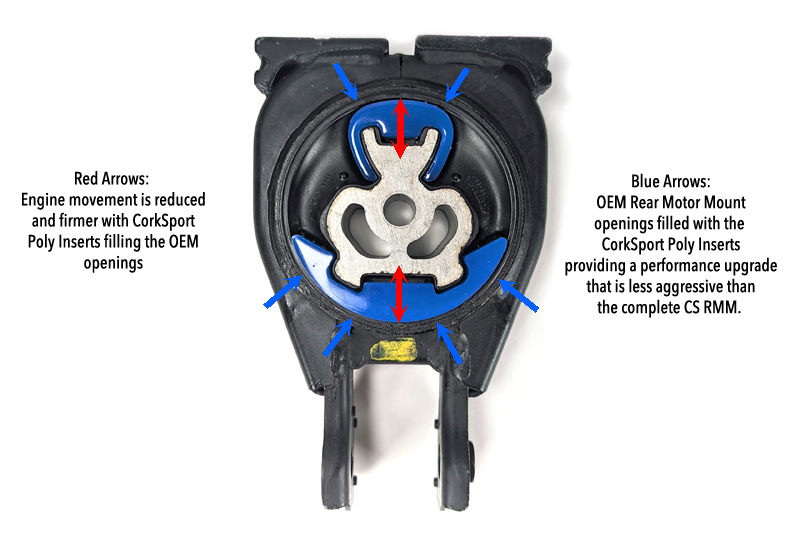
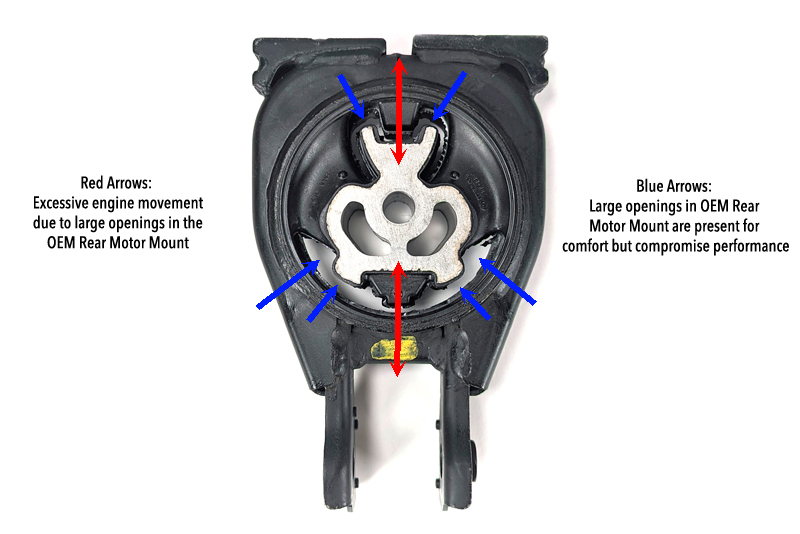
For those looking for a Rear Motor Mount upgrade for your 4th GEN Mazda 3 or CX-30 but don’t want to add too much additional NVH, we are excited to release the CS RMM Inserts. The CS Inserts utilize the OEM mount and offer performance quality between the stock and CS Rear Motor Mount. This means you will get less NVH from the upgrade when compared to the CS RMM, which will be great when driving around town. While not being as aggressive as the full replacement CS RMM, you will see a nice improvement in feedback and responsiveness when pushing it on the back roads or in other situations in which you are utilizing the full potential of your Mazda. If you are interested in this new option, keep on reading for more specifics on how the CS RMM Inserts were designed.
NOTE: NVH (noise, vibration, harshness) is a standard term used in the automotive industry. NVH is a byproduct of changing some OEM components to aftermarket components in the pursuit of focused performance. Examples of components that can increase NVH: are engine mounts, clutch/flywheel, intake, exhaust, suspension, tires/wheels…and many more.
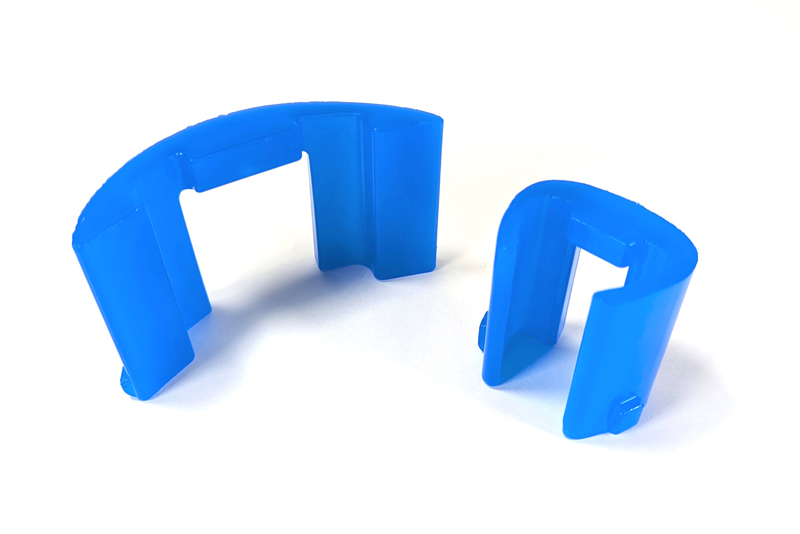
During the design process, we started with the Mazda 3 OEM rear motor mount and worked on modeling inserts that would completely fill the two openings. Once the initial designs of the two inserts were completed we began testing the samples and started with both front and rear inserts installed at the same time. Our initial impressions were quite surprising. We found that this combo resulted in the same if not more NVH than when the full CS Rear Motor Mount was installed.
Since the dual combo didn’t get us to where we wanted, we then tried each insert one at a time. This helped quite a bit and reduced NVH down closer to where we wanted. The issue we encountered when using only one insert was that the gear with worse NVH varied depending on whether we were in drive or reverse. This led us to trim and remove sections of the front and rear inserts to try and get the best of both worlds. By removing the center of the inserts, we were able to find a design that operated in line with our target performance levels. It ended up being a good middle ground between the stock and CS RMM. A comparison of the performance can be seen in the video below showing all three options.
Now onto some other specs of the CS Inserts. The durometer of the polyurethane we selected for the front and rear inserts is 70A. This gives the inserts enough flex to be installed into the mount without too much effort. This all allows for a tight fit so they do not work their way out during operation. Locking tabs were integrated into the inserts to ensure they remained installed in their correct position.