

When lowering your car with coilovers or lowering springs, you will need an alignment to reset the suspension geometry for optimal performance and tire wear. One of the key aspects of this alignment is the camber.
The suspension alignment of your Mazda can completely change the way the car handles, brakes, and accelerates. Camber is one of the critical variables in an alignment that needs to be set up for your Mazda and for your driving needs. Let’s talk about camber and why you might need camber plates.

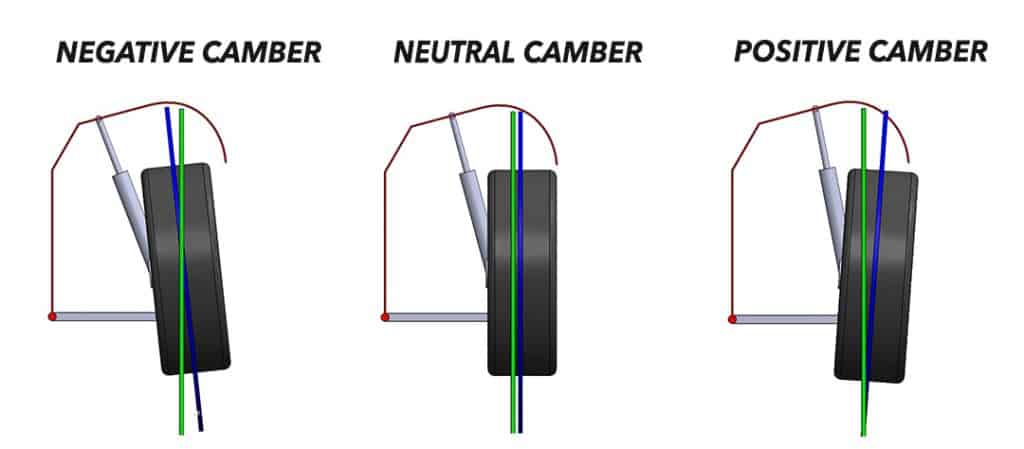
Camber (aka camber angle) is the measured angle of the wheel/tire centerline vs true vertical. Any measurement in angles is typically expressed in degrees in the automotive world and can be stated as negative, neutral/zero or positive degrees of camber.
In the image below we have a diagram showing a mock setup with a MacPherson strut suspension style. MacPherson struts setups are common in passenger cars and are used in the Mazda 3, Mazda 6, CX5, CX9, & CX50.
Camber Diagram Breakdown:
- The thin red arching part represents the chassis and fender of the vehicle.
- The grey color components represent the lower control arm and the strut assembly (MacPherson Strut).
- The black thing that looks like a tire…is the tire and wheel.
- The green line represents “True Vertical” so we can see the camber .
- The blue line represents the “Wheel/Tire Centerline” and will change angles depending on camber.
Let’s assume the vehicle is sitting on the ground and we are facing the front of the vehicle driver’s side. When the vehicle is sitting on the tires this is considered our “static ride height”. This is important to note because this is how the vehicle’s static alignment is measured. Let’s break down the adjustments of camber.
Negative Camber:
Negative camber is when the top of the tire leans inward towards the center of the vehicle. A typical amount of negative camber for a street-use vehicle is negative 0.5 – 1.0 degrees in the front and slightly more negative 0.8 – 1.5 degrees in the rear. This provides a good balance of performance cornering grip, braking, accelerating and tire wear. The slightly more negative rear camber aids making the car more oversteer prone which is safer for the average driver.
The Pros of Negative Camber:
Negative camber is critical to the suspension alignment as it directly affects the total mechanical grip of the tire. Negative camber helps keep the tire contact patch in full contact with the road surface during corning. When the vehicle is sitting or driving straight the tire is leaned inwards slightly with negative camber. When you turn the vehicle typically leans outward slightly (body roll) and thus affects the tire contact patch. The static negative camber counteracts that body roll, keeping the tire contact patch flat to the ground when you have a body roll from turning.
The Cons of Negative Camber:
Negative camber reduces the overall tire contact patch size in straight-line driving. This affects braking and acceleration due to the reduced contact patch size. Too much negative camber, typically more than negative 3 degrees, will drastically affect this to the point that it may make the vehicle unsafe to drive on public roads. So, negative camber is a balancing act of too little vs too much and should be professionally adjusted to benefit the overall suspension setup and use of the vehicle.
Positive Camber:
Positive camber is not typically used on a street and/or road course racing car. With positive camber, you would have the cons of camber in straight line performance braking and acceleration and even worse performance in turn as the positive camber would exaggerate the body lean. If you have positive camber, it is highly recommended to inspect your suspension for issues and/or get the vehicle aligned and adjusted.
However, there are exceptions to this. In very specific racing environments such as oval circuit races. Negative camber on the outside tires and positive camber on the inside tires can be beneficial because the vehicle is only ever turning in one direction. Therefore all four tires (not just the outside tires) are counteracting the body lean of the vehicle while turning.
Static vs Dynamic Camber:
Camber can be defined in two forms; static and dynamic.
- Static Camber is when the vehicle is sitting on the tires (aka at rest). This is how alignment shops measure the vehicle’s alignment including camber.
- Dynamic Camber is the resulting camber as the wheel/tire moves up and down in the suspension travel.
When an individual speaks to their camber setup, they are most likely talking about their static camber. Dynamic camber is not easy to measure without knowing the geometry of the suspension itself. Dynamic camber changes as the suspension travels up and down. Typically as the wheel/tire travels up from ride height (aka bump travel), there is more negative camber called camber gain. The opposite follows when the wheel/tires travel down from ride height (aka droop travel), there is less negative camber called camber loss, and can even become positive camber with some suspension styles.
Camber Gain in Bump, Static Ride height, & Droop
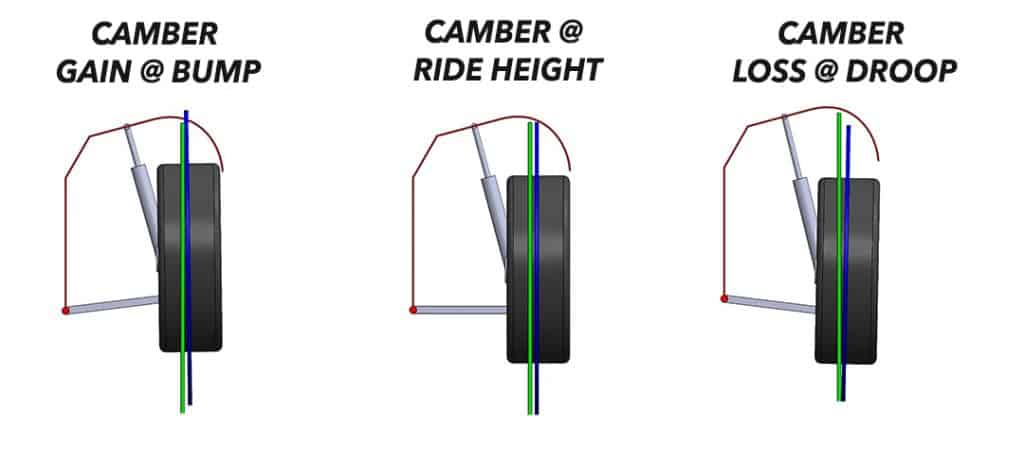
In a MacPherson Strut-style front suspension (Mazda’s go-to setup), the camber gain is fairly minimal at typically less than 1 degree of negative camber gained in the first bit of suspension travel. As the suspension excessively compresses in bump, the camber gain is typically reduced or lost. This is called the camber gain curve and is described as a curve because it is dynamically changing as the suspension travels up and down.
Reviewing the above diagram there are three images showing the change in camber due to camber gain/loss. Watching the relation of the blue and green lines, you can see the chamber change depending on wheel/tire travel.
- Middle Image: Shows static ride height at neutral/zero camber. This can be seen with the blue and green lines, they are parallel.
- Left Image: Shows bump travel camber gain. The blue and green lines are intersecting at the top and have a larger gap at the bottom.
- Right Image: Shows droop travel camber loss. The blue and green lines have a gap at the top and are intersecting at the bottom.
As you can see, camber is a very dynamic aspect of the suspension geometry that affects many aspects of the vehicle. Cornering, braking and accelerating are all directly affected by dynamic camber, but this all start with your static camber setup.
Let’s be real, static camber is how you fit those new wheels and tires you are so excited about; so let’s talk more about camber and its effect on fitting those wheels and tires. Static camber, as discussed above, sets your baseline camber for the dynamic camber to “build off of” through suspension travel.
Static Camber + Camber Gain = Wheel/Tire Clearance to Fender
Here you can see a diagram of wheel/tire clearance to the front fender when the suspension is in bump travel.
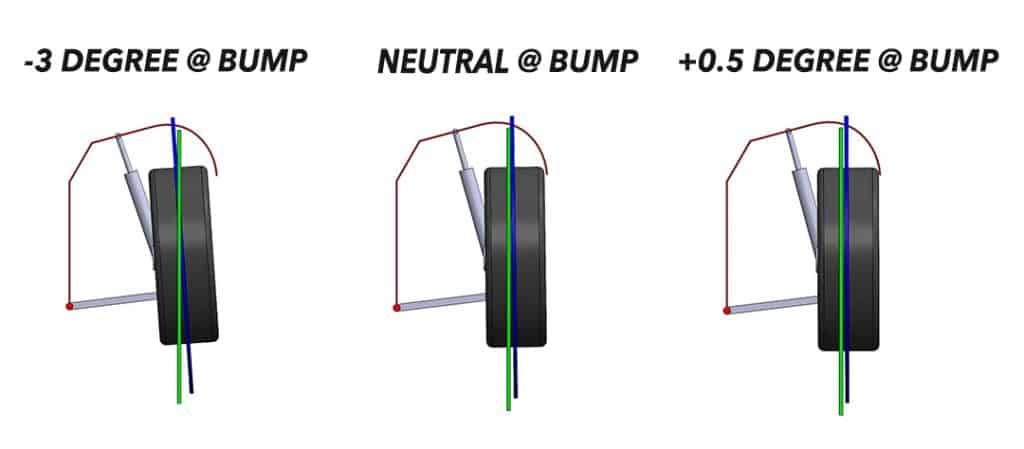
The more negative the static camber is, the more fender-to-tire clearance you have in bump travel.
Your chosen wheel and tire setup will also have an effect on this clearance due to the many different widths and offsets you can choose. Generally, the smaller the offset, the more the wheel will “poke” outward from the side of the vehicle. Wheel width and offset are the key aspects to fitting a wheel on a given setup. Typically your Mazda 3 is going to need a fairly conservative wheel and tire setup to fit without excessive negative camber.
Instead of trying to explain all the details about wheel and tire fitment setup, I’ll point you to a fantastic website that allows you to input your existing wheel and tire setup and compare to your new setup. The website outputs a great visual diagram of the current and new setup with measurements you can reference. See: www.willtheyfit.com
Here is an example of our wheel and tire setup vs the OEM wheel and tire setup. This is currently on our 2021 Mazda 3 Turbo Hatch. It looks fantastic and performs great with our Turbo Lowering Springs and our Coilovers.

Lastly, camber is not the only suspension setting affected by lowering your car on springs or coilovers. Toe is the next critical suspension setting that needs to be corrected after camber is set in place. Toe also drastically affects how the vehicle drives and will quickly destroy tires if not setup correctly for the intended driving.

Read about The Best Camber Plates for the Mazda 3 & CX-30
How Do You Adjust Camber?
Most MacPherson struts do not have any camber adjustability from the OEM, so what do you do? Depending on the amount of drop from your lowering springs and your driving needs, you may need to purchase aftermarket camber plates to get your suspension dialed in or to prevent your meaty wheel and tire setup from rubbing!
So, the moral of the story. When lowering your car, make sure to get a proper alignment for the betterment of your vehicle’s performance and the longevity of your tires! Don’t go too crazy with camber; remember it’s a balancing of performance, durability, and fitment.

Thanks for tuning in, we hope this was a helpful blog about camber setup for your Mazda!
You may also like
- Cold Air Intake Systems Explained for your Naturally Aspirated & Turbo Mazda
- CorkSport CBR Update #2: Bodykits