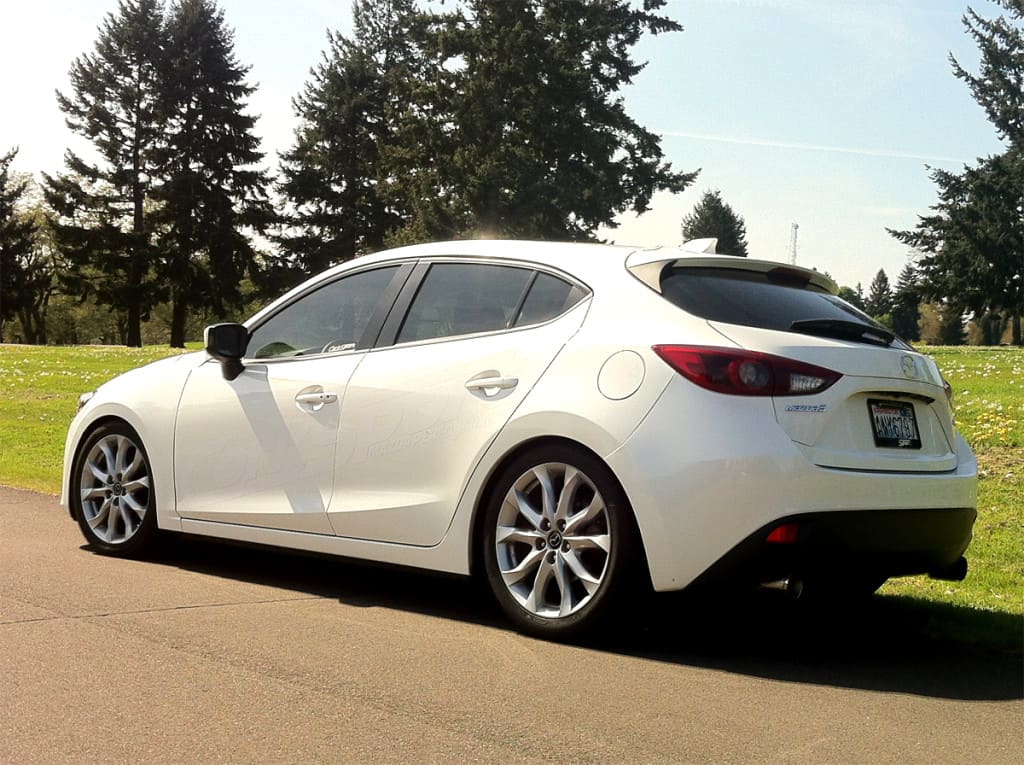
Whether you want the better handling that comes with the lowered center of gravity, or you want to rid yourself of the wheel gap eyesore. Lowering springs will give you want you’re looking for.
Improved Performance
For running the track, or a spirited drive through the countryside, CorkSport lowering springs are the upgrade you’ve been looking for. By adding lowering springs and lowering the center of gravity of your Mazda allows the car to stay more planted to the road.
One of the biggest things to note on stock suspension is how far upward the suspension travels when hitting a bump. It can make the car feel like it wants to lift off of the road; depending on how fast you’re taking corners. Lowering springs help to correct the car’s suspension travel when you hit a bump in a turn.
Lowering springs also have about 25% increased stiffness. For the Mazdaspeed platform, increased stiffness in the rear is a must. Mazdaspeeds like to squat pretty hard when hitting full boost, so any way you can manage to stiffen up the rear is a great modification for your car.
A Better Look
Adding lowering springs also gives your baby amazing eye appeal and a much more aggressive look. Whether you drive a Mazdaspeed3, Mazdaspeed6, Mazda 3, Mazda 6,CX-5, CX-3 or MX-5, lowering springs will get rid of that ugly wheel well gap. The result is a Mazda that carries a much cleaner and more aggressive look and gives you the ability to take it to the track if you want to.
Some people want to drop their Mazda as much as possible, and some don’t. CorkSport lowering springs don’t deliver a super aggressive drop. If you’re not interested in scraping your front bumper on every road bump, the CorkSport lowering springs have the right drop for you, and provide the increased handling capabilities you’re looking for.
If you’re curious about other suspension pieces for your Mazdaspeed, check out our Struts and Shocks combo kits, that give you just what you need for suspension.
I recently had the opportunity to interview one of my favorite up-and-coming racers and wanted to share with you some of her advice and story. This is just an awesome look into the winning mentality of one of SCCA’s Wendi Allen Scholarship prominent women Racers! From where she started to where she’s headed and some info in between, you’ll get a chance to hear direct from Johanna Foege in this interview.
How long have you been racing? What got you started?
My brothers both got involved with auto-crossing while I was in college and were always trying to convince me to come out and race with them. It wasn’t until the end of 2011 when a friend offered me a co-drive in their Mazda3 (and a year after I purchased my first MazdaSpeed3) that I finally gave it a try.
At that first event, I ended up taking first in my novice (open) class of 7, on my first run, nonetheless! Naturally, I was immediately hooked.
What have been the best outcomes for you since starting racing?
This year I received the SCCA Wendi Allen Scholarship. I suppose this means that I’ve made enough positive impressions on SCCA members to have been nominated for this award, which is intended for young women drivers that show promise at driving and inspiring other women. This scholarship has made a crazy year of racing possible for me, and I’m so grateful to have received the recognition and the opportunity to compete in 8 national tour events throughout 2018!
What have been your best standings thus far?
My first taste of victory was at a local event in Champaign, IL when I took the fastest run of the day (out of all the drivers), in the Mazdaspeed6 back in June 2014. I’ve only made it to one National event which was in September 2017 at Lincoln, NE, but I managed to trophy there, finishing 3rd in my class. And just last week at the Championship Tour Event in Peru, IN, I managed to finish 16th out of 275 drivers.
What do you believe is the best MOD for racing – if you had to pick the best one?
I think this entirely depends on your car and the kind of racing you do! For autocross, the rear sway bar has been my favorite in my Mazdaspeed3, as it helps combat the understeer, pushy front-wheel drive characteristics. My favorite mod on the Mazdaspeed6 has been the custom valved, high spring rate coilover setup since that car has relatively soft suspension and a lot of body roll from the factory.
What is your favorite MOD – other than the Driver Mod, which we know you invested in already?
If awesome tires count as a mod, definitely that! All other mods depend entirely on how much grip your tires have on the surface at any given moment. This applies to the street, too. Also, have you seen our Hoosiers?
What has been the most memorable mistake you’ve made on the track?
At 2017 SCCA SOLO Nationals, I had a KILLER run- 0.7 seconds faster than the rest of mine, and 0.5 seconds ahead of first place in my class. I’d been working on looking ahead while driving throughout the year and was doing such a good job of this that I hit a cone that was right in front of me on that run. I remember seeing it at the last second and thinking, “There’s no way I’m getting around that now!” What I didn’t know at that moment, was that cone was going to cost me first place at my first Nationals.
What is your best advice for other Drivers starting out?
Take a school, ask people for help and advice (and be receptive to it), and don’t give up! Don’t be too hard on yourself, driving skills take a long time to polish, and do come more naturally to some people. In the end, racing is really about mental preparation, confidence, and ambition composure on course.
Why do you believe women in racing is important?
I think it’s time we see a paradigm shift about the activities that women (and men) pursue. I’m all about supporting whatever healthy hobbies people find themselves interested in, and I don’t think there needs to be gender stereotypes associated with any of them. I love to see women participating in motorsports because it serves as a reminder to all that we are on the same playing field as men, and are capable of just as much. As more women enter the world of racing, I really hope it opens the door to other ladies feeling comfortable pursuing what has historically been an atypical interest. I just hear way too many women say “That’s so cool that you race, but I could never do that!” You can, and you should give it a try!!! Maybe someday, they will.
Lastly, feel free to add anything you’d like the public to know about you, your car or your racing experience!
I’ve made efforts in the Mazdaspeed (forum) community to support and encourage all members, but particularly other women, to participate in the sport of autocross. I’ve taken part in organizing four different national meets, and assured autocross was on our schedule at each one. I also made myself available to instruct at these events, and really focused on getting the women members to take part with me. I’ve gotten several of the local member’s girlfriends into the driver’s seat at autocross events as well. It has been rewarding to watch them find enjoyment from it and help them grow into better drivers, as many have found it easier to learn from a fellow woman, than their significant other, lol.
My teammate and partner of 5 years, Clint, and I live nearly 600 miles apart. He’s been my inspiration, engineer, coach, mechanic, and best friend all along, and I credit him for bringing me to where I am today, and for building us an amazingly capable and unique car. I just started a blog to keep track of our long-distance relationship racing adventures this year, as well as driving tips, goals, and my progress through each event!
As temperatures rise, your Mazda is going to feel the heat. With all of the road trips and picture-perfect drives, you need to keep your baby looking good and driving well. We rounded up the top summer care tips that the CorkSport community submitted to us on Facebook and added in a few of our own.
Search for shade
The sun can damage your car’s paint job and interior materials. Keep your Mazda safe by parking in the shade or using a garage whenever possible. Not only will it keep the interior from being a blazing heat soaked oven, it will do a little more to keep you and your Mazdaspeed comfortable!
Get fresh fluids
Keep your Mazda running smoothly during the hot summer months with fresh fluids in your coolant system. It will protect your engine and keep your AC cold as ice. Keep in mind that your intercooler will be working overtime in the coming temperatures, might as well give it that extra boost of topping off the fluids.
Check your oil
Oil is your car’s lifeblood. Regular oil changes are the cheapest way to extend the life of your Mazda and keep it performing at its best. Change your oil before your next big road trip or if it’s been longer than three months since your last change. You can also look into cleaning out your oil catch can, as it’s been protecting your engine from some extra gunk for a while!
Give her a proper wash
This is crucial for keeping your Mazda looking good and preserving the paint. Be sure that you’re cleaning the brush that you’re using so you don’t scratch her, and the pre-soak is there for a reason! Check out our thoughts on ceramic coating that can protect your paint!
Keep the interior fresh
Exterior shots are sexy but you spend most of your time inside your Mazda so don’t forget about keeping your interior clean. We have customers that use vinyl conditioner to keep their interior pure and preserve its matte metallic finish. Since you’ll be spending a lot of time inside your ride, you might think about upgrading the interior components for that luxury feel, the Corksport Alcantara Steering wheel or shift knob is a great start!
Maintain a sexy shine
Now that your interior is fresh and the exterior is washed, it’s time to get that sexy shine. Kiefer Westlund, a professional detailer, and John Lukis a CorkSport 7th Gear Member recommend regular waxing using Meguiar’s Ultimate Liquid Wax. Meguiar’s wax is affordable and will last for many washes. For more tips on keeping your exterior shine, check out our blog post on how to keep that new Mazda sheen.
Now you’re ready to take on the hottest months of the summer performing well under the hood and looking good.
Cheers,
CorkSport
Caring for your Mazda in Summer December 11th, 2018CorkSport
Sometimes it’s the simplest changes to a vehicle that can really make a difference. A crisp and well-lit interior makes for a surprising improvement. CorkSport is proud to announce that we now have LED kits for 2016+ Mazda CX-3 and 2016+ Mazda CX-9.
The CorkSport LED Light Kit replaces all interior and some exterior lights that are normally yellow incandescent bulbs. All CorkSport LEDs are the 7000k color for a pleasant, but bright and clear illumination.
Check out a comparison of the CorkSport LEDs vs the standard incandescent bulb.
Sure, you can probably find some random lower-quality LEDs online, but only at CorkSport will you get a complete kit with exactly the bulbs you need along with color installation instructions, a CorkSport tin and top notch customer service.
-BS @ CS
2016+ CX-3 LED KIT
2016+ CX-9 LED KIT
Interior LED Light Set for 2016+ Mazda CX-3 and Mazda CX-9 July 5th, 2018CorkSport
If you haven’t heard already, Mazda has finally kicked out a new Mazda 6 with a turbocharged engine!
CorkSport jumped on the waiting list early and we are proud to be one of the first owners of a 2018 Mazda 6 Grand Touring Reserve. Ours is Soul Red Crystal. In the short time we have had the car, it has already been on the lift, the dyno, and many backcountry roads. We are digging into the new platform and have already started work on a handful of new performance parts.
This license plate relocation kit is just the beginning of what we’ve got in store for this new car.
So let’s talk about our first mod for the brand new 2018 Mazda 6. If you’ve got one, hopefully, you were lucky enough to prevent the dealer from drilling holes in your bumper because we are proud to introduce the CorkSport License Plate Relocation Kit for 2018 Mazda 6!
As with all CorkSport License Plate Kits, the 2018 Mazda 6 kit includes everything you need to move your plate from the middle of your bumper to the side and free up much-needed airflow (trust us, you’ll want that airflow for some other parts we are working on). All mounting brackets, hardware, and even bumper hole plugs are included to make for a quick and simple installation with no permanent modifications required.
All components have been proven to last and looking good while they do it. A zinc-coated steel adapter is used to connect to the OEM emergency tow hook hole. A laser cut, precision formed, and powder-coated mounting bracket is used to support the ¼” thick Lexan plate mount. We even include stainless steel tamper proof mounting hardware to ensure your plate, and relocation kit doesn’t disappear in a parking lot.
While mainly a cosmetic modification, the CorkSport License Plate Relocation kit does provide a small increase in airflow entering your radiator and intercooler. Even though it’s a small improvement, we’ve already found the OEM intercooler needs all the help it can get (more on that in coming months).
For an added visual boost and to support the #1 brand in Mazda Performance, be sure to pick up a CorkSport License Plate Frame to go with your relocation kit!
This is the first of many performance parts we have in the works here at CS HQ. Let’s reveal a few of those already in the pipeline…
Upcoming products include an upgradable Short Ram Intake System, Performance Intercooler & Piping, Lowering Springs, and a Stainless Steel 80mm Cat-Back Exhaust System. We’ve already seen gains with the SRI System and will be testing the Exhaust and Intercooler parts in the coming months. Check back here for more updates!