Keeping you up to date with the latest CorkSport Mazdaspeed news!
Category: Mazda3
Since 2004 the Mazda 3 has been the go to compact car and we have been making performance parts for it since the release. The most powerful version is the Mazdaspeed 3 which was available from 2007-2013.
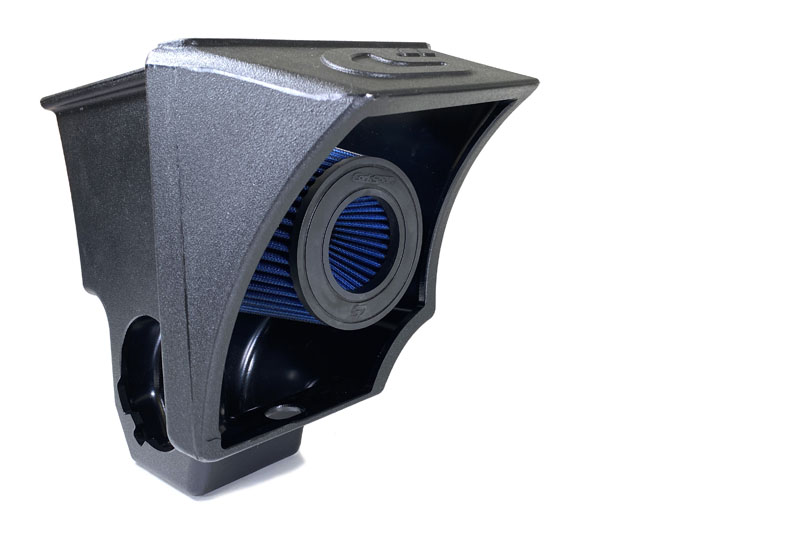
Designed specifically for the non-turbo models in conjunction with the CorkSport Short Ram Intake; this creates a complete performance cold air intake system that bolts in with ease.
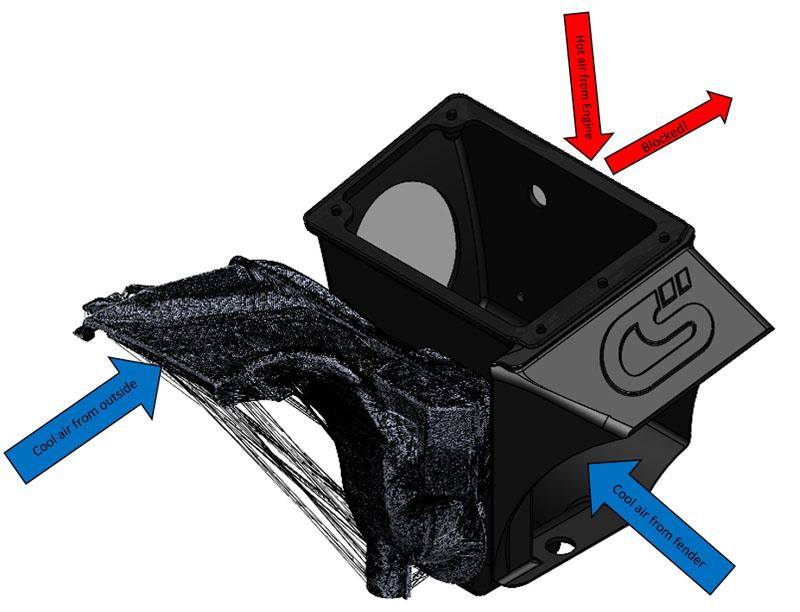
To maximize potential airflow AND keep the hot engine bay air away from the intake we incorporated the OEM intake snorkel and opened the airbox end to take in cooler ambient air from the fender area.
Here you can see the open end of the CorkSport Airbox providing full airflow to the filter from the fender area and the opening on the front of the airbox for the snorkel to interface. The result is maximum airflow and minimal hot air from the engine and radiator.
Tested & Approved
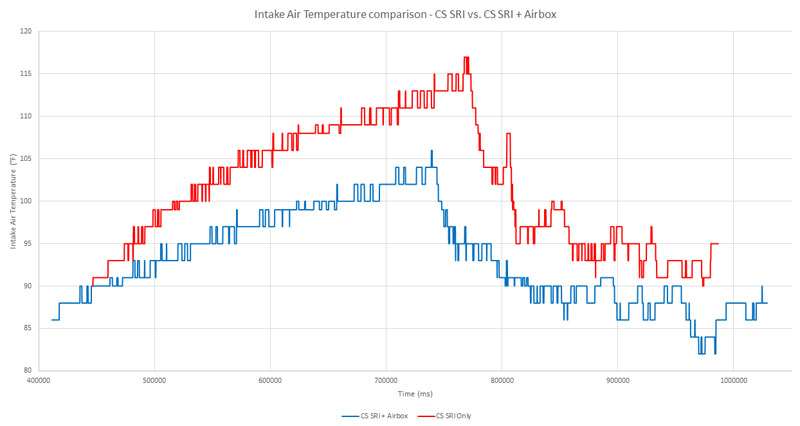
To validate this design we did on car testing in real-world situations. Below you will see a graph showing air intake temperature of the CorkSport SRI only vs the CorkSport SRI + Cold Air Box. Both tests use the same car and begin testing with an up-to-temp car in approximately 80 degF sunny weather.
The testing starts with a 5 minute idle period to simulate sitting in traffic or staging line at a drag race. This is the “heat soaking” that is so commonly mentioned in social media channels. After that, the car is moderately accelerated to 50mph which pushes fresh ambient air into the intake snorkel and fender area. You can see that in both stationary and moving testing, the cold air box keeps intake air temperatures cooler by approximately 10 degF.
Efficient & Responsive
Is a cold air box necessary for your Mazda already equipped with the CorkSport Short Ram Intake? No, but the cold air box WILL help your engine breathe easier, run more efficiently and feel more powerful and responsive in all driving situations. It will help make your Mazda even more fun to drive, which is why we all do this!
Built CS Strong
Now let’s talk about the construction of the CorkSport Airbox. CAD designed and manufactured via a rotor molding process allows us to create very unique shapes that can fit in the engine bay. The material is XDPE plastic that is very durable and resilient to engine bay temperatures and chemicals. In fact, it’s the same material we use for our Mazdaspeed Fender Fuel Cell and the 4th GEN Mazda 3 Turbo Inlet Pipe. The translucent cover is a grey/brown tinted acrylic material that is durable and looks fantastic in the engine bay.
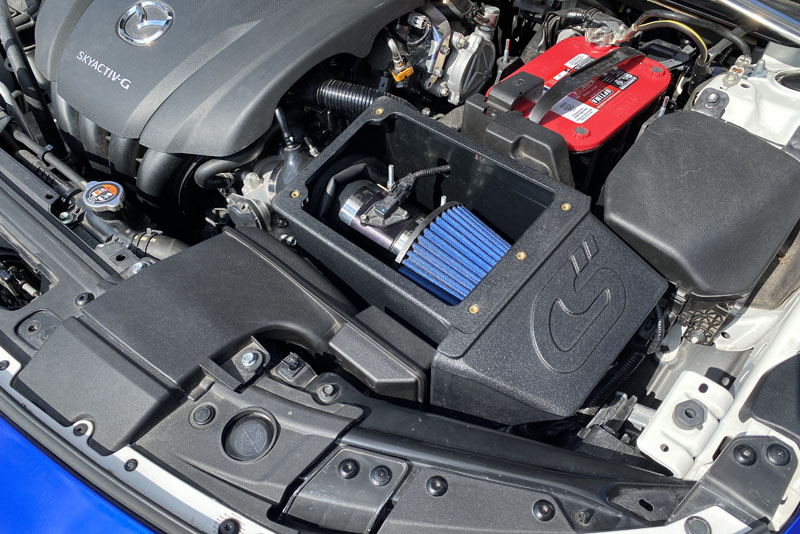
With the removable cover, servicing is super quick and easy, so you don’t have to remove the entire airbox just to clean your air filter.
CorkSport Care & Support
Lastly, like all CorkSport performance parts, you receive color step-by-step instructions, all the needed installation hardware, and support from our knowledgeable team at CS HQ. Thanks for checking out the latest and greatest from CorkSport!
CorkSport Mazdaspeed 3 Coilovers are back and ready for your street and track Mazdaspeed 3 and Mazda 3! Taking the feedback from the previous generation of CS Coilovers and applying those to the new hotness has created a design that best balances performance for the street and track.
No longer using an inverted design, we opted for a more conventional, but performance-oriented monotube design with a pressure chamber. A monotube design was used for its superior damping response and precision vs a twin tube design. With that, we have increased the resolution of damping control from a 15-click range to a 30-click range giving you more fine-tuning control.
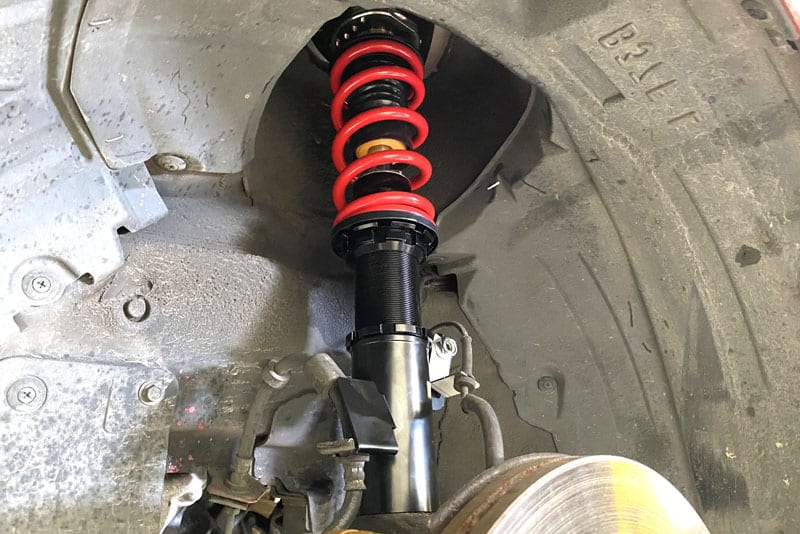
Installed Mazdaspeed Coilover with CS Springs
Next, the fronts now have independent spring load and ride height adjustability. This gives you the ultimate control in spring setup and ride height without affecting each other to do so. This helps to keep suspension travel optimized within the damper and makes adjusting ride height simpler.
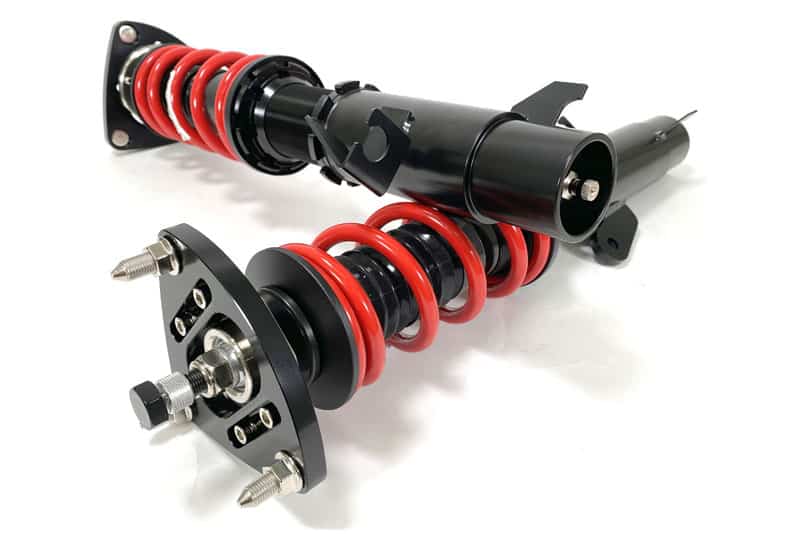
Swift Springs For Coilovers
Lastly, you may have noticed there are two different colored springs. We are offering two options for springs; CorkSport Red Coilover springs and Swift Spring upgrade. Even though there is no spring rate change for Swift, we still wanted to offer the option for those who swear by them. We suggest the daily driver opt for red springs and save money for some other goodies like Camber Arms, Toes Arms, or a Rear Swaybar. If you are wanting to push your car on the track, you may notice the Swift spring upgrade. Either way, you get to decide!
Talking about springs, we did “soften” the overall spring rates slightly per the requests of the community. For the balance of comfort and performance, we are using 6k fronts and 7k rear springs.
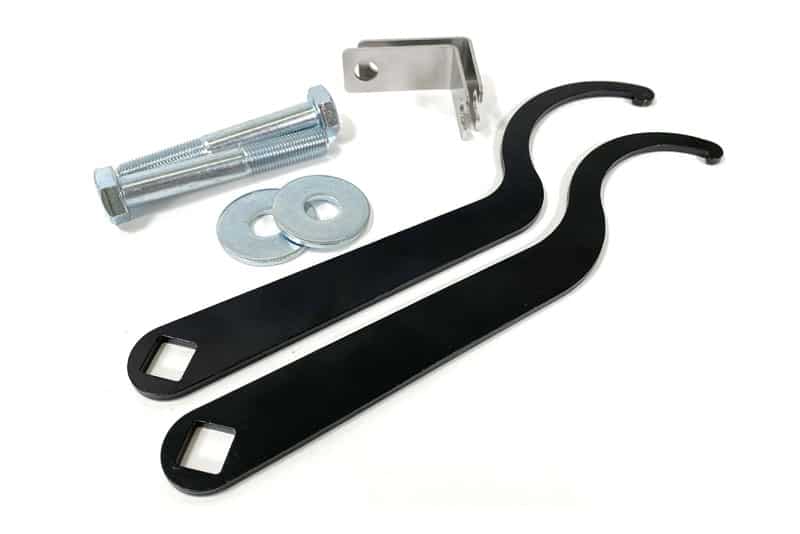
Now to the things that you already loved about the Mazdaspeed 3 Coilovers just get better! Included with the front strut assemblies are camber adjustable upper mounts so you can dial in your camber, wheels speed wiring harness brackets for OEM like installation and of course the needed rear hardware and adjustment wrenches.
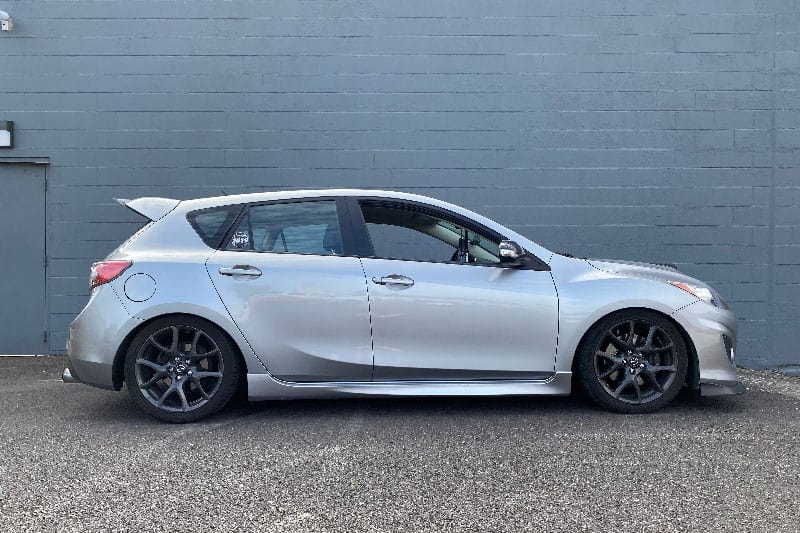
Now let’s chat about ride heights. While the CS coilovers are designed around handling, we can’t ignore the great visual boost that comes with lowering a car. The CS coilovers offer a large range of height adjustability. In the front, you can adjust the height from ~0.5” higher than OEM all the way down to ~2.0” lower than OEM (+0.5” to -2.0”). For the rear, you can go from ~0.25” higher than OEM all the way down to ~2.0” lower than OEM (+0.25” to -2.0”). This is 2.5” of total adjustability in the front and 2.25” of total adjustability in the rear.
Mazdaspeed 3 Coilover Maximum Ride HeightMazdaspeed 3 Minimum Ride Height
This is a great balance that allows for proper suspension function at low heights for those who want a stance look while also offering an OEM+ look for those that prefer a more subtle appearance. Don’t worry though, wherever you end up on the height range, the lowering does come with handling benefits as well, such as a lower center of gravity, decreased body roll, and improved driver confidence!
This project began after slaying the Tail of The Dragon’s 318 curves last October. We determined that the new Mazda 3 would benefit from additional bracing, and we are currently testing the first round of prototypes. In this blog, we will go into the development process of the Rear Hatch Brace and the steps we took to get to our current sample, which will be the design you can purchase for your hatch in the coming months.
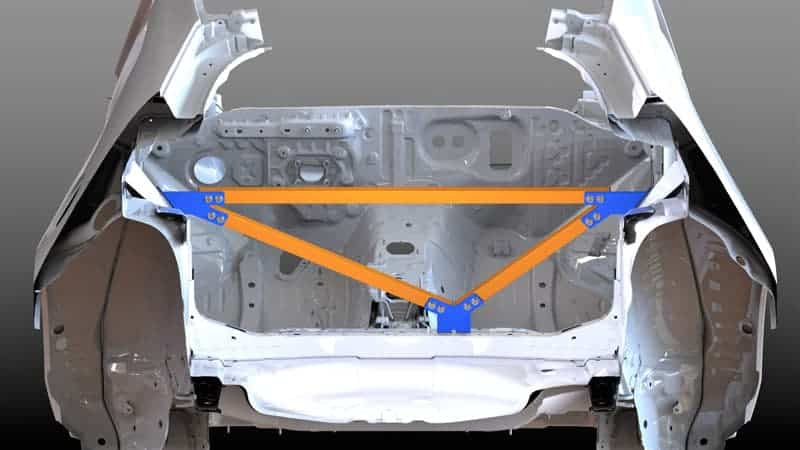
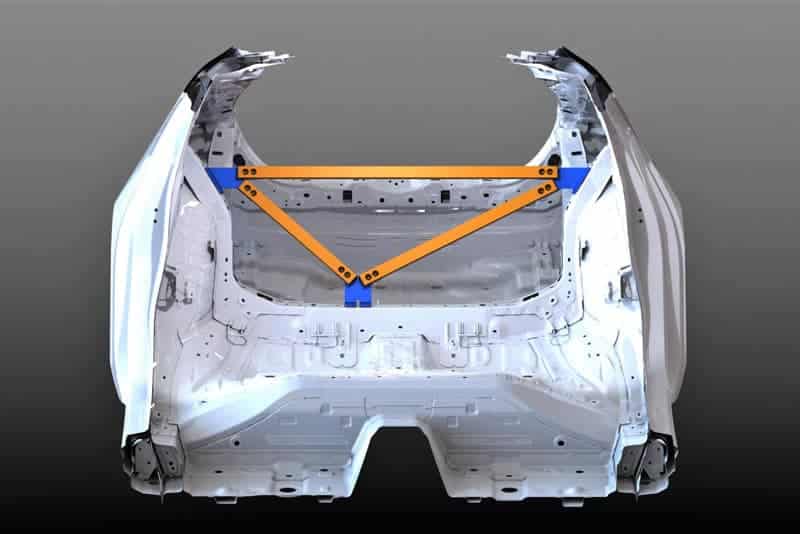
This project began by searching for suitable mounting locations to tie the brackets and cross bars into the chassis effectively. After removing a good amount of the hatch trim panels, we found that the existing mounting locations for the seat back latch were a perfect spot to use as the location for the main cross bar brackets since they are tied into a main chassis structure. They also feature two M10 bolt locations perfect for providing a secure bracket mounting point.
After we nailed down the main cross bar’s mounting locations, we looked for another spot to tie in additional bars required to triangulate the brace. The bracket that links the rear seats back together was an obvious choice since it also offered two M10 mounting locations that were easily accessible. The CAD model depicts the brackets below, which are highlighted in blue.
Once we identified all the mounting locations, the next step was to move on to designing the brackets and cross bars. This process was considerably easier since we created the parts using the Mazda 3 hatch chassis in CAD, as seen above. The first components to be designed were the brackets. The brackets needed to match the angle of the rear seats without sticking out too far into the storage space to retain the practicality and usability of the hatch.
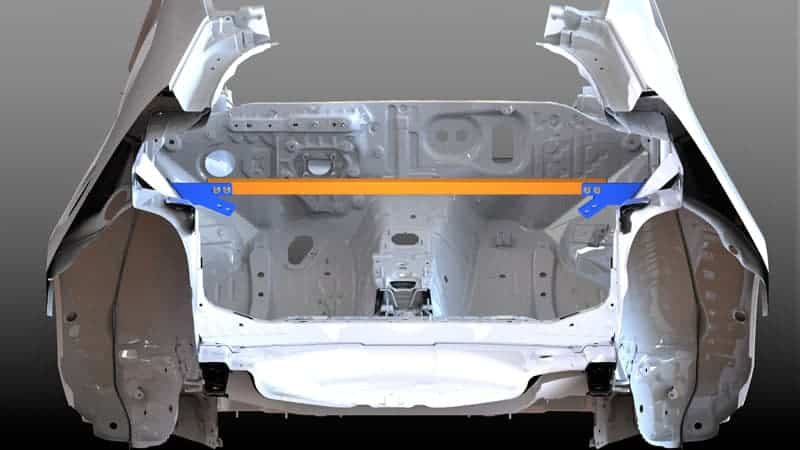
Retaining practicality is also the main reason why we wanted the brackets and cross bars to be separate. If you ever need to remove them for additional space, it can be done quickly without removing any trim pieces. We also wanted to provide two configurations or “Stages” of the RHB to give you more options. Once all these constraints were taken into consideration, it resulted in our bracket design, which is currently being tested on one of our shop cars. Below you can also see a comparison between the CAD model’s Stage 1 and 2 configurations.
Stage 1 – Single Bar System
Stage 2 – Triple Bar System
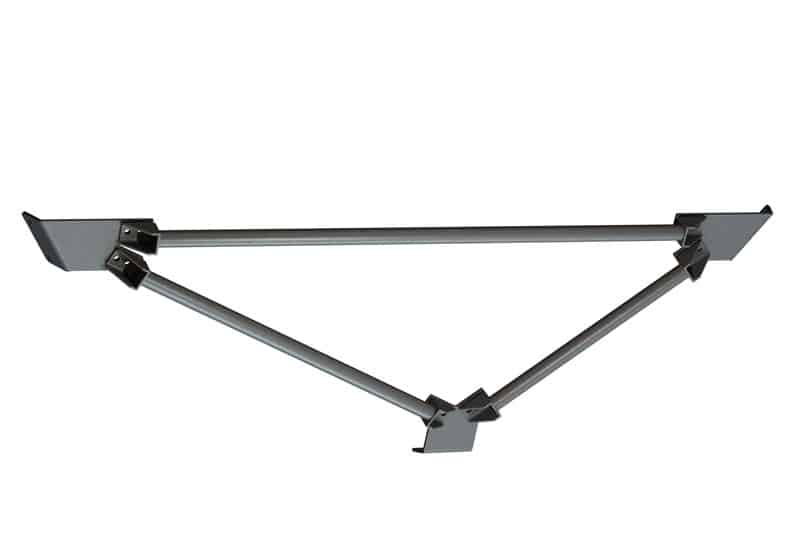
For the design of the cross bars, we initially started with an alternative design and material. The first iteration of the cross bars featured a round tube that would be welded to bent sheet metal end brackets to provide a mounting surface to interface with the brackets attached to the chassis. While this design would have been functional, it looked less OEM than we wanted. Additionally, it would have added considerable difficulty to the RHB’s manufacturing and overall cost.
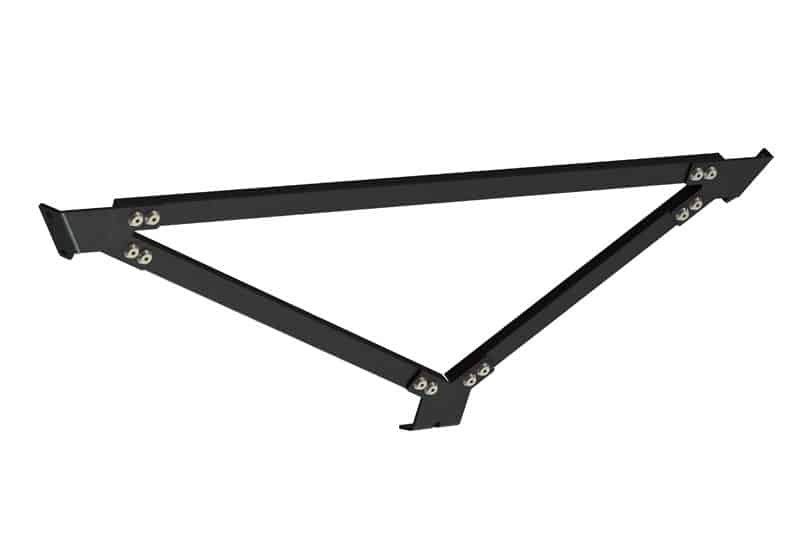
We decided to search for a better solution that would function as expected while also improving in the areas the previous design lacked. Over the course of the design process, we moved to a rectangular tube as the stock material. The R&D process resulted in the rectangular cross bars we are testing on the car now. A comparison between the two designs is highlighted in the images below.
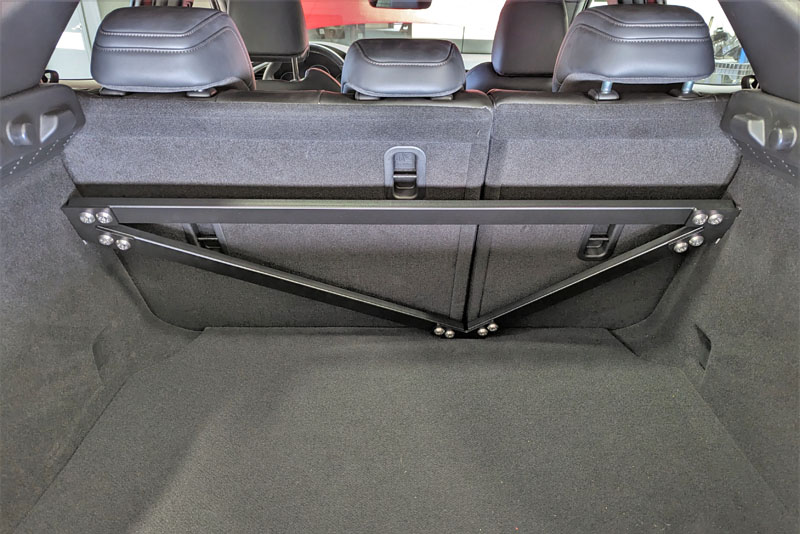
The last detail of the Mazda 3 Rear Hatch Brace is all the hardware tying the brackets and cross bars together, along with the coating used on the parts. For the hardware, we wanted to provide bolts that matched the clean look of the brace and complemented the look we were going for. That led to us selecting countersunk bolts and finishing washers which are stainless steel for excellent corrosion resistance and help add the extra flare we were shooting for. The cross bars and brackets are textured black powder coat, further complimenting the factory interior while providing a rugged finish. As you can see below, the results are beefy!
Thank you for reviewing the details of the design process of the CorkSportRear Hatch Brace. If you are interested in picking one up for your 4th Gen Mazda 3 Hatch, stay on the lookout – it will be hitting the website in the coming months.
When lowering your car with coilovers or lowering springs, you will need an alignment to reset the suspension geometry for optimal performance and tire wear. One of the key aspects of this alignment is the camber.
The suspension alignment of your Mazda can completely change the way the car handles, brakes, and accelerates. Camber is one of the critical variables in an alignment that needs to be set up for your Mazda and for your driving needs. Let’s talk about camber and why you might need camber plates.
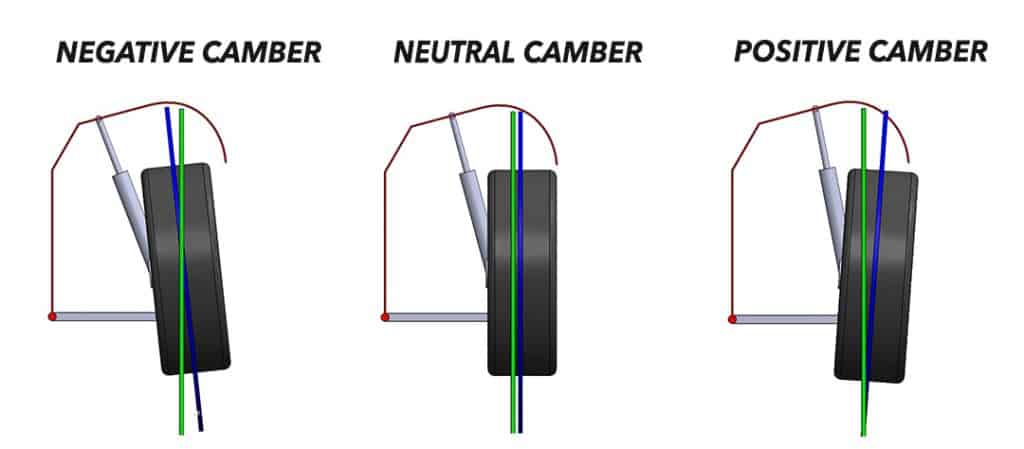
Camber (aka camber angle) is the measured angle of the wheel/tire centerline vs true vertical. Any measurement in angles is typically expressed in degrees in the automotive world and can be stated as negative, neutral/zero or positive degrees of camber.
In the image below we have a diagram showing a mock setup with a MacPherson strut suspension style. MacPherson struts setups are common in passenger cars and are used in the Mazda 3, Mazda 6, CX5, CX9, & CX50.
Camber Diagram Breakdown:
The thin red arching part represents the chassis and fender of the vehicle.
The grey color components represent the lower control arm and the strut assembly (MacPherson Strut).
The black thing that looks like a tire…is the tire and wheel.
The green line represents “True Vertical” so we can see the camber .
The blue line represents the “Wheel/Tire Centerline” and will change angles depending on camber.
Let’s assume the vehicle is sitting on the ground and we are facing the front of the vehicle driver’s side. When the vehicle is sitting on the tires this is considered our “static ride height”. This is important to note because this is how the vehicle’s static alignment is measured. Let’s break down the adjustments of camber.
Negative Camber:
Negative camber is when the top of the tire leans inward towards the center of the vehicle. A typical amount of negative camber for a street-use vehicle is negative 0.5 – 1.0 degrees in the front and slightly more negative 0.8 – 1.5 degrees in the rear. This provides a good balance of performance cornering grip, braking, accelerating and tire wear. The slightly more negative rear camber aids making the car more oversteer prone which is safer for the average driver.
The Pros of Negative Camber:
Negative camber is critical to the suspension alignment as it directly affects the total mechanical grip of the tire. Negative camber helps keep the tire contact patch in full contact with the road surface during corning. When the vehicle is sitting or driving straight the tire is leaned inwards slightly with negative camber. When you turn the vehicle typically leans outward slightly (body roll) and thus affects the tire contact patch. The static negative camber counteracts that body roll, keeping the tire contact patch flat to the ground when you have a body roll from turning.
The Cons of Negative Camber:
Negative camber reduces the overall tire contact patch size in straight-line driving. This affects braking and acceleration due to the reduced contact patch size. Too much negative camber, typically more than negative 3 degrees, will drastically affect this to the point that it may make the vehicle unsafe to drive on public roads. So, negative camber is a balancing act of too little vs too much and should be professionally adjusted to benefit the overall suspension setup and use of the vehicle.
Positive Camber:
Positive camber is not typically used on a street and/or road course racing car. With positive camber, you would have the cons of camber in straight line performance braking and acceleration and even worse performance in turn as the positive camber would exaggerate the body lean. If you have positive camber, it is highly recommended to inspect your suspension for issues and/or get the vehicle aligned and adjusted.
However, there are exceptions to this. In very specific racing environments such as oval circuit races. Negative camber on the outside tires and positive camber on the inside tires can be beneficial because the vehicle is only ever turning in one direction. Therefore all four tires (not just the outside tires) are counteracting the body lean of the vehicle while turning.
Static vs Dynamic Camber:
Camber can be defined in two forms; static and dynamic.
Static Camber is when the vehicle is sitting on the tires (aka at rest). This is how alignment shops measure the vehicle’s alignment including camber.
Dynamic Camber is the resulting camber as the wheel/tire moves up and down in the suspension travel.
When an individual speaks to their camber setup, they are most likely talking about their static camber. Dynamic camber is not easy to measure without knowing the geometry of the suspension itself. Dynamic camber changes as the suspension travels up and down. Typically as the wheel/tire travels up from ride height (aka bump travel), there is more negative camber called camber gain. The opposite follows when the wheel/tires travel down from ride height (aka droop travel), there is less negative camber called camber loss, and can even become positive camber with some suspension styles.
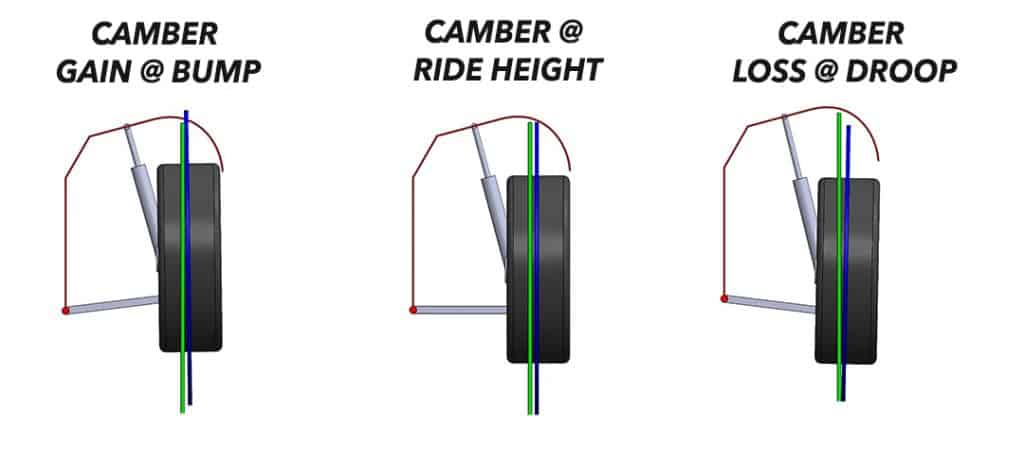
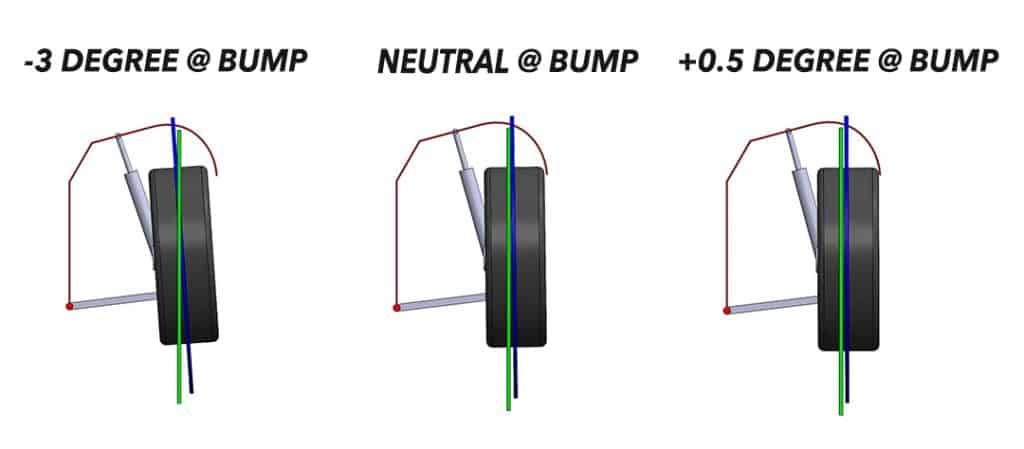
Camber Gain in Bump, Static Ride height, & Droop
In a MacPherson Strut-style front suspension (Mazda’s go-to setup), the camber gain is fairly minimal at typically less than 1 degree of negative camber gained in the first bit of suspension travel. As the suspension excessively compresses in bump, the camber gain is typically reduced or lost. This is called the camber gain curve and is described as a curve because it is dynamically changing as the suspension travels up and down.
Reviewing the above diagram there are three images showing the change in camber due to camber gain/loss. Watching the relation of the blue and green lines, you can see the chamber change depending on wheel/tire travel.
Middle Image: Shows static ride height at neutral/zero camber. This can be seen with the blue and green lines, they are parallel.
Left Image: Shows bump travel camber gain. The blue and green lines are intersecting at the top and have a larger gap at the bottom.
Right Image: Shows droop travel camber loss. The blue and green lines have a gap at the top and are intersecting at the bottom.
As you can see, camber is a very dynamic aspect of the suspension geometry that affects many aspects of the vehicle. Cornering, braking and accelerating are all directly affected by dynamic camber, but this all start with your static camber setup.
Let’s be real, static camber is how you fit those new wheels and tires you are so excited about; so let’s talk more about camber and its effect on fitting those wheels and tires. Static camber, as discussed above, sets your baseline camber for the dynamic camber to “build off of” through suspension travel.
Static Camber + Camber Gain = Wheel/Tire Clearance to Fender
Here you can see a diagram of wheel/tire clearance to the front fender when the suspension is in bump travel.
The more negative the static camber is, the more fender-to-tire clearance you have in bump travel.
Your chosen wheel and tire setup will also have an effect on this clearance due to the many different widths and offsets you can choose. Generally, the smaller the offset, the more the wheel will “poke” outward from the side of the vehicle. Wheel width and offset are the key aspects to fitting a wheel on a given setup. Typically your Mazda 3 is going to need a fairly conservative wheel and tire setup to fit without excessive negative camber.
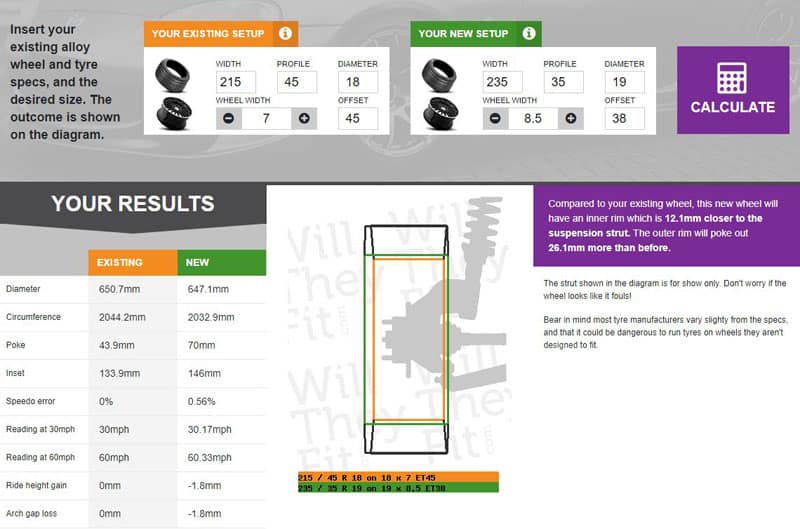
Instead of trying to explain all the details about wheel and tire fitment setup, I’ll point you to a fantastic website that allows you to input your existing wheel and tire setup and compare to your new setup. The website outputs a great visual diagram of the current and new setup with measurements you can reference. See: www.willtheyfit.com
Here is an example of our wheel and tire setup vs the OEM wheel and tire setup. This is currently on our 2021 Mazda 3 Turbo Hatch. It looks fantastic and performs great with our Turbo Lowering Springs and our Coilovers.
Lastly, camber is not the only suspension setting affected by lowering your car on springs or coilovers. Toe is the next critical suspension setting that needs to be corrected after camber is set in place. Toe also drastically affects how the vehicle drives and will quickly destroy tires if not setup correctly for the intended driving.
Most MacPherson struts do not have any camber adjustability from the OEM, so what do you do? Depending on the amount of drop from your lowering springs and your driving needs, you may need to purchase aftermarket camber plates to get your suspension dialed in or to prevent your meaty wheel and tire setup from rubbing!
So, the moral of the story. When lowering your car, make sure to get a proper alignment for the betterment of your vehicle’s performance and the longevity of your tires! Don’t go too crazy with camber; remember it’s a balancing of performance, durability, and fitment.
Thanks for tuning in, we hope this was a helpful blog about camber setup for your Mazda!
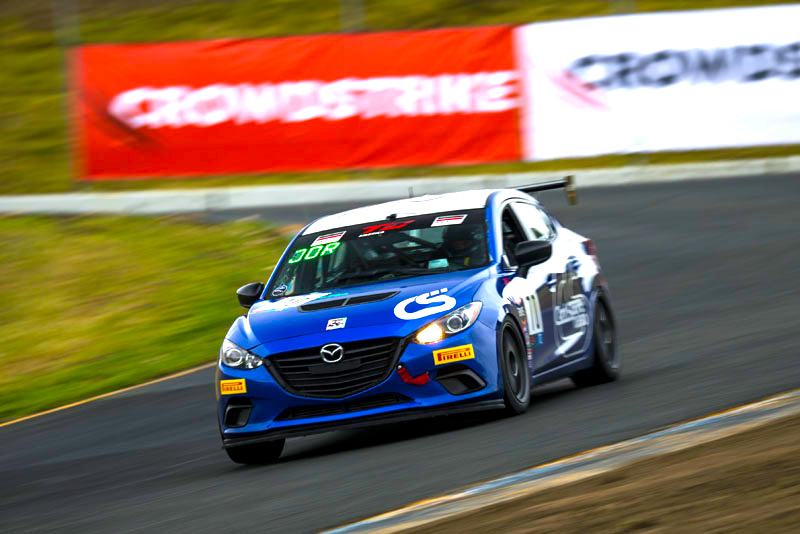
Racing is brutal! When pushing a vehicle to the razor’s edge, you tend to find the platform’s limitations rather quickly – then set out to overcome them! This is precisely where the CorkSport 3rd & 4th Upgrade Gears come in.
In the years of racing our Touring Car class Mazda 3, we found many pitfalls that have been easy to overcome. However, we found the gears’ limit with the 317whp/355wtq of the CorkSport Turbo Kit pumping through the manual transmission. Pair that with a limited-slip differential and wide sticky racing tires…well, it’s shocking the drivetrain has held up as well as it has.
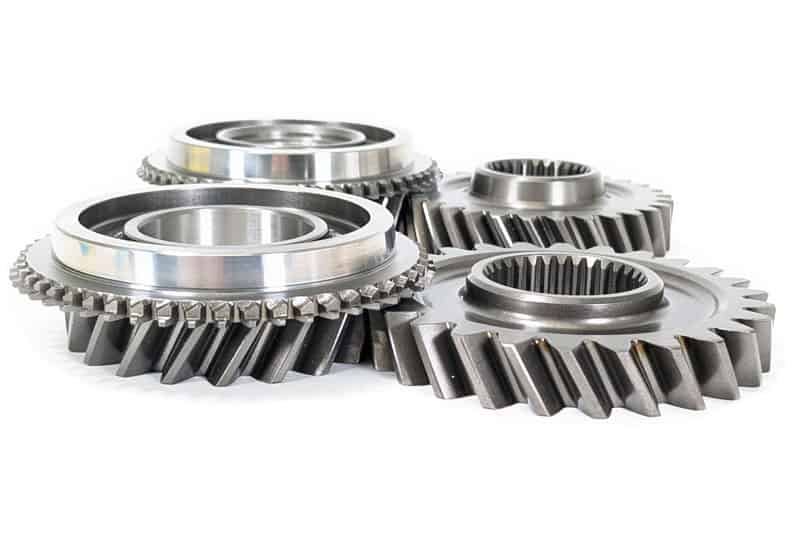
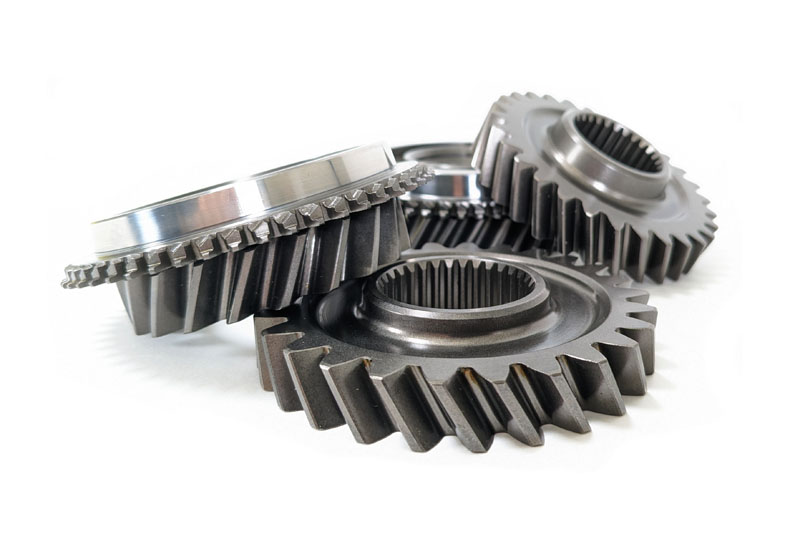
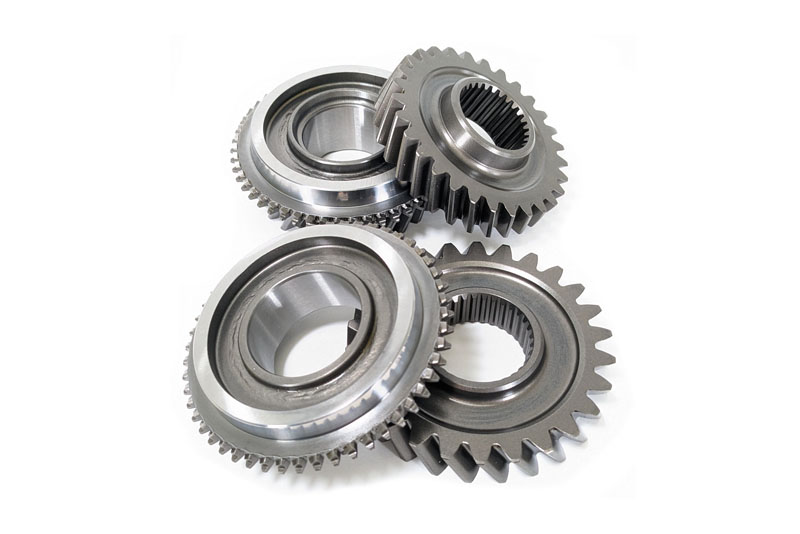
Destroying a transmission during a race weekend was not a viable path to success, so we developed our own race-quality CorkSport High Strength Gears to solve the problem. As you might imagine, this posed some significant challenges. For example, to retain the 6-speed setup, we had to stick with the same gear widths – which are very narrow.
To gain the strength and durability needed, we opted to use a higher strength material; SAE9310 steel, and to further increase the durability, the surfaces are shot peened. The shot peening process helps durability by reducing the chances for stress cracks to develop, increasing fatigue life and bending strength.
Since then, we have been running these gears in our TC Racing Car for a complete season to validate that there are, in fact, better than OEM. Racing is the ultimate test for performance parts, and we are happy to report the transmission has caught every shift!
So why might you need these upgrade gears? Do you have a turbo or supercharger kit on your manual Mazda 3 or Mazda 6? Do you like driving your car hard and even doing some structured racing events? If yes, these may be in your future, so you can push your Mazda to the limits without worrying.