Have you ever seen a timing kit with an integrated bottle opener? I didn’t think so! We here at CorkSport know that when replacing the timing chain or installing other modifications that require you to time your 2.3L DISI MZR engine, something cold and refreshing is a must-have. That’s why we chose to make the CS Timing Kit with a bottle opener so that it can be more than a tool that is just used for timing your motor.
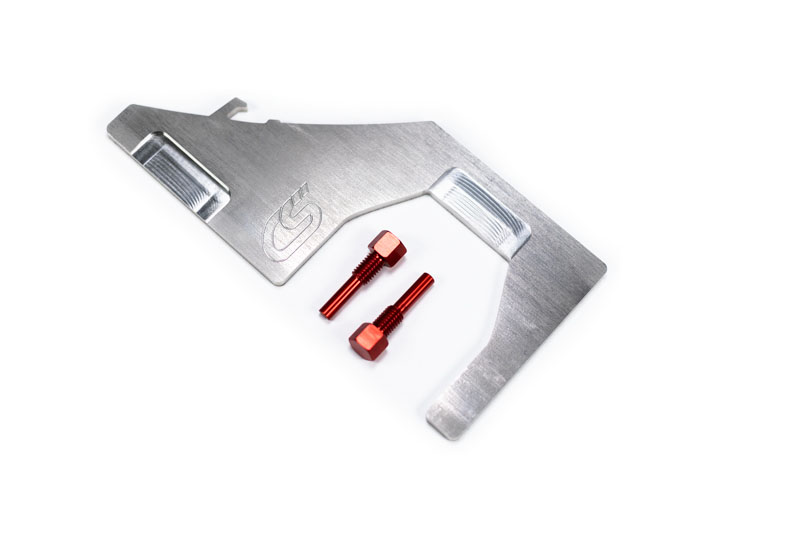
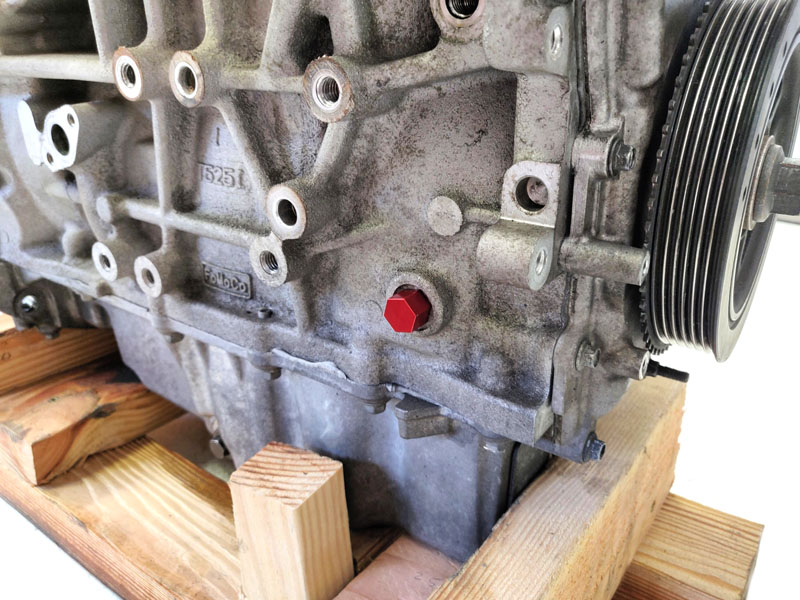
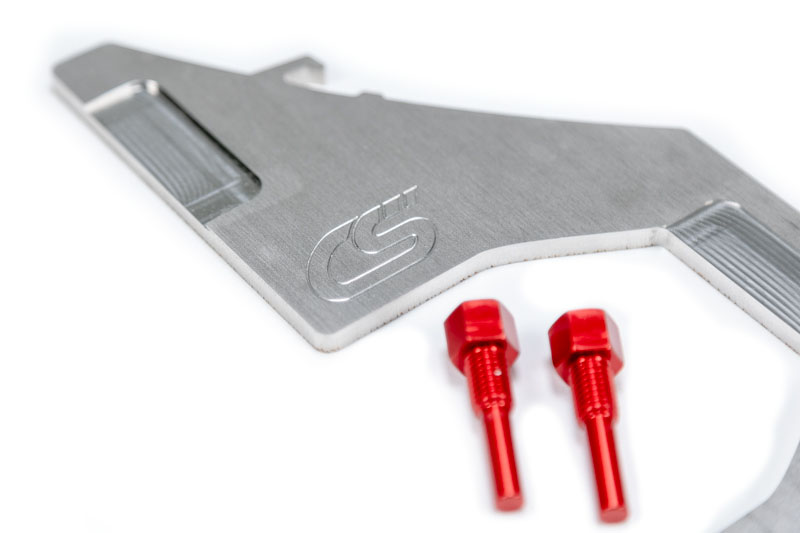
Included in the CorkSport Timing Kit, are two 6061-T6 aluminum crankshaft timing pins. The timing pin is used to set the number 1 piston to the Top Dead Center (TDC), which is a necessary step when timing the 2.3L DISI MZR engine – especially after replacing your refreshing Mazdaspeed 3 or Mazdaspeed 6 with a Mazda OEM VVT Kit!
We picked aluminum over Stainless Steel in this case because if the pin is accidentally left in after the motor has been timed and the motor is turned over, the aluminum pin will give way instead of damaging the motor which could happen if a steel pin is used. This is also why we decided to include an additional timing pin, so you’ll have a backup if needed.
Finally, we chose to anodize the timing pin in a bright red, so that is easily visible when installed in the motor so it doesn’t get left in by accident.
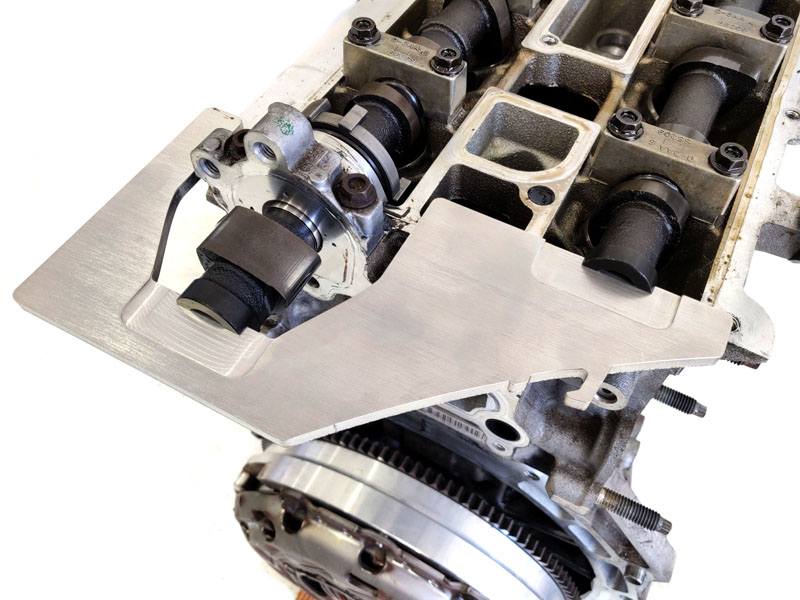
Also included in the CS Timing Kit is the cam alignment plate which is made out of 1/4″ 304 Stainless Steel to provide a long-lasting finish as well as the durability needed to ensure the pockets in the alignment plate stay at the proper specifications.
The cam alignment plate features precision machined pockets that are used to align the cams ensuring a tight and accurate fit. The purpose behind using a camshaft alignment plate during the timing process is that it is used to locate the intake and exhaust camshafts so that they are properly synced with one another.
After the cams have been properly aligned with the timing plate, the camshaft gears that connect the timing chain to the cams can now be tightened using the wrench flats built into the cams to hold them in place while you torque down the cam gear bolts.
Even though similar timing tools have been out for a while, the main goal behind the CS Timing Kit was to provide anyone with a 2.3L DISI MZR engine, a single place where you can get both the Mazda OEM Timing Chain Kit and the tools necessary for the job. We hope that the CS Timing Kit helps gets your 2.3L Mazdaspeed back up and going in no time.
Many community members are asking, “What clutch should I buy for my Speed3/Speed6?” or “What’s the best clutch for Mazdaspeed 3/6?” and there isn’t a perfect answer because the right answer depends on your goals with your car.
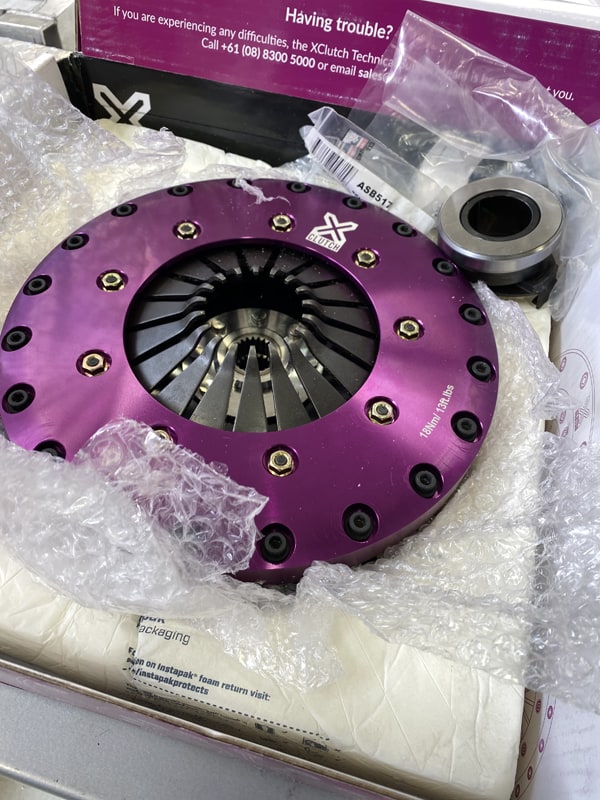
While I can’t say what the best clutch is, I can share my experience to date with my Twin Ceramic Rigid Disc X-Clutch in my Mazdaspeed 3.
First Impressions
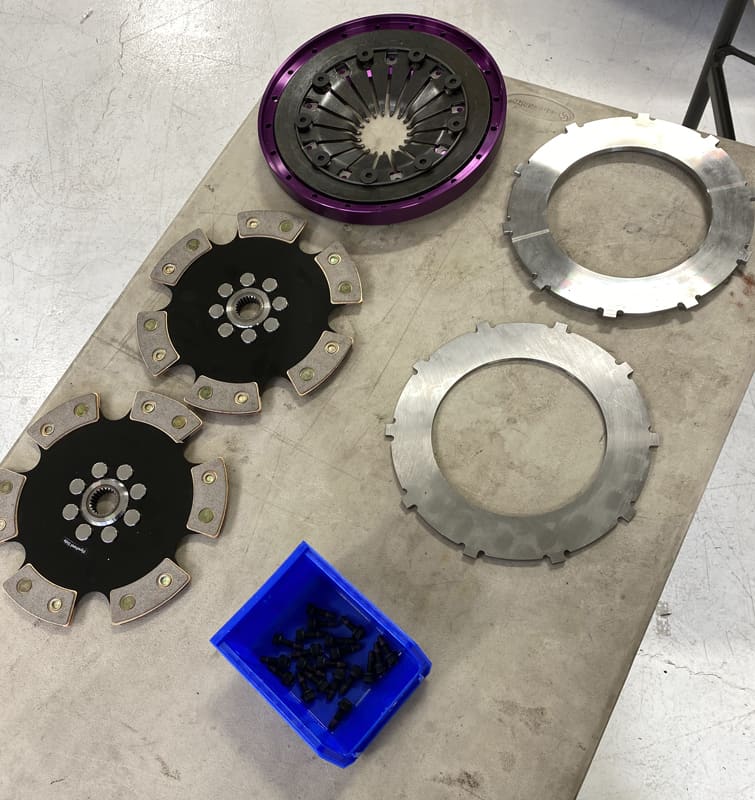
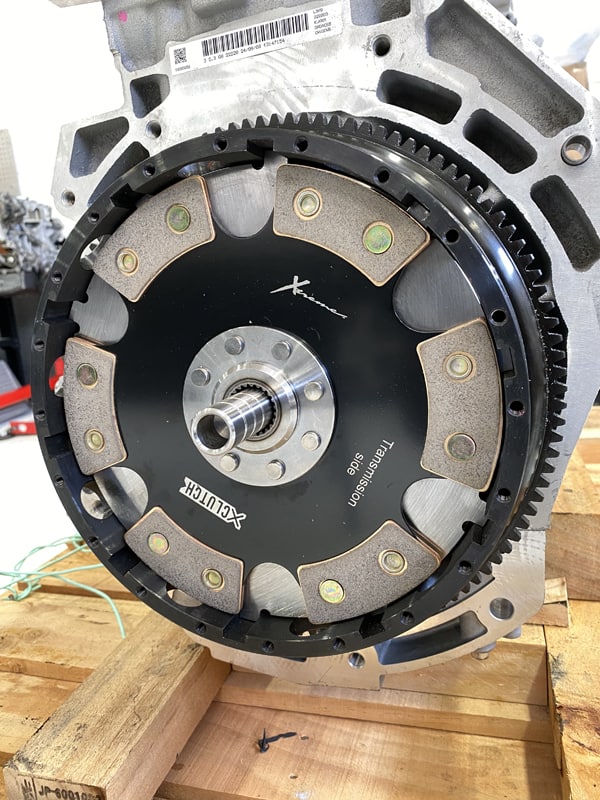
Opening the box I found a very well-packaged assembled clutch kit. This included the assembled pressure plate, discs, and flywheel along with a new throw-out bearing, flywheel to crank bolts, and a nice alignment tool. XClutch also included some generic instructions – They certainly don’t rival CorkSport instructions, but are better than most clutch instructions I have used.
Getting into it
After disassembling the clutch assembly, I found some nicely constructed components. The material fit and finish was great along with the identification of transmission vs engine side of the discus laser engraved was a nice touch.
Something worth noting: Some clutch kits come to you in separate pieces. This makes you 100% dependent on their instructions for the assembly process (and a lot of times those instructions are lacking), but with the XClutch the whole thing came assembled. I like this because it gave me the chance to see how it was assembled and therefore made me more confident I would assemble it correctly on the engine.
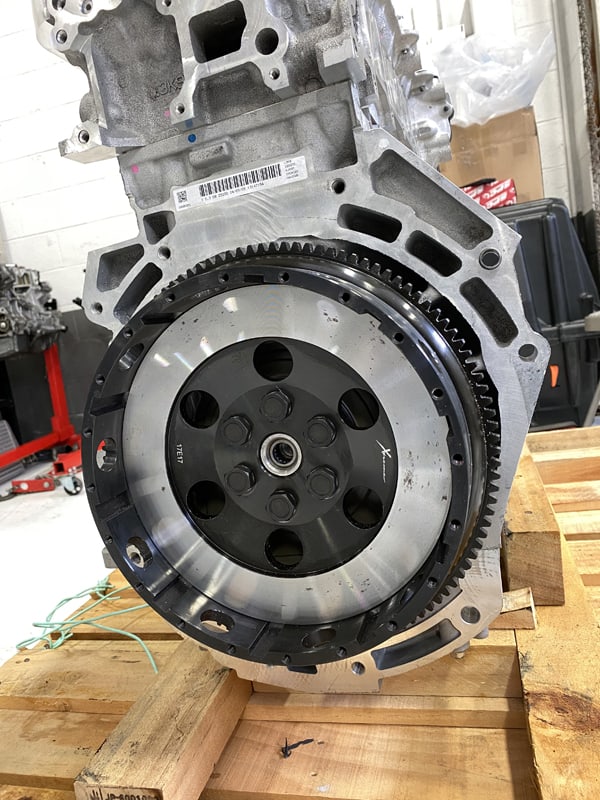
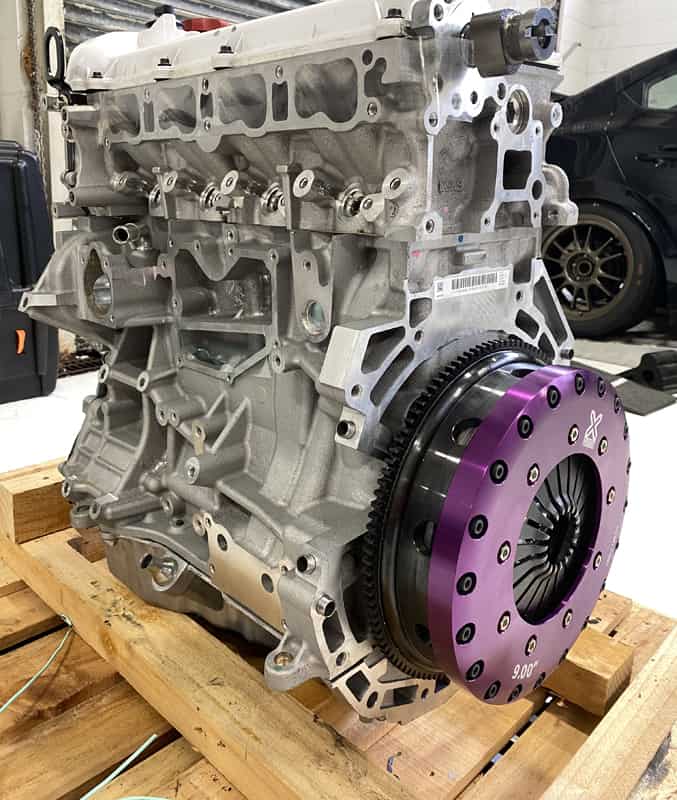
Now let’s get the clutch on the engine. After disassembling the clutch kit, the first part to go on the engine is the flywheel after a quick cleaning of the machine parts and surfaces. Using the provided hardware and some lock-tight the flywheel gets torqued down. The flywheel was a perfect fit on the snout of the crank…a little persuasion was needed which tells me the flywheel will be perfectly centered.
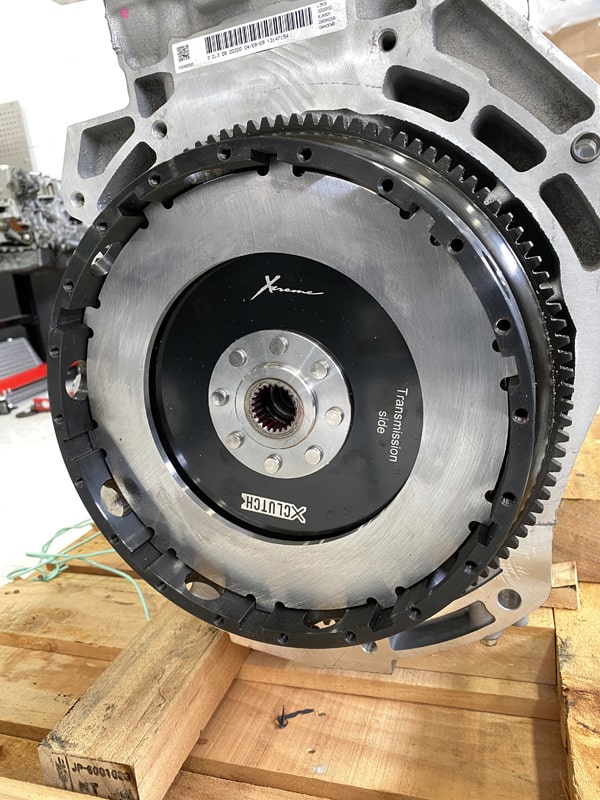
Next is the first clutch disc (make sure you can read “transmission side”) then the middle floater plate. Following that is the next clutch disc (and again make sure you can read “transmission side”) along with the provided alignment tool.
The Tool
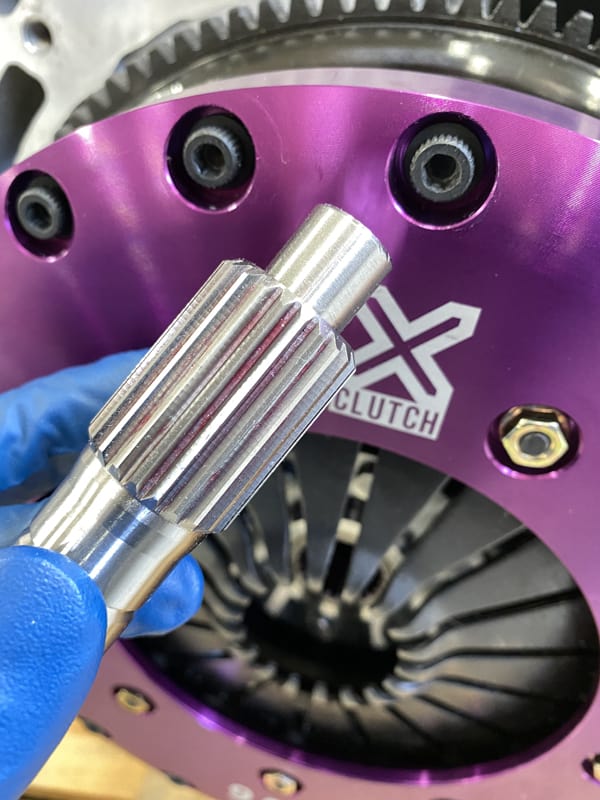
So I want to take a minute to talk about the alignment tool. I’ve installed many clutches in many vehicles throughout my life ranging from an OE replacement in my 92’ Mazda b2600i, Mazdaspeed3, and a twin-disc in a Dodge. Every single kit came with the generic plastic alignment tool that doesn’t fit great and flexes.
But not X-Clutch, their kit included a very nice billet steel alignment tool that fit snugs and did not sag or move when installed. This seemingly simple tool made a huge difference in the whole installation process.
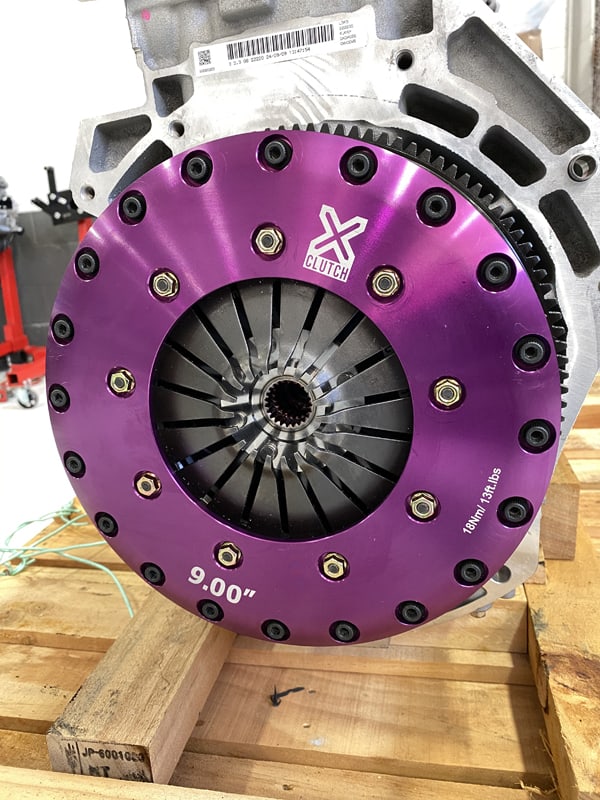
Back to the install steps; next up is the pressure plate floater plate. Typically this is part of the pressure plate assembly, but with the Xclutch design, this is separate.
Last is the pressure plate itself, which applies force to the clutch discs. The installation of this is slow and tedious, but important to follow. The hardware must be installed and torqued down evenly around the perimeter, much like torquing a wheel but with a lot more lug nuts.
X-Clutch has clear instructions on this so don’t worry.
Bringing it back together
So your clutch is all buttoned up and now it’s time to attach the transmission to the engine. I’ll admit this was a task I was dreading…many times, I’ve fought this process because the damn input shaft in the transmission just would not line up with the clutch disc and crank, but I was pleasantly surprised.
I don’t know if it was luck or if the alignment toll was really that perfect, but in one try the transmission slid right onto the clutch and aligned perfectly. It was honestly shocking. I can only hope your installation goes as smoothly.
Now the review you have been wanting…
First impressions are great. The peddle pressure is very similar to OEM, maybe just a hair stiffer, but is nearly identical so if you’re worried about a stiff pedal DON’T, it’s cake. The engagement point is around the middle right now, but I expect it to move up in the pedal stroke slightly as it breaks in further. I like this, but this is a preference thing.
Engagement control is interesting. Going from an ACT 6-puck ceramic to this is very similar in the “grabbiness” of the clutch since they are both ceramic puck discs, but the X-Clutch I would say is a bit more aggressive. This makes sense with the rigid disc design and the very high torque capacity…1,350 ft/lbs!
So here’s my suggestion and you can check them out here. Learn More!
Conclusion
If you want a OE replacement with a bit more headroom for power then the Street single disc organic is going to be your closest bet. If you want good street manners but have more power to hold then the Street Plus twin disc organic is going to be your best balance. Lastly, if you are pursuing motorsports and high heat capacity then the Race twin disc ceramic will be your go-to clutch kit.
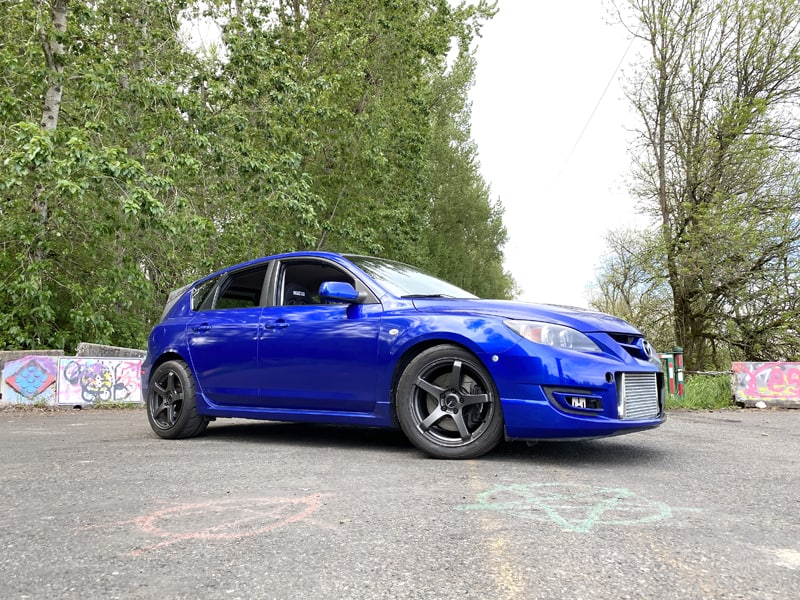
Hey everyone, this is Daniel, one of the engineers at CS. In case you don’t know me (I’m quiet on socials, but I’m working on that!) I’ve been with CorkSport since the middle of 2017, so I’ve probably had my hands on any product released in the last five years. For example, the exhaust manifold for the Mazdaspeeds was my baby for a while, and I’m still super proud of how it turned out. In this blog, I’ll be going through my Speed 6 build. It has been a long time coming, but it is finally getting close to how I want it!
Daniel’s Mazdaspeed 6 at HIN
I got my MS6 back in January of 2018. It was a bone stock 2007 Sport with ~68k miles, but I got a decent deal due to some scratches/dings from the previous owner’s kids. I was familiar with the Speed6 because a high school buddy bought one shortly after we graduated, so I had been looking off and on since I started at CS. Since we didn’t have one in the fleet at CS then, and I wanted the AWD, it was an excellent fit for me. In typical speed fashion, I got a check engine light on the ~2-hour drive home from where I bought it! Clearing the CEL would require an EGR cleaning before I could register it, but I was still in love, despite the stock wheels & monster truck ride height.
Daniel’s Mazdaspeed 6 Before Modifications
From humble beginnings, the modifications started slowly. The first six months were the “basics”; HPFP internals, downpipe, exhaust, lowering springs, upgraded TMIC, and plasti-dipped stock wheels. I was still surviving on the stock intake and using the OTS tunes on the Cobb Accessport – standard new Mazdaspeed owner things. I completed a VVT replacement at around 70K miles as the chain started hitting the valve cover, but then things started getting interesting.
Black Mazdaspeed 6
Just before the 1-year of ownership, my stock K04 turbo began smoking as expected. Being the only Mazdaspeed 6 at CS meant my car was in the shop off and on for R&D, so I took advantage of one of the early exhaust manifold test fits to throw in a CST4 Mazdaspeed Turbo (still known as the “CS 18G turbo” back then), a 3.5” intake (with a custom & very early prototype of the Mazdaspeed 51R battery box), a few other supporting mods, and some special sauce from Erik @ Dramatuned. So just before my car’sbirthday, it was FBO minus manifolds. Somewhere in there, I was also the guinea pig for the CorkSport 330mm Big Brake Kit on the MS6 (still one of my favorite mods to date) and some wheel spacers to clear.
Image: CorkSport-MS6-BBK
2019 was a bunch more R&D for the Mazdaspeed 6 platform. I spent a few months driving around without a front bumper during the MS6 Front Mount Intercooler development! Then came some even more fun stuff. I was able to snag some early production run intake manifold and exhaust manifold along with an EWG setup (Exhaust Manifold, Tial, and Dumptube). Finally, I was “full bolt-on” and completed tuning. While its v-dyno was a little overestimated, here’s an idea of power to expect for a similar setup on pump gas (red line) and on a couple of E mixes (the blue line was E30, green was E25). Ethanol is worth it!
After having gone through most of the CorkSport catalog for power mods, I began to do a few aesthetic mods, which is where the “SPDBOAT” plate came in, a simple play on Mazdaspeed and how heavy and “boaty” the cars can feel at times. It’s dumb, but I love it! Also came some miscellaneous mods. An upgraded rear sway bar, diff mount, as well as the transfer case, and rebuild with billet bearing caps all were added.
Daniel’s Mazdaspeed 6 SPDBOAT at the Lake
By birthday number two, a long-awaited wheel setup was introduced. Initially, I ordered a set of Gram Lights that would’ve fit without too much effort. However, after many issues and shipping delays, I canceled that order and went something much more aggressive. I settled on 18×9.5 Enkei GTC01RR wheels on a 255/40 tire. I was going for meaty with this setup, and it looks great. After a fender roll all around, camber, and spacers in the front to clear brakes, final offsets are +35 front, +42 rear with ~2.5 degrees of negative camber. There’s only so much wheel and tire you can fit without more intense modifications, but the handling boost was amazing!
Enkei GTC01RR Rims for the Mazdaspeed 6
I ran the car on this setup for another year. This configuration was a great “all-rounder,” and I loved it. Not perfect at any specific thing, but a great daily that’s fun in the corners, decent enough to go to a show, and with enough power to do well on the occasional trip to “Mexico.” But then, it started consuming oil. Just after my third year with the car (early 2021 for those keeping track), I found cylinder four down about 40psi of compression and cylinder 1 with about 20% leak down. Still working fine, but eating about of quart of oil every ~600 miles meant it was time for a rebuild.
Mazdaspeed 6 at Mazda Takeover
While I hate to leave on a cliffhanger, that’s the end of part 1. Stay tuned for part 2, where things get spicy, including a built motor, a bigger turbo, and a broken bone…?
I hope you enjoyed my tale, and please let me know if you have any questions. By now, I know more than I need to about the MazdaSpeed 6!
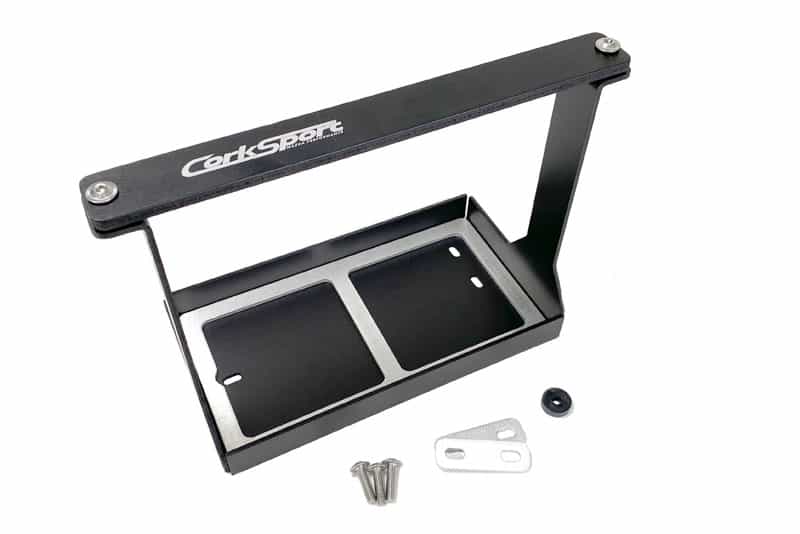
Today we are proud to introduce the CorkSport 51R Battery Tray for 2006-2007 Mazdaspeed 6! This products adds some much needed room for larger intakes by switching to a much narrower “51R” sized battery. We sized the CS battery tray to fit our 4” intake with no problems or modifications to your car. It’s a 30 minute install which opens up your engine bay for further mods and even makes later installs and maintenance easier. Read on for full details and check out the Mazdaspeed 6 51R Battery Tray in our shop to purchase.
Today is a huge day for the Speed community; one that has been coming for a long time with both celebration and frustration. Never the less time is up and this project is ready for the community as a whole!
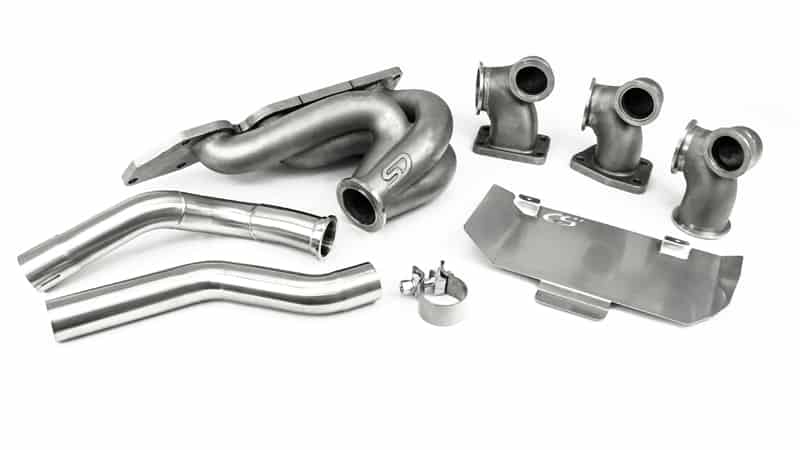
We are proud to announce the Performance Exhaust Manifold for the Mazdaspeed 3 & 6! With over 2 years in development, the MPS exhaust manifold has been long waiting, but for good reason. A project of this scale does not happen overnight; many variables have to be considered, evaluated, and verified.
I’m confident you have seen “leaked” images from our 6 Alpha and Beta testers over the recent month, but we can make it official.
CorkSport
Stay Up-to-date with CorkSport
But with so many options currently available what makes the CorkSport option compelling? Why should you care?
Those are great questions and can easily be answered with multiple great reasons. The most obvious is the design: this includes the overall shape and the type of material & manufacturing.
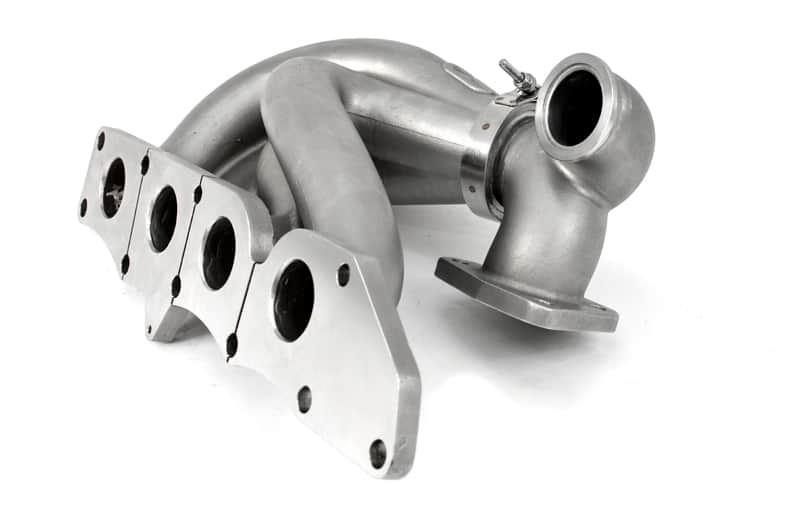
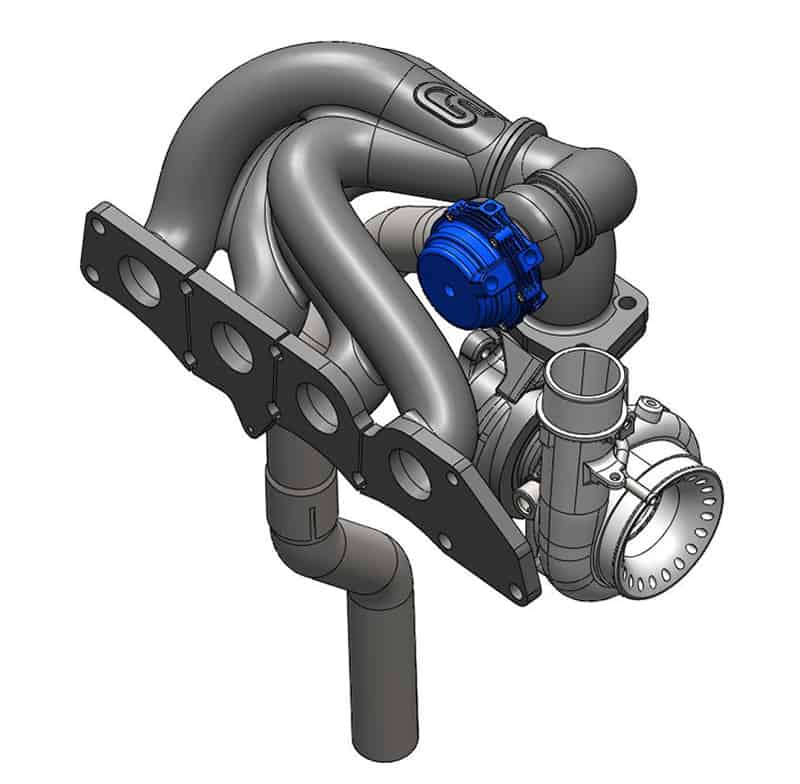
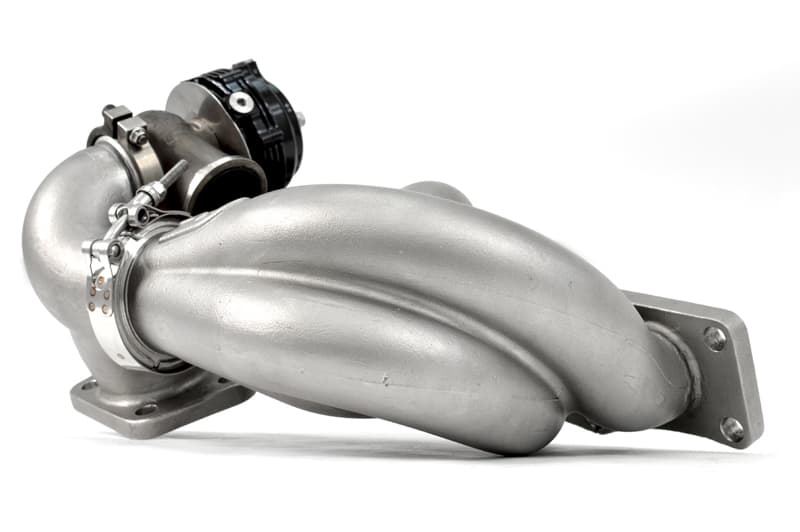
Mazdaspeed Exhaust Manifold
Material & Manufacturing: In our initial investigation and vetting of this project we strongly considered two primary manufacturing methods; Casting and Tubular fabrication (check out the blog here). In a nutshell, we opted for a cast manufacturing method because it reduced the chance of failure modes, reduced the overall size and weight, and gave us more flexibility in design.
Like most exhaust manifolds, we opted to use 304 stainless steel because it is corrosion-resistant, handles heat well, and is a common and cost-effective material.
Check out our other Blogs
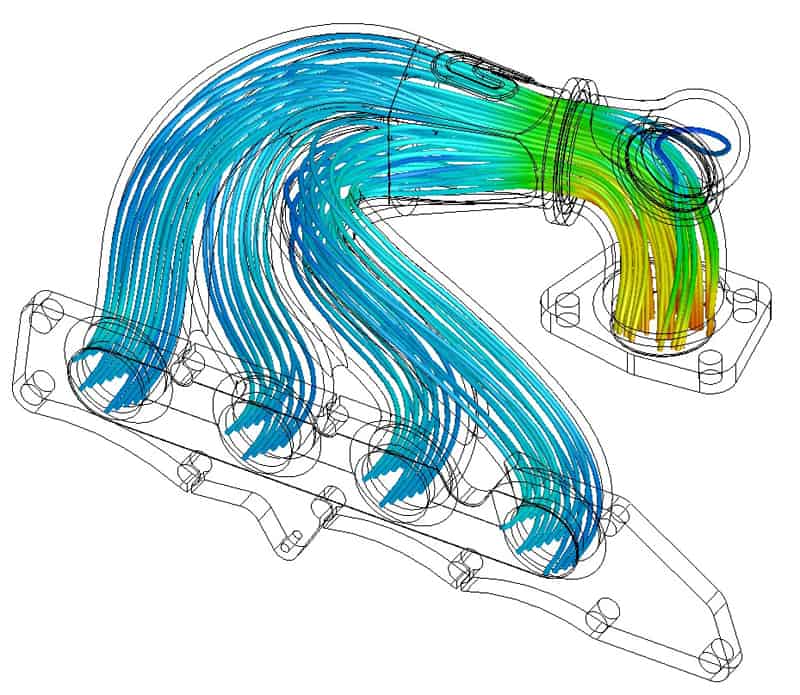
Following up is the Design of The Exhaust Manifold
The list of details that went into the design is far too long to list here, but we can cover the major items that define the CS Exhaust Mani. With investment casting, we had a lot more flexibility in design with the bend radius, diameters, and wall thickness of the individual runners. This allowed us to increase the inner diameter of the runners to 1.59 inches, achieve a 0.200-inch wall thickness, and fine-tune the path and bends of each runner to optimize runner length and flow.
Check out our other Blogs
With that flexibility in design, we were able to increase peak flow and improve flow balance per runner. Overall we were able to increase peak flow 45% over the OEM manifold and 33% over the XS Power V3.
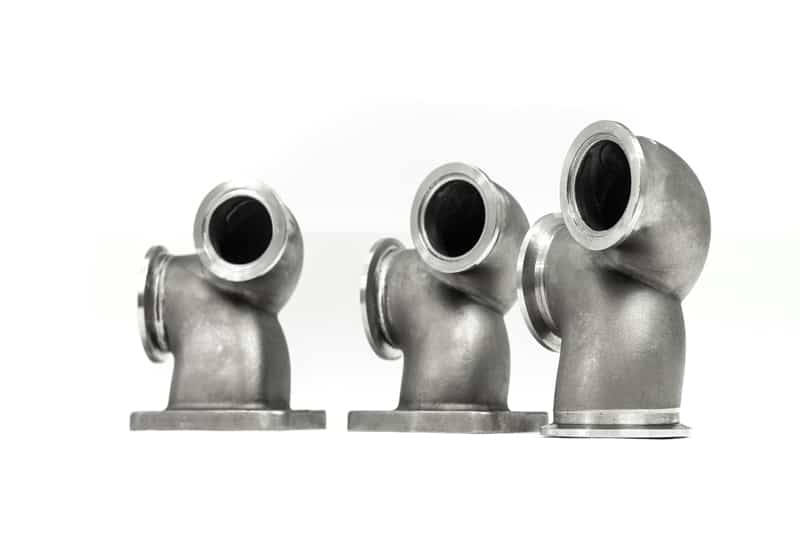
Next up in design, and arguably the most exciting and unique aspect, is the modular flange system.
Mazdaspeed Exhaust Manifold
This is unlike any other manifold available for the Mazdaspeed today…you can choose your flange between OEM Stock Flange, Precision V-Band, or T3. Sure all these options are available today from other options, but none are modular. Say you pull the trigger on the OE Stock Flange today, but a year from now you want to upgrade your build to a Precision V-band flange. With any other manifold, you would have to buy another $900+ manifold to get the new flange, but with the CorkSport Exhaust Manifold, you just have to get the new flange elbow for your setup. This is MUCH MUCH cheaper and easier to change!
CorkSport
Speaking of install, compared to the typical performance exhaust manifold the CS design is cake to install. With the modular design, you are not fighting the entire bulk for the manifold and flange at the same time. You can leave you turbocharger unmoved connected to the downpipe and intake system, you just install the flange elbow after the manifold is in and bolted to the engine.
Mazdaspeed Exhaust Manifold
Making life even easier…we opted to develop a pre-fabbed dump tube (screamer pipe) for the Tial 44mm EWG. This is an optional feature for the kit, but one we highly suggest because it’s just so damned easy. Designed for MPS 3 and MPS 6, it fits around most standard downpipes and dumps below the sub-frame right behind the drive axle. Also included with each kit is a SS heat shield that is required for the GEN1 and GEN2 Mazdaspeed 3. You Mazdaspeed 6 guys just get a cool garage ornament.
So how does the CS exhaust manifold stack up on power?
Check out our other Blogs
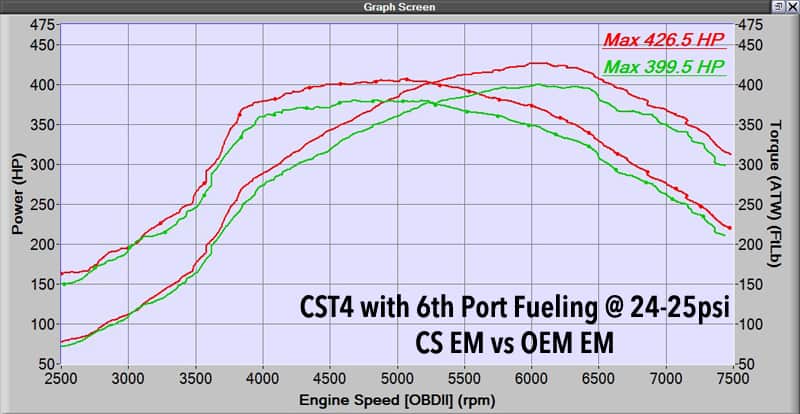
First up is a fully bolted CST4 MS3 with a 6th port fuel system: Comparing the CS EM to the OEM EM, this drop-in test we found that the turbo was spooling faster, carried more mid and upper range power and held that gain through to redline. Overall it improved power under that curve which is what truly makes a car fast and fun to drive.
Check out our other Blogs
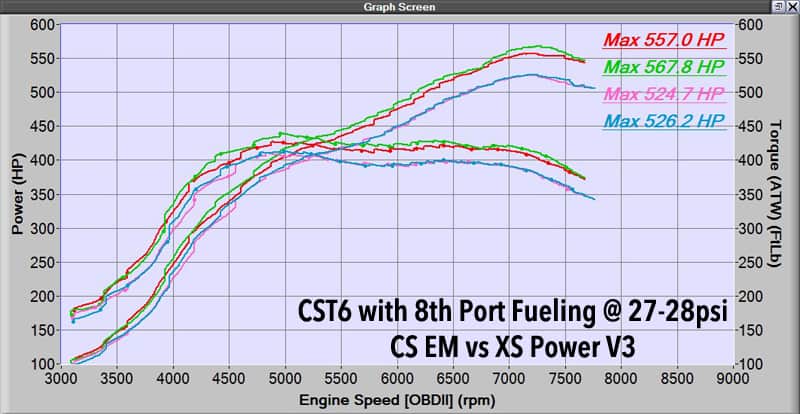
Next up is a fully bolted and built CST6 MS3 with 8th port fuel system: Just like the previous graph, we saw an improvement in spool, mid and upper rpm ranges, and carried it to redline. The difference here is the exhaust manifold we are comparing. This is showing the difference between the CS EM and the XS Power V3.
With that being said, the CorkSport Exhaust Mani has been proven to 685whp on this same car and with the Mazdaspeed CST6 Turbo. We are confident the CS exhaust manifold has far more capacity to support; if we have anything to do with that we will prove it.
Mazdaspeed Exhaust Manifold
Lastly is sound…we’ve been asked a lot about the sound. How will it affect the sound? Will it sound like a Honda now? Will it be louder?
We knew the sound was critical because let’s be honest…we are all car guys/gals and Mazdaspeed has a great unique sound to it. We did not want to lose that so we did our best to hit performance goals without sacrificing the Mazdaspeed grumble.
One of our Beta testers put together a great video comparing the sound of OEM vs CorkSport. The car is a GEN1 MS3 with a built engine, full bolt-ons, CST4 Turbo, and Cobb Exhaust system. Check out this video link for sound!
In our design, we kept a varied length runner design to help maintain the Mazdaspeed grumble. We believe we succeeded in keeping that classic grumble, but also refined the sound a bit. We like to describe it as exotic. Either way, the grumble lives on, and honestly, none of our beta testers can stop grinning ear to ear with every WOT pull.
With that being said act fast! We know these are going to fly off the shelf and we are going to do our damn very best to keep them in stock for everyone, but don’t wait!