CorkSport Mazdaspeed 6 Front Mount Intercooler

The MS6 FMIC installation gives you a stealth install with minor trimming and allows you to keep the windshield washer bottle.

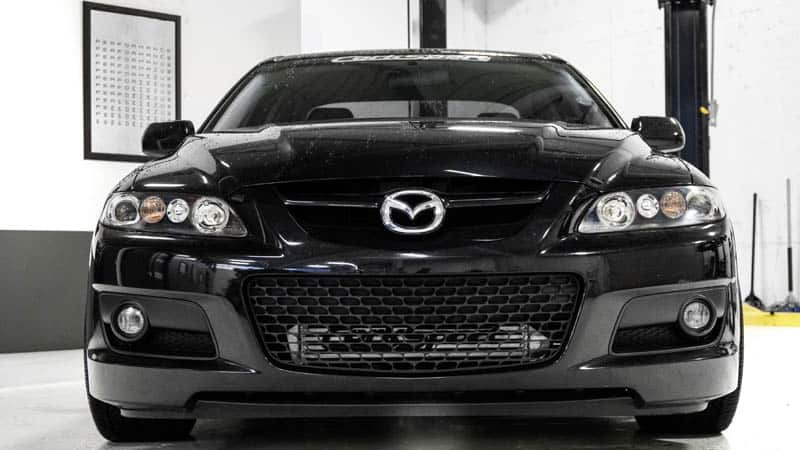
It’s been a long time coming but it has finally returned: the CorkSport Front Mount Intercooler Kit for Mazdaspeed 6! We’ve had many challenges on this project but we’re happy to report that it’s finally here and better than ever. We originally released this way back in 2012 (check out the release blog HERE for a throwback) but the only thing we kept from that kit was the intercooler core itself. All of the piping, silicone, and mounting has been redesigned for best fitment and minimizing trimming needed for install. Check out the images and full info below!

Superior to the factory Mazdaspeed 6 TMIC, the CorkSport FMIC gives you consistent cooling all the time without heat soak

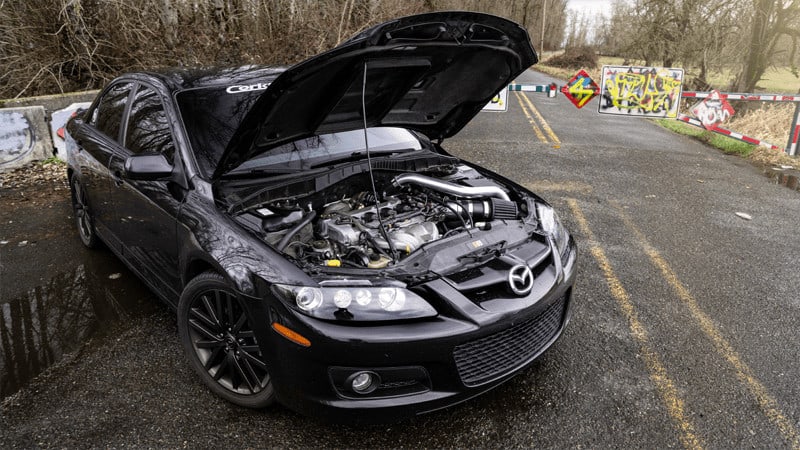
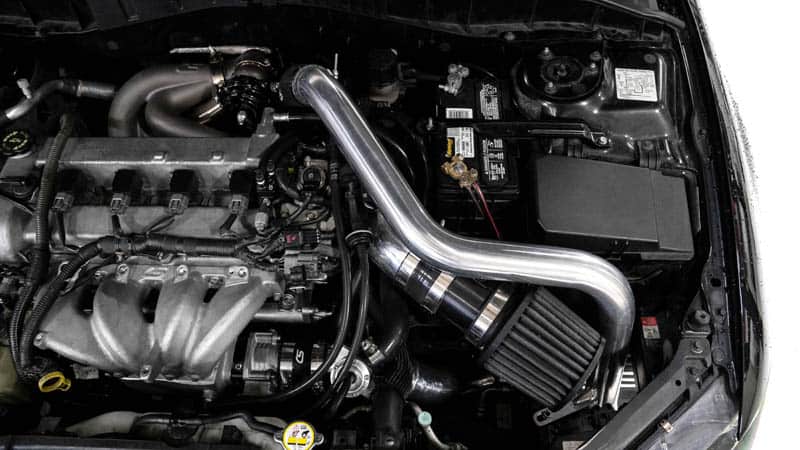
To start things off, let’s look into the intercooler itself. It is a unique design where both the inlet and outlet point toward the driver’s side of the vehicle. This means our pipe routing is a little more complicated than most, but it makes it much easier to fit as you do not need to relocate your windshield washer bottle or deal with any of the fitment issues that come with squeezing a pipe through the passenger side of the car.

Stay Up-to-date with CorkSport   


The bolt in Mazdaspeed 6 FMIC kit which makes it the best intercooler kit available.

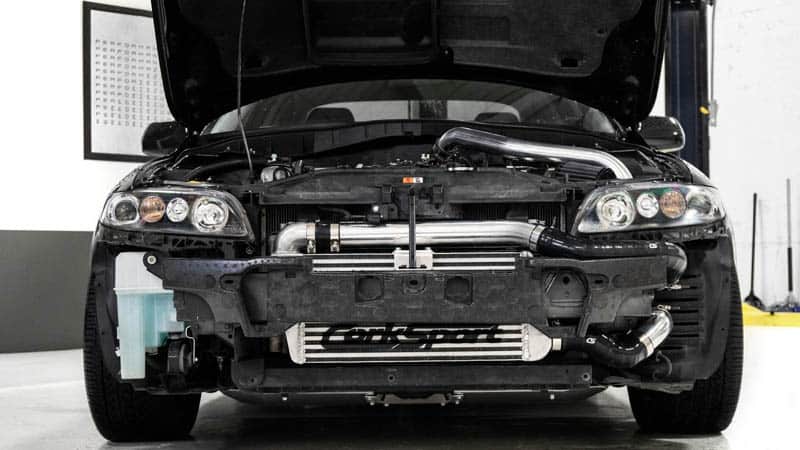
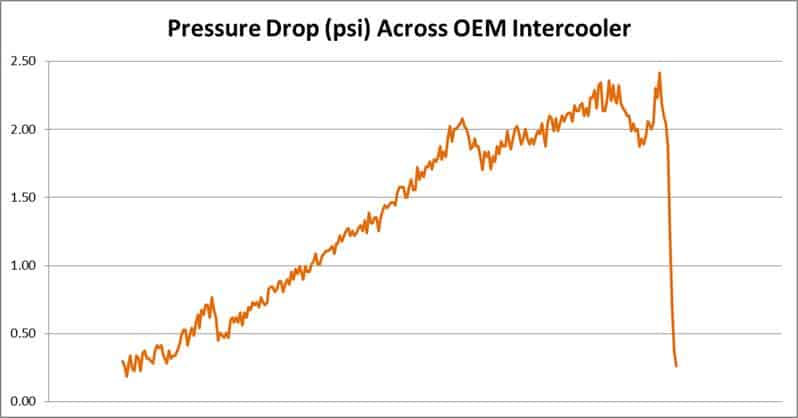
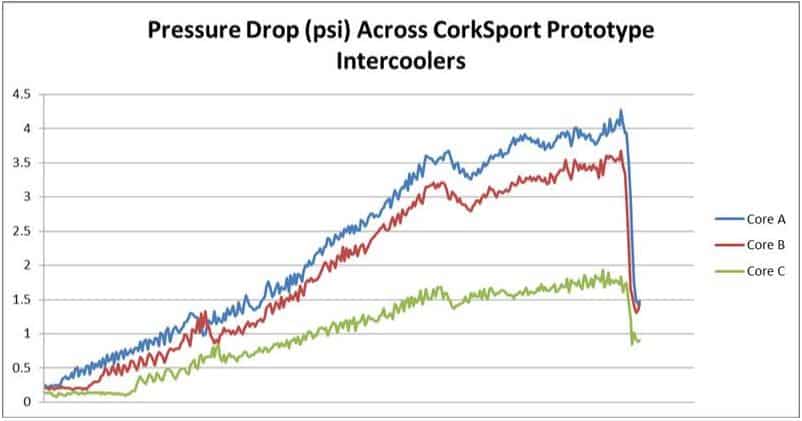
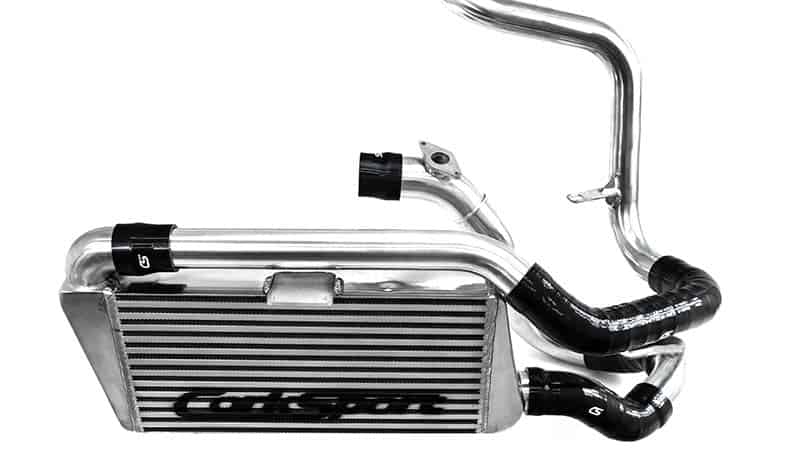
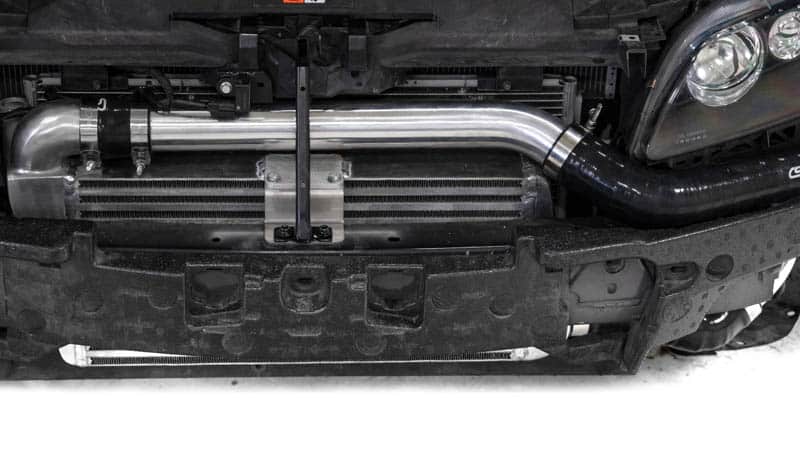
The intercooler core is a high flowing, bar and plate design that measures 21”x10”x3”. This is good for efficient flow up to 500-550WHP yet adds minimal boost lag, even at lower power/boost levels. This big core fits snugly behind the crashbar to eliminate trimming the crashbar or your underbody shields. There is still some trimming required to fit the core and piping, however almost all of it is trimming on plastic components, with one metal cut on a thin sheet metal bracket.

Mazdaspeed 6 FMIC fits up to a 4 inch SRI

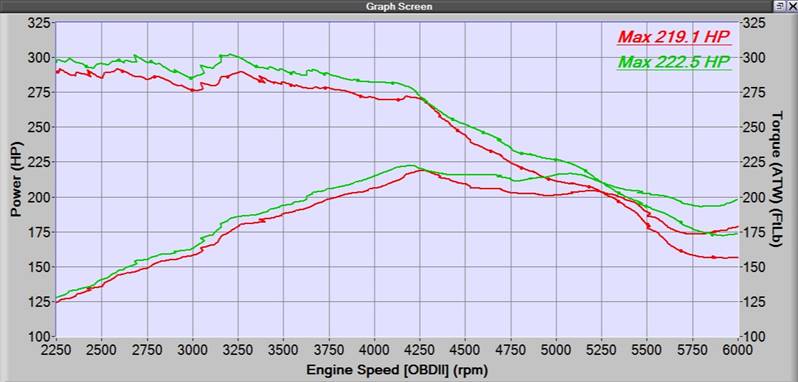
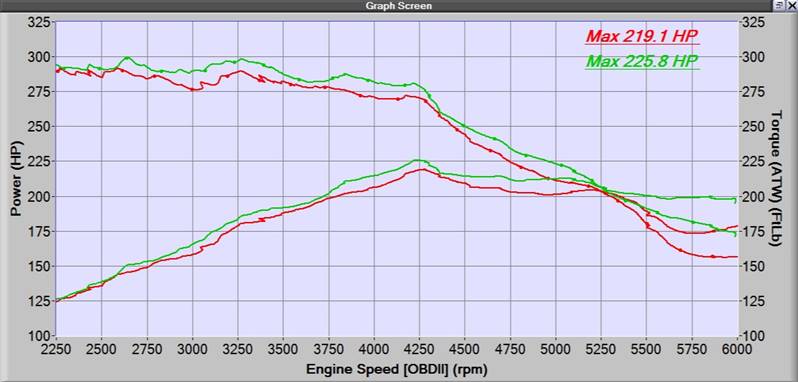
Moving onto the piping, the CS intercooler kit uses varied piping sizes for the hot and cold side intercooler pipes. The 2.25” hot side pipe ensures the charge air reaches the intercooler as fast as possible, helping reduce boost lag. The cold side uses 2.5” piping in the first half and 3” piping in the second half. Having this large volume of cool charge air directly in front of the throttle body helps with throttle response and the large diameter further helps with peak flow capacity. This piping setup has proven itself to work great on our GEN2 MS3 FMIC kit, and has been pushed to 684WHP on Barett’s GEN1 (he modified the GEN2 piping to fit his GEN1).

Wire reinforces silicone hoses make the Speed 6 FMIC a quality product

There was painstaking care taken to ensure the kit is as easy as possible to fit on your MS6. The hot pipe has a lot more freedom for intake fitments than our previous kit and we made sure all the CS intakes fit like a glove. Other aftermarket intakes have not been test fit but check out the images, they will give you a good idea if your SRI will fit or not. All the piping is mandrel bent and comes in a polished finish, so it is ready to install right out of the box and look and perform great!

Mazdaspeed 6 FMIC kit

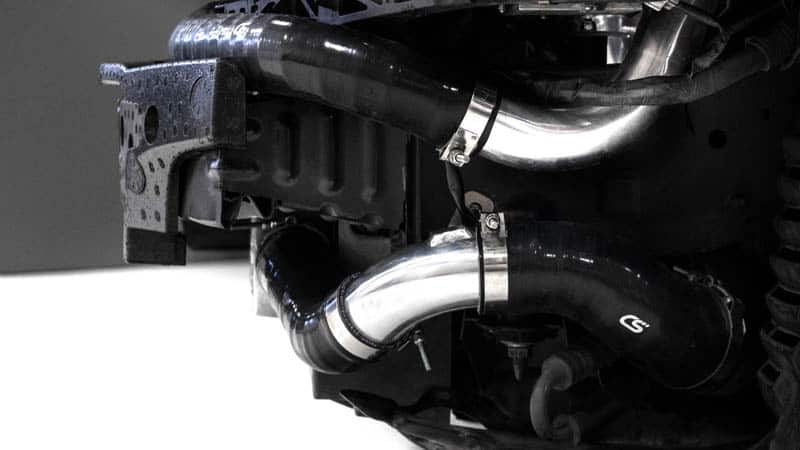
Keeping everything together is the custom designed silicone couplers. You may notice that some of the silicone sections are longer than a typical silicone coupler. This is to ensure the best fitment as some shapes can simply not be made easily in a piece of pipe.

Front Mazdaspeed 6 with Front mount intercooler CorkSport product

As with most CS silicone components, each coupler uses 4-plys of nylon reinforcement braiding and 5 layers of silicone. This is typically very good at resisting expansion under high levels of boost; however, we wanted to really make sure the long couplers of the MS6 kit do not expand. Any coupler longer than about 6” uses an extra layer reinforcement made of metal wire. This further resists expansion under boost, and even helps keep all the piping stable between mounting locations. While the outside of the coupler may look bumpy, the insides are still very smooth like a typical piece of silicone.

A complete FMIC for the speed6, everything you need to install is included except the tools

Each Mazdaspeed 6 intercooler kit comes with everything you need for install. Stainless steel T-bolt clamps are included for each connection to ensure secure, leak free joints. The intercooler mounting bracket, hardware, and full color install instructions are also included so you know you can get the job done right.

The MS6 FMIC installation gives you a stealth install with minor trimming and allows you to keep the windshield washer bottle.

We’re happy to finally have this out and are excited to see you all get your hands on them. Be sure to drop any questions you may have below and check out the product listing for more images!

Connect with us

You may also like

Stay up-to-date on the latest news and product updates from CorkSport.

* indicates required

SkyActiv-G 2.5T Intercooler & Piping Testing

The CorkSport Intercooler and Piping upgrade kits for the Mazda SkyActiv-G 2.5T are inching closer to release and it’s time to share more of the R&D that goes into making these kits perform the best. We went through extensive testing to determine which intercooler was the best fit and to validate that our changes were worthwhile. If you missed any of the previous blogs on these kits be sure to check them out: OEM IC & Piping Breakdown, CS Piping Upgrade Design, and CS Intercooler Design.

AEM CD-5 Digital Dash on Mazda 6

AEM CD-5 Digital Dash

Testing Preparation

To start, we got some new toys from AEM Electronics. The main brain of the entire testing operation for the intercooler is an AEM CD-5L digital dash with logging. This dash allows us to tap into the vehicle’s ECU to see the same information that the OEM sensors are reading. To go along with the CD-5L, we got new AEM sensors that can be positioned to get the data that we need to see how our intercoolers perform.

We used the CD-5 to datalog our dyno runs so we can see what the car is doing while simultaneously seeing power levels from the dyno. To get the data we need, we tapped into the OEM intercooler and 3 intercooler core designs that we created to get pressure and temperature data before and after the intercooler core. In case you were wondering, drilling into a brand new intercooler is stressful!

Mazda 6 on Dyno
SkyActiv-G 2.5T Intercooler Testing

Once we got everything wired up and the AEM properly set up, we were ready for testing to begin. There were multiple rounds of testing, each consisting of a string of dyno pulls back-to-back to test heat soak. We also performed standalone power runs with the intercooler setups. During testing, we used the full OEM intercooler and piping kit, and each of the CorkSport Intercoolers with the CorkSport piping. Of the three CorkSport intercoolers, we took the best setup and tested it with and without our piping kit.

Conditions were near identical for all tests, with the CS intercooler tests being ~10°F. warmer than the OEM tests (65° vs 55°).

Testing Intercooler Pressure Drop

OEM Intercooler pressure testing graph
Pressure testing the OEM intercooler.

Starting with pressure drop, the OEM intercooler performed better than we initially expected. The graph above shows the pressure drop across the core through a dyno run. In this case, the smaller the number the better. Starting at around 0.5psi at low RPM and peaking at around 2.4psi at higher RPM is pretty good for a core with fins that are fairly dense.

CorkSport Intercoolers pressure testing graph

Pressure testing the CorkSport intercooler cores.

Shown in the graph above are the CorkSport intercooler pressure drop results. Core A has the densest fins, while Core C has the least dense fins. Looking at the graph above, you can see that Core A and B had a larger drop in pressure than OEM. Meanwhile, Core C had a smaller pressure drop than the OEM core. Having a smaller pressure drop than OEM means that your turbocharger can make less boost at the turbo yet still hit the boost target in the intake manifold. In other words, your turbo is working less to make the same power levels! Based on our results, option C appears to be the best option due to the low drop in pressure, but first, we will test temperature drop to be certain.

Testing Intercooler Temperature Drop

OEM Intercooler Change in Temperature Graph
OEM Intercooler Change in Temperature from Inlet to Outlet.

The graph above shows the change in temperature from the inlet to the outlet of the OEM intercooler during a dyno run. As you can see, there is a temperature delta (the amount of heat being removed from the boost air) of approximately 100-110°F through the majority of the dyno run. Not bad for the OEM intercooler as larger the better here, but we can do better.

CorkSport Intercoolers Change in Temperature Graph

CorkSport Intercoolers Change in Temperature from Inlet to Outlet.

The graph above shows the same temperature drop data for each of the three prototype cores. Please note, the difference at the beginning of the runs is a result of using the run with the best temperature change for each core. With this comparison, larger numbers mean that the intercooler is cooling the boosted air efficiently. As you can see, the very dense cores (A and B) with a high-pressure drop, cool better. However, there are diminishing returns that come when you make a core denser. Through the meat of the dyno run, Core C has approximately 140-150°F of temperature drop, Core A has 150-180°F of temperature drop, and Core B has 140-170°F of temperature drop. This data shows that Core C cools almost as well as A and B despite having a drastically lower pressure drop. Core C is definitely our winner, but we have one last thing to test: heat soak.

Testing Intercooler Heat Soak

OEM Intercooler Heat Soak Graph
OEM Intercooler Heat Soak

The graph above shows the OEM intercooler tested for heat soak by being run on a dyno in back to back runs. The graph is showing the intercooler inlet and outlet temperatures, so the boost temperature before the intercooler and the boost temperature after the intercooler that your engine sees. Over the runs, the inlet temp increases as the engine and turbo get hot. The OEM core does a pretty good job at preventing the outlet from increasing over the pulls (heat soak), but the CorkSport core can do better.

CorkSport Intercooler Heat Soak Graph
CorkSport Intercooler Core C Heat Soak

The graph above shows the results of the same test that was performed with the CorkSport prototype Core C. The inlet temp follows a similar path of heating up drastically as the run’s progress, but the improved cooling efficiency is highlighted when you look at the outlet temps. The CorkSport intercooler core cools better and also shows less heat soak, leaving you with 20+ degree cooler temps after the same tests. During testing of the CorkSport core, ambient temps were slightly higher than the OEM test, having been done on a relatively cool day in the mid to upper 50s. If the tests had been performed at 100% identical ambient temps or overall higher ambient temps, the results would be further skewed in the CorkSport kit’s favor!

Testing Intercooler Power

Last, but certainly not least, is power. We tested back to back with the OEM setup, CS FMIC only, and then the CS FMIC with the full piping kit. With the CorkSport FMIC alone, we picked up 3WHP at peak but more importantly, 3-9WHP and 3-12WTQ from 2250-4250RPM. Seen in the graph below.

Dyograph comparison between CorkSport and Mazda Intercooler Cores
Dyno Testing OEM Intercooler and CorkSport Intercooler

With the CS intercooler and piping Kit, we picked up around 6WHP at peak compared to full OEM but even more WHP and WTQ through the midrange. For clarity, the graph below is the full CS setup vs. full OEM setup; without tuning!

Dyograph comparison between CorkSport and Mazda Intercooler setups

Dyno Testing OEM Intercooler and CorkSport Intercooler with Upgraded Piping

While these gains are decent, the intercooler and piping kit will truly shine once we are able to tune the car for different boost and load targets. In addition, we checked for changes to spool time and throttle response with the piping kit but only noticed marginal gains as we are limited by the current tune on the car. Based on our testing though, it is clear that we are increasing the efficiency of the turbocharging and the intercooling system, which future proofs your ride for further mods and tuning down the road.

Let us know if you have any questions regarding our testing, we can’t wait for you all to get these parts. Look for the CorkSport Intercooler Upgrade and CS Piping Kit coming soon, along with more fun parts for the 2.5T!

-Daniel

Shop Now
Pssst. You can’t buy it yet…. Soon.

CorkSport Mazda6 2.5T Boost Tube

We are proud to release the CorkSport Upgraded Boost Tube for 2018+ Mazda 6 2.5T and 2016+ CX-9 2.5T. The CorkSport boost tube is larger, stronger, more reliable, and of course better looking than the OEM rubber tube. Increase throttle response down low, hit boost targets easier and future-proof your ride for mods down the road with a simple 1-hour install. Read on for full details and be sure to check out the R&D blogs here and here for the backstory.

In case you haven’t read the previous blog installments, the CorkSport Boost Tube improves on the OEM boost tube by first strengthening the tube. Instead of using rubber with one reinforcement layer, the CS boost tube use silicone with 5 layers of reinforcement. Aside from the extra layers of reinforcement, silicone stays strong at high engine bay temperatures that may cause rubber to flex excessively. In addition, silicone lasts longer and will better resist cracking as your Mazda 6 Turbo ages. The OEM boost tube is made from materials very similar to the OEM Mazdaspeed 3 boost tubes that showed signs from aging extremely quickly, especially when subjected to higher than OEM boost levels. Cracking or splitting of the OEM tubes results in boost leaks and a poorly running car, definitely not what you want from your brand new SkyActiv 2.5T.

The added strength prevents the CorkSport Upgraded Boost Tube from expanding excessively when subjected to pressure. When pressure tested at 20psi (the largest pressure we have seen at the intercooler outlet), the OEM tube was shown to expand 12% at the internal cross-sectional area. The CS tube tested under the same conditions expanded 3x LESS. This difference would get even larger when subjected to the same pressure at a higher temperature. What does this mean for performance though? When you get on the gas, the boosted air will have to expand the tube before it can enter your engine. The less the tube expands, the easier it is to hit boost targets, and the better throttle response you have, especially down low in the RPM range.

The CS Boost Tube also is a larger inside diameter than your OEM tube. It is 3” through the middle vs. the OEM ~2.44”. Since this area of the charge piping system is directly ahead of the throttle body, this large volume of air has the same effect as it does with our GEN2 Mazdaspeed3 FMIC kit, reducing boost lag and increasing throttle response. For full info on why this happens, check out the release blog for that kit here. As a basic overview, the large volume of air right before the throttle body fools the engine into thinking it has a larger intake manifold plenum than it really does. While not as severe of an effect with just changing this boost tube, try it for yourself and see what you think!

Installing the boost tube is a little tricky due to where it is located, but we include high-quality installation instructions to make it easier. Even so, it can be installed in an hour or less in most cases. We also include polished stainless steel T-bolt clamps to ensure a complete seal and add a subtle visual boost.

Be sure to check out the product listing for more pictures, the installation instructions, and a detailed product video. Let us know if you have any questions, we’ll be sure to help you any way we can!


Lastly, if any of you are looking for a more serious upgrade, stay patient, our FMIC upgrade & full piping upgrade kit are coming soon!

Stay up-to-date on the latest news and product updates from CorkSport.

* indicates required

SkyActiv 2.5T: Let’s Talk Intercooler Pipe Upgrades

We recently went over the stock intercooler & piping system for the 2018+ Mazda 6 2.5T. If you missed it, be sure to check out the blog HERE.

Today, it’s the first look at the CorkSport parts that will be coming in the near future to remedy the issues we found with the OEM system. We are not covering our upgraded intercooler just yet though; today’s focus is piping upgrades!

Mazda 6 SkyActiv 2.5T engine with Intercooler Pipe

As you can see we’ve been busy getting the Mazda 6 upgraded intercooler piping designed & 3D printed for test fitting (while you can’t see it I promise the cold pipe is hanging out in there too!). I’m happy to say there’s plenty of room to fit the upgraded piping sizes that we were targeting and hopefully, they will net us a few HP gains without any other changes.

These horsepower gains typically come from removing sharp bends and diameter reductions in the stock piping that cause pressure losses. Then, the turbocharger can operate more efficiently to reach the desired boost level. Now how about some more detail on how and why each pipe has changed.

Modeling and design for FMIC piping upgrade for Mazda 6

Starting off with the hot side of things (piping from turbo to intercooler), check out the CAD image above. As you can see, the OEM piping (left) is smaller than the CorkSport Mazdsa 6 piping (right). In fact, we plan to use 2.25” piping for the hot side. Note that the plastic OEM piping is much thicker wall than the CS aluminum piping so even if the outer diameter looks similar, the inside diameter is much larger.

In addition, we keep this same inside diameter throughout while the OEM piping has a major diameter reduction through the middle. For those of you coming from a Mazdaspeed 3, 2.25” is the same size used on the hot side of all CS intercooler kits and has proven itself to support 600+WHP on Barett’s car (more info on that HERE). While we know the Sky-T may not be to that level just yet, 2.25” is a great size that gets the hot air to the intercooler as fast as possible while retaining high horsepower capabilities.

It’s not all about size though. Instead of using many tight radius direction changes like OEM, the CorkSport hot pipe uses smooth, large-radius mandrel bends throughout. This means smoother and faster airflow to your intercooler. Lastly, you may notice the CS hot pipe is significantly longer than the OEM hard plastic unit (the OEM rubber tube starts at the connection point circled in the image above). This reduces the amount of flexible connectors used, limiting what could expand at high boost levels. That being said, the CorkSport kit will use high-strength silicone with four fabric reinforcement layers to prevent any expansion anyways.

Design of piping

The cold side of the system was already a decent diameter from the factory, but as you can see, we went even larger. The rubber OEM cold pipe will be replaced with a 3” diameter aluminum pipe. This large diameter pipe and huge volume of air that comes with it right before the throttle body has proven to help throttle response and reduce boost lag on our GEN2 Mazdaspeed 3 FMIC kit. We hope to get much of the same from the SkyActiv 2.5T. The cold side also uses large radius mandrel bends for smooth and fast airflow.

Lastly, the cold side piping reduces the amount of flexible connectors used. And just like the hot side, each end of the pipe will use 4-ply reinforced silicone to prevent any expansion under high boost levels.

Those of you with a keen eye will have realized that our planned silicone connectors do not use the same connection style as the OEM intercooler. This is for good reason: we believe that the OEM intercooler will run out of cooling capacity before the OEM piping really becomes an issue. So a piping upgrade by itself wouldn’t show too much of a performance advantage.

In addition, we were able to design the piping to be the best it can without using the constraints of the OEM intercooler. So yes, the upcoming CorkSport intercooler upgrade will be required for the CS Mazda 6 piping upgrade to work, but it’s so the CS piping & FMIC combo can be the best it can be for you all!

For those of you that have stuck around this long, check out this tease of a CAD model of the CorkSport FMIC & Piping kit.

Mazda 6 Intercooler Pipe Design with FMIC

And just because we like teasing you, check this early prototype out. Testing to come soon!

Mazda 6 Intercooler Pipes

Stay tuned for more, as next time we will cover the intercooler itself. Also, let us know your thoughts down below, we love your input!

-Daniel @ CorkSport

2018+ Mazda 6 2.5T OEM Intercooler & Piping Analysis

We’ve already mentioned briefly that we have an upgraded intercooler kit in the works for the SkyActiv 2.5T, but now it’s officially time to dive in and get into how and why a Mazda 6 upgraded intercooler kit is a good fit. To understand how to make a performance part, we first have to understand what makes the stock parts tick and where we can improve them, which is what we will be covering today!

For those of you that are new to the boosted lifestyle, I feel that I should go over a few terms that will be thrown around frequently later in this blog.

  • Hot Side Piping: Also known as just “hot side” or “hot pipes” this piping section carries the pressurized air (boost!) from the turbocharger to the intercooler. As it is before the intercooler, the air has not been cooled and the “hot” name is quite accurate (think 200-250°F. or even more on a turbo that’s too small). Shown above on the right side.

  • Intercooler: A basic heat exchanger. Air flows through the inside and is cooled by air flowing through the outside while you drive down the road. The same way a radiator works except with air inside instead of coolant. It is made up of three parts the “end tanks” and the “core”. The end tanks are what transfer the air from the piping to the core while the core is the actual heat exchanging portion. Shown front and center in the above image.

  • Cold Side Piping: Also known as just “cold side” or “cold pipes” this piping section carries the pressurized air from the intercooler to the engine. As it is after the intercooler, the air has been cooled to make more power. Shown above on the left side.

Now into the details…

The hot side piping must make its way all the way from the rear of the engine to the front of the car. The OEM piping takes a pretty direct route, and is a decent diameter for stock piping, starting & finishing at just under 2” inner diameter. This, however, is where the good things end.

To start, the two rubber sections of the hot side are single ply. These allow for good flexibility on install and to allow for engine movement but will start to expand on higher than stock boost levels, increasing boost lag and decreasing throttle response. In the image above, the main rubber section squishes under the small weight of the upper plastic section of the hot pipe. This isn’t even the main issue with the hot side piping!

The upper plastic section of the hot side has quite a few small radius bends, and a few areas where the pipe reduces in diameter severely, affecting the maximum flow and restricting the power of your 2.5T. Check out the worst area below, it’s tiny!

And what might be causing this reduction in diameter you may ask?


That’s right, its clearance for a hose clamp. Mazda, I’ve got to call you out on this one, couldn’t you have just rotated the clamp, and kept the diameter in the pipe? Anyways, on to the intercooler itself.  

The intercooler itself isn’t too bad, a decent sized core with lots of fins to help cool as good as it can. That being said, there’s still plenty of room for improvements. First: make it bigger. The intercooler mounting could’ve been simplified to get more width, and there’s a bunch of room to go thicker. While thick is not the best for heat transfer efficiency, it will still help cool off the air better. Height is already more or less maxed out without cutting up the crash beam, but we should be able to make enough extra volume elsewhere to make a big difference.

Intercoolers are a delicate balancing act between cooling efficiency and pressure drop. Cores that cool extremely well usually have a larger pressure drop (loss of pressure from inlet to outlet) and vice versa. With the high fin density of the OEM intercooler, we can expect a relatively high-pressure drop (2-4psi would be my rough guess) but pretty good cooling. From early dyno testing on the CorkSport Short Ram Intake, the intercooler does a good job cooling but loses power on back to back dyno runs. I expect that this is the intercooler “heat soaking”. Heatsoak is what happens when an intercooler is undersized or is not getting enough airflow, it heats up and is no longer able to cool the boost off, robbing you of power.

The two images above show the real Achilles heel of the OEM intercooler and what is likely causing the heatsoak issues: the end tank design. Since the charge air enters and exits the core at an upward angle, it’s being directed away from the lower runners of the core. There is a sharp angle that would be hard for the air to turn, meaning the bottom three internal runners (shown with the red box) are likely not actually doing much. So you’ve got intercooler taking up space that is likely not doing much… We aim to fix this.

The cold side of the system is actually pretty good-inner diameter of just under 2.25” on the ends (even larger in the middle) and a short path into the throttle body. We’ve already covered the basics of it when discussing the upcoming CorkSport boost tube HERE. Like with the hot side, the rubber connector is prone to expansion under increased boost levels. While the CorkSport silicone boost tube will still be coming on its own, we plan to offer something even stiffer that is optimized for our upgraded Mazda 6 Front Mount Intercooler kit.

Much more information to come in following blogs as we’ve been busy working away on this project. Stay tuned for full details on the upcoming CorkSport FMIC kit, and if you’ve got any questions, leave them down below.

Connect with us