Charging for the WIN!

Track Tested CorkSport Approved 3rd Gen Mazda 3 Partsย – Leading the Pack.

The last race weekend I had available before the runoffs turned out to be pretty interesting.

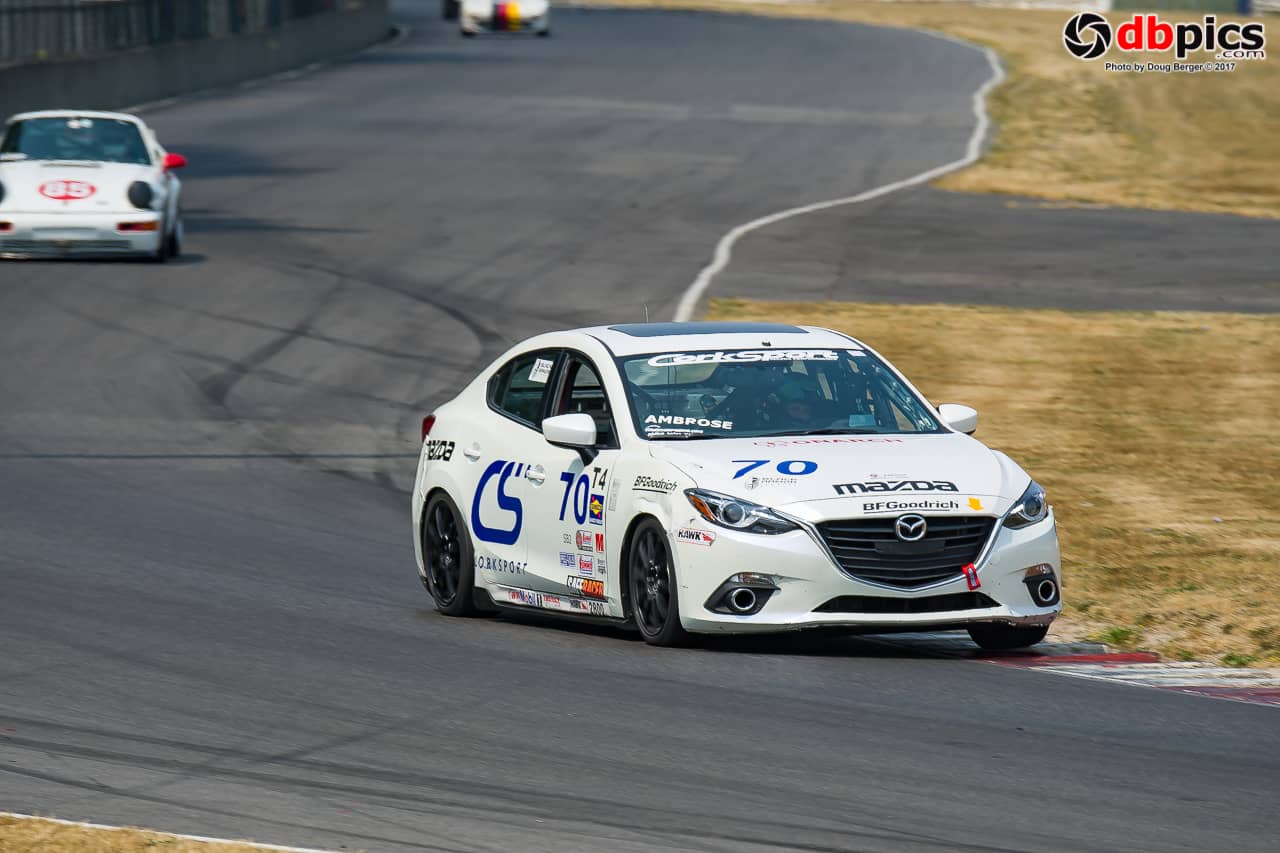
Locally there are very few T4 (touring 4) class cars so I often find myself running with other class cars and this weekend was no exception at Portland International Raceway. I showed up for qualifying on Friday morning with a new part to test and a suspension setup with something I had not tried.

I looked over the entry list the day before, and there read a list of cars you would expect to clobber a Mazda 3 on the track. 3 Porsche 911s, a pair of V8 mustangs, an STL Miata and more.

To make sure I had a clear track for qualifying, I hustled to the pre-grid to make sure I was the first car out. Straight out of the pits, I went flat out to get some distance on the Porsches to be able to push the car for the entire time I was out qualifying. As I watched the lap timer in the Mazda 3, my times kept dropping lap after lap. 6 laps in and I had already bested my fastest lap time at Portland by a second, so I called it quits and pulled in to the pits.

On the way out of the track I grabbed the time sheet to review and see where I placed. A quick review of the sheet showed I had qualified the Mazda 3 in second out of 10 cars and I was in front of 2 of the Porsches.

The start of the race didnโ€™t go that great. Out of all the cars on the track I was in the bottom ยฝ for horsepower. But I was making up the speed in the corners.

One of the back cars jumped the start a bit and managed to take us 3 wide into a corner which is only good for 2. I was forced to give up some room to one of the Porsches to keep from having contact which put me back to 4th. Several laps into the race one of the Porsches who got ahead of me at the start spun off the track so I was able to move back up a spot while trying to chase down the leader who was running ~1 second a lap faster than I was. The 30 minute mark came pretty quick, and the race ended on a not-so-exciting note of me being in 3rd, and the leaders ~ ยฝ a lap ahead and all but a few of the rest of the field being lapped.

The big question you all want to ask is: “What were you testing for the 3rdย Gen Mazda 3?”

First things first, the changes we made to the Mazda 3:
  • We made an adjustment with the CorkSport rear adjustable swaybar. Being able to make quick adjustments on the rear swaybar bar allows us to soften the suspension to match the alignment changes.
  • We had taken more rear camber out of the back of the car with the CorkSport adjustable camber arms, trying to decrease rear grip (yes you read that right). We have been having problems with front end push (understeer) so we worked on dialing rear grip out of the car. ย โ€“ We had the CorkSport front camber plates maxed out for camber to the class limits, but it wasnโ€™t enough to offset the rear grip.
  • We originally were running our CorkSport Mazda 3 adjustable shocks on the track but we had to remove them as they are not legal for the Touring 4 class. The adjustable shocks make a world of a difference over what I have to use on the car and I wish we could’ve changed back. Being able to fine tune the Mazda 3 suspension is a great asset for any performance driver.

Now to the fun, what I got to test that was new:

The engineers here at CorkSport have been working on a revised Mazda 3 Rear engine mount for the 3/6/Cx5 over the past few months. The best way we have to extreme test parts is on the track.

Think of the race-testing this way: I am driving full throttle, banging gears, and when I am off the throttle means I am on the brakes, so there is no time for the mount to get any rest. There is the maximum amount of heat, load, and stress in a compressed time line, compared to street driven cars, so if failure is to occur it would be on the track.

At the end of the month, I will be doing a test on a final version of the rear engine mount at the SCCA Runoffs and competing to bring home a National Championship for CorkSport and Mazda.

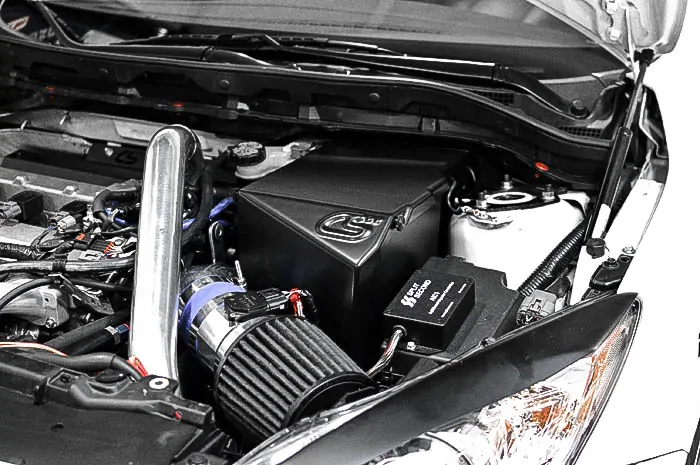
This brings me to my next point: All of the parts mentioned above have been punished on the track and had zero failures. I have been on the same rear sway bar, rear camber arms, camber plates, and short ram intake, and cat back exhaust since we started racing the car at Daytona in 2015.

You just can’t beat the fact that our CorkSport parts walk the talk when pushed to the extreme, which means they won’t let you down, no matter what you’re doing.

Charge for the WIN!

Derrick

Welcoming Our New Partners of The CorkSport Shop Program!

What is CorkSport Up to?!

We know youโ€™ve been seeing the social media posts calling for US Performance Installation Shops to contact us. So, as a customer, you have likely been reaching out to your local shop and telling them to call in or head to our link in order to get more info!

First off: A big THANK YOU to those who recommended their favorite shops, and to those Shops who have understood what we are about and got started in an awesome community partnership with CorkSport!

Weโ€™re excited to experience the support that has been passed along to the community, as well as to other small businesses through these partnerships.

Weโ€™re continuing to work with the Mazda Community to build, expand, and grow the number of enthusiasts out there. In doing this, the partnerships we are building will help the โ€˜newest generationโ€™ of Mazda enthusiasts to get started somewhere. With the help of a local shop, they can learn what they need to know, have a trusted place to take their car, and find themselves inspired by the work they do.

PIC: Mazdas247.com

CorkSportโ€™s Community Partnerships will allow for Mazda Enthusiasts to have a place to go for installation help, questions, concerns, and inspiration on what their car is capable of.

If you know of a Performance Installation Shop near you, or are one yourself; get in contact with CorkSport to see what weโ€™re capable of accomplishing together!

Contact Us by clicking HERE


Shout out to the following companies for being the earliest adopters of CorkSportโ€™s Shop Program!

Youโ€™ll see below some of these Performance Shops are run by well-known Mazda enthusiasts, which is why we’ve chosen them as trusted community partners!

This is not an exhaustive list of our partners. We are building that list and you will soon be able to see which Shops we are partnered with on our website.ย This resource will provide you with a quick guide to where to go for installation help in the future!

We are looking forward to what we can build together in our expanded CorkSport family!

CorkSport Community Partnerships: building the Mazda Community, one enthusiast at a time.

Cheers,

Kim Russell,

Corksport Performance

4 inch Intake and a Clean Engine Bay? The CorkSport 51R Battery Box & ECU Relocation is NO Compromise

Mazdaspeed 3 Engine Bay with battery reolocation kit and 4inch Short Ram Intake.

CorkSport is proud to announce the new ECU Mazdaseed Relocation Battery Box designed for the 51R battery and 4โ€ short ram intake systems.

Mazdaspeed 3 Relocation Battery Box 51r

We love the clean and simple look of the CorkSport full-size battery box and we know you do also. Our goal was to bring that same level of awesomeness to all the big power guys and gals running 4โ€ intakes and 51R batteries in your Mazdaspeed.

We knew we couldnโ€™t compromise on the fit and finish youโ€™ve grown to love, and this new battery box doesnโ€™t disappoint.

The greatest challenge came in the form of locating the ECU inside the box; as that is the whole point of the CorkSport battery boxes. With a bit of massaging and adjusting, we innovated a sleek solution for the ECU placement without compromising the style and fitment of the battery box.

In the original CorkSport Mazdaspeed battery box, the ECU was located on the front panel. This packaged well with the full-size battery and made access easy, but in order to increase the clearance for a 4โ€ intake system in your Mazadaspeed, we had to reduce the width of the battery box as much as possible. This required us to rethink the location of the ECU and the overall design of the battery box to accommodate it. Check out the computer-drafted model below.

Design of the ECU Mazdaspeed Relocation Battery Box

Moving the ECU to the side provided ample clearance for a 4โ€ intake system and retained the standard battery location. The front of the battery box had to be extended out a bit, but this also gave us a chance to keep the wiring harness inside the box to maintain the high-level fit and finish. To finish off the installation, the battery is retained with M6 studs fastened into the battery box and a 0.120โ€ anodized aluminum bracket.

Overall the new Mazdaspeed 51R ECU Relocation Battery Box hit all the marks for fit, finish, and performance.

Stay Up-to-date with CorkSport   


Installed Mazdaspeed ECU Battery Box Relocation Kit.

If youโ€™re looking to downsize your battery, upsize your intake system, or are just plain tired of looking at all those unsightly wires then let the CorkSport 51R ECU Relocation Battery Box be the answer to your goal.

Click HERE to View Product & Purchase

-Barett @ CS

Stay up-to-date on the latest news and product updates from CorkSport.

* indicates required

You may also like:

How to Series: Service and Lubricate Your CS Dual VTA BPV

Hey guys! Brett from CorkSport here today, and Iโ€™m ready to show you a basic guide to follow on how to service and lubricate your Dual VTA (or any BOV for the most part.) Typically itโ€™s good to do this every couple oil changes or so.

The main things that you will want to inspect is the O-Rings, and look for any contamination. Clean off old grease, dust, or grime.

Don't forget to inspect the O-Rings.

Fully Clean out the inside of the valve housing as well. Make sure you evenly coat it throughout the housing.ย Also be sure to lubricate the piston and the O-Rings as shown. We Recommend Lubriplate 105 as your go to grease for this valve!

Make sure you evenly coat it throughout the housing.

Reassemble the valve and reinstall. Be sure that you didnโ€™t drop your gasket on the bottom when you serviced it!

If you would like another visual aid, you can also check out this video here: How to Service your Blow off Valve/ Bypass Valve. In this video, the CS preferred grease was not used. However, it will help you to understand what needs to be done.

Reassemble the valve and reinstall.

Don’t have the Mazdaspeed Dual VTA BPV yet?

You can order it HERE.

Any further questions? Email us or call us at sa***@*******rt.com and 360-260-2675.

Cheers,

Brett @ CS

The Engine Build Process on a 2009 MazdaSpeed 3

A Mazdaspeed bent valve.
The bent valve on my Mazdaspeed.

Whatโ€™s up, fellow Mazda enthusiasts!

Youโ€™ve probably heard the phrase โ€œbuilt blockโ€ lately on social media or at your local car meet, but you might be wondering what that actually means. In fact, youโ€™ve probably heard it enough times that you donโ€™t even notice it. For you newbies, itโ€™s when the engine internals are replaced with performance parts. Whether you do or donโ€™t understand what a built block is, I thought I would share my knowledge and experience through the engine building process for my 2009 Mazdaspeed 3.

The incident

The moment we all dread (or maybe even look forward to?) finally happened โ€ฆ zoom zoom BOOM (ZZB).  I was merging onto the highway, within the speed limit, when the engine went silent and my dashboard became a Christmas tree of lights. I tried to start it โ€ฆ nothing. Well, shit.

I called the tow truck and brought my Mazdaspeed back to CorkSport HQ. A compression test gave me the quick, sad story. It was 0 0 0 0 across the board. Obviously, something gave out. That something turned out to be the friction washers on the crankshaft.

I now pronounce you piston and valve. You may kiss the valve.

The diagnosis

The engine slipped timing and bent all of the valves. Luckily, I didnโ€™t vent the engine block in the process, so that could be reused. After all this, I didnโ€™t trust the engine. So it was time to get built!

A 2009 Mazdaspeed bare block.
The bare block from my Mazdaspeed.

I pulled the engine and transmission from the vehicle and stripped them down to the bare components so the machine shop could do their magic. But, before we could let them start, I had to get some parts ordered for the machine shop to consider in the build tolerance. Just look at that stack of money โ€ฆ I mean parts.

The engine build parts

Forged Mazdaspeed internals.
Forged internals for the Mazdaspeed.

The bare engine block, a new used cylinder head, ACT 6-Puck clutch, and forged internals were sent to M & B Cylinder Heads for some much-needed love. The block was bored and cross-hatched to match up with the pistons, the main bearing journals were line honed where needed, and the deck surface was cut down just a hair to provide a new surface thatโ€™s true and flat. Since I wasnโ€™t going for just a bare bones build, I opted to have some added processes done to help with reliability and performance.

  1. I planned to run without the balance shaft, commonly called a BSD (balance shaft delete), to increase the oil capacity of the oil pan. This would remove some rotating mass to help the engine rev more freely. However, this does come with some compromises, mainly in severe NVH (noise, vibration, harshness) the driver experiences. For this reason, I had the rotating assembly (crankshaft, connecting rods, pistons, clutch assembly, and crank pulley) balanced to further reduce vibrations.
  2. My build goal was at least 450 whp to further benefit the effect of the CorkSport Mazdaspeed camshafts, so I had the cylinder head ported to improve flow. The intake runners were opened up and cut to a single runner setup along with the exhaust ports. Both intake and exhaust had most of the work performed on the โ€œbowlโ€ area of the runners โ€” the area just above the valve seat. To top it off, the combustion chamber was touched up to remove any sharp points to help reduce hot spots that may cause detonation.

Check out the cylinder head porting:

Mazdaspeed single runner.
Hereโ€™s the single runner.
Mazdaspeed exhaust runner.
And hereโ€™s the exhaust runner.

The engine build operation

After what felt like an eternity, we got all the completed parts back from M & B and were ready to begin the assembly process. This is when I really stepped back and let Vincent take the lead. Heโ€™s the master when it comes to engine blueprinting and assembly.

The blueprinting process is arguably the most critical and time-consuming process of the engine build process. Each cylinder diameter is measured at three different vertical locations to determine cylinder taper, then measured again 90 degrees from the previous locations to determine cylinder roundness.  The piston outer diameter is measured as well and verified for the cylinder it was matched to at the machine shop. Once the block and pistons are confirmed, then the finer details are set in motion with the piston ring gaps, the main bearing and connecting rod bearing crush, and setting the main and head studs. Iโ€™m just skimming the surface here. Please note that all of this is measured down to the tens-of-thousandths of an inch. Thatโ€™s 0.0001โ€ for clarity. This really is a precise art.

Mazdaspeed engine build blueprint papers.
Precision means paperwork. Here are the blueprint papers for the Mazdaspeed engine build.

With the short block assembled, itโ€™s time to focus on the cylinder head. The cylinder head almost seems easy after the short block assembly. The cylinder head comes assembled with the seals, valves, and springs from the machine shop. Whatโ€™s left to Vincent is the tappet and camshaft installation. The tappets are non-adjustable solid tappets and each has a specific and precise thickness. Once the camshafts are installed, the gap between the camshaft base circle and the tappet is measured and adjusted until the correct gap is achieved. Then the complete the cylinder head can be installed on the short block and the head tightening sequence performed.

If you want to see a really awesome video of this whole process, including a bunch of detail I havenโ€™t added to this blog, youโ€™re in luck (thanks to CorkSportโ€™s Brett White).

I hope you enjoyed this tale as much as I enjoyed writing it. This not the end of my build, so hang tight for the rest of the engine and vehicle in a later post. Weโ€™d love to hear about your build, whether itโ€™s a few bolt-on parts or a crazy built engine and car. Comment below and tell us about it!

Barrett @ CS

Connect with us

You may also like