 There are many features and design elements that can be incorporated into coilovers so when CorkSport decided to design new coilovers for the Mazda 3 and Mazdaspeed 3 we had to come up with priorities. We asked the Mazda community what features they wanted to see incorporated and what we came up with and will be releasing in the near future fulfills all of those wants and needs at a competitive price.
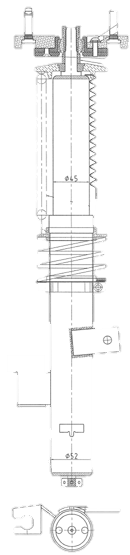
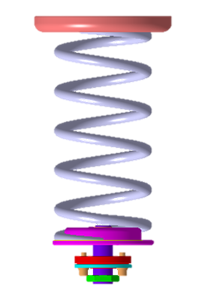
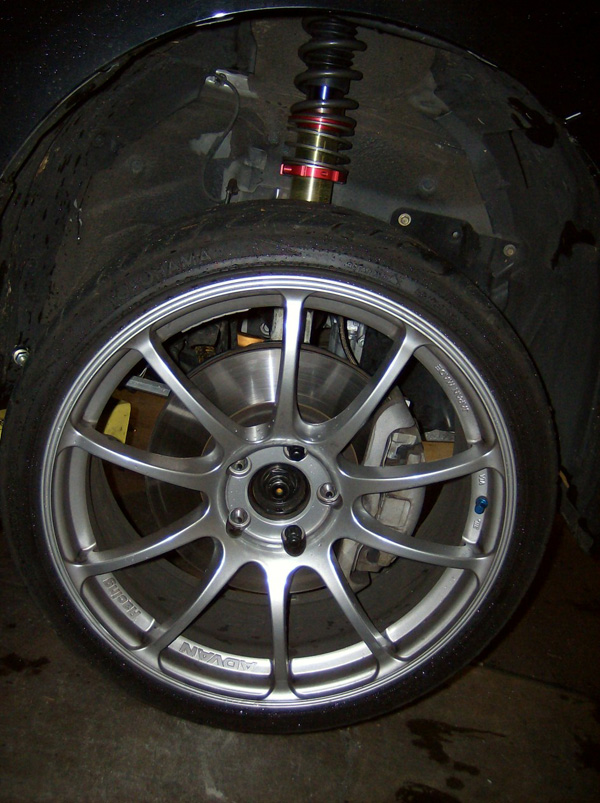
You told us you wanted inverted struts. We decided on a 45mm inverted strut body for the fronts and traditional strut bodies for the rear. There are some huge advantages to inverted struts. Inverted refers to a strut that is built upside down. The shaft that moves actually holds the gas or oil in some cases. Traditionally this is held in the lower section of the strut and moved up and down as the control arm moved up and down. The first huge advantage of inverted struts is the unsprung weight. This refers to the weight that your suspension holds. If the weight is on a portion of the suspension that moves this is referred to as sprung weight which we limited by moving the factory oil and strut body to a hard-mounted body position so the only weight that has to move is a hollow body.
The second advantage of inverted struts is side loading. With Macpherson-style struts in the front, your suspension is literally held together by the strut. By increasing the surface area on the strut tubes we increased the rigidly of the structure to make a more stable suspension, which is great if you like a good autocross day, track day or a drive through the twisties.
The rear of the Mazdaspeed 3 and Mazda 3 uses a multilink suspension meaning the rear is tied together in a way that the suspension doesn’t hold any load. There was little need to go to an inverted strut in the rear so we decided against it.
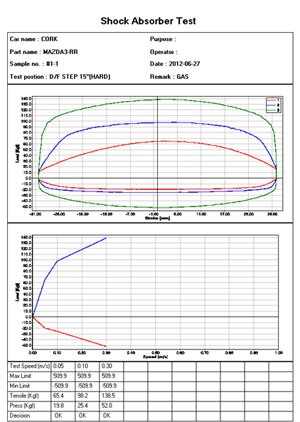
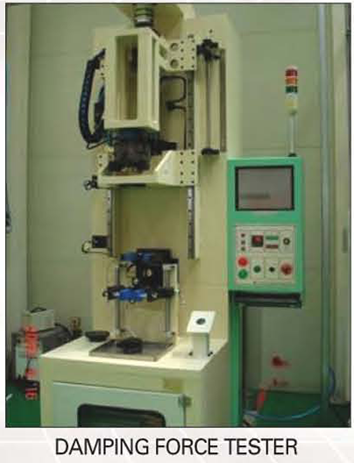 For those of you out there that need data, we have what you want.
If you have ever tried to dig up data on coilovers, you may have found that it was hard to actually get the compression and rebound on the settings. Now I am not sure if this is because it is a tightly guarded secret or most companies just don’t fully test their struts before sending them out, but we wanted to make sure that ours would be the best option on the market and outlast the factory struts in every way so we tested all of the struts for rebound and compression on professional tooling.
The data below breaks down rebound and compression into six twists of the dampener knob. They are 15-way adjustable but by showing the six major steps the data is a little easier to absorb. Now you can have the important data that no one else seems to want to share.

 Another important part about choosing coilovers is comfort. Yes, they will be stiffer than stock but there are ways to limit the stiffness so that the system is not undrivable on harsh roads.
Up front, we added helper springs to make those little bumps and potholes take less impact on your vehicle. It can also save those nice wheels from bends and dings. The 15-way adjustable front and rear also help. With easy adjustment, you can go soft for the weekdays and stiffer for the weekends. You can also combine dampening and swaybar adjustments to make that perfect combination for your driving habits.
After you really get comfortable with the adjustments you can start changing end link preload, sway bar adjustment, strut dampening, camber settings, and toe settings.
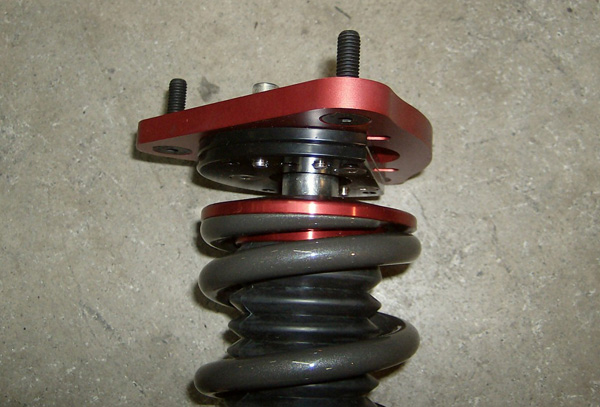
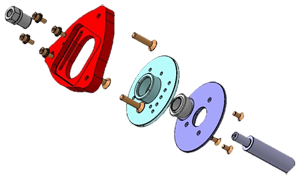 In January, CorkSport released the front camber kit for the Mazdaspeed 3. Aside from the obvious ability to change camber, these camber plates have a lot of advantages over the factory camber plates so we decided to incorporate these into our coilover design. Using thick machined aluminum, high-grade bolts and tightly machined plates and bearings they will hold up to almost all abuse. They also get rid of the unwanted flex in the factory rubber mounts.
Now that we have covered the front coilovers we can learn a little about the rears. Because the system is a multilink rear suspension we have a separate spring and shock combo. In order to again have great ride quality with great handling we went with a progressive spring. In order to have ride height adjustability, we produced an adjustment device for the spring that is easily adjusted with an Allen wrench from the bottom of the spring.
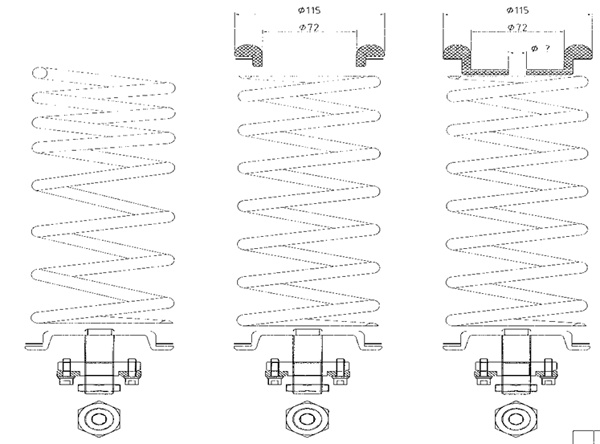
The rear shocks are 15-way adjustable just like the fronts and can be adjusted in length to match any setup of the coilover springs. We have also accommodated for the differences between the Gen1 and Gen2 struts so everyone can enjoy these coilovers. For those people who like a little more camber in the rear, you don’t have to worry because we are currently in the development of camber adjusters for the rear.
Even at the lowest settings, we were able to dial camber into factory spec but some of us like more adjustments to their suspension settings. Soon CorkSport will release our camber adjustments for the rear. There will be another blog on camber coming soon.
We are in the final stages of testing on the coilovers and will be announcing the release soon! To be included on our pre-release list for advance information on this product.
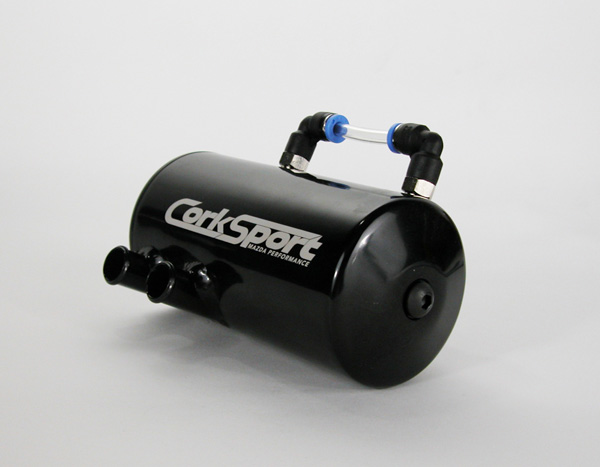
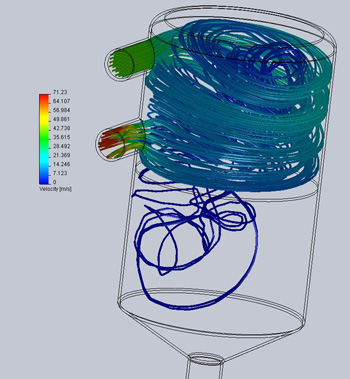 Unlike other catch cans on the market that simply expect the contaminates to fall out of the PCV vapors, our newly released oil catch can has a unique cyclonic vacuum design that forces contaminants to the walls of the can before the air can move back into the intake system. This Solidworks simulation shows how the system was designed. You can see that the air swirls around the outside of the can trapping the contaminants at the wall. This allows them to fall through a disk that is welded between two chambers used to separate the PCV vapors and the contaminants. Once the contaminants are separated you can view them with a sight tube located on the side of the catch can.
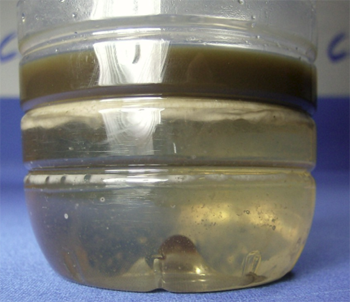 We were particularly surprised to see how much water vapor builds up in the crank case of these cars. After a few miles of driving with the catch can on our shop Mazdaspeed 3, we could really see what separates our catch can from the competition. After only 500 miles we had separated out a great deal of contaminants from the PCV system. Most of which was water vapor that had been trapped in the PCV lines and engine block. This alone should ensure that oil doesn’t break down quickly on our DISI MZR engine.
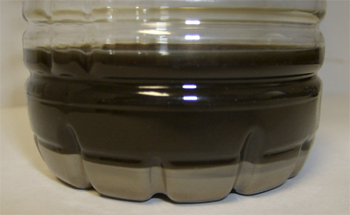 As you can see from the picture this is something you don’t want getting back into your engine. We took this sample and sent it out for particulate analysis. The results really prove that you don’t want this in your engine. Along with a large amount of oil, which can be seen, there was metal and water present in the oil. All of which we don’t want to be reburned in our engine or stuck to the back of our valves.
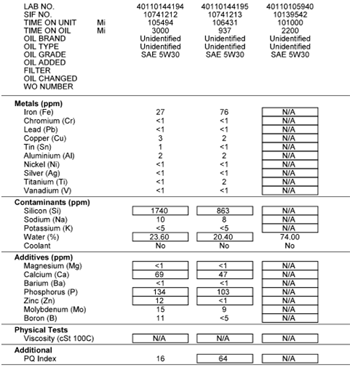 Even though it took a little longer than we expected to release this, I’m sure everyone will agree that there are certain things you want done right and somethings are worth the wait. When it comes down to it there are just some contaminants that you never want entering your motor. Most of them are listed on the sheet to the right.