
Part 2 of the Mazdaspeed3 AWD Swap blogs, we are going to get a baseline weight, show you some of the parts going into the car and finally tease you with cantilever suspension. Have a seat and grab a drink!
Read Part 1 How to Get A 900 Horsepower Mazdaspeed 3 AWD Swap – The Intro
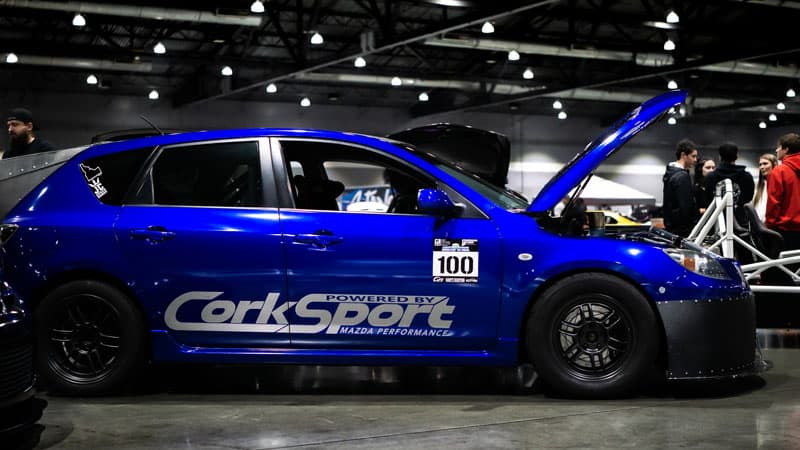
Before I started the AWD swap on my half-mile drag-racing Mazdaspeed 3 I wanted to get a baseline weight and weight distribution. Without a driver, my 2009 Mazdaspeed 3 weighed in at 3000 pounds on the money with just under 2000 pounds on the front wheels and just over 1000 pounds on the rear axle.
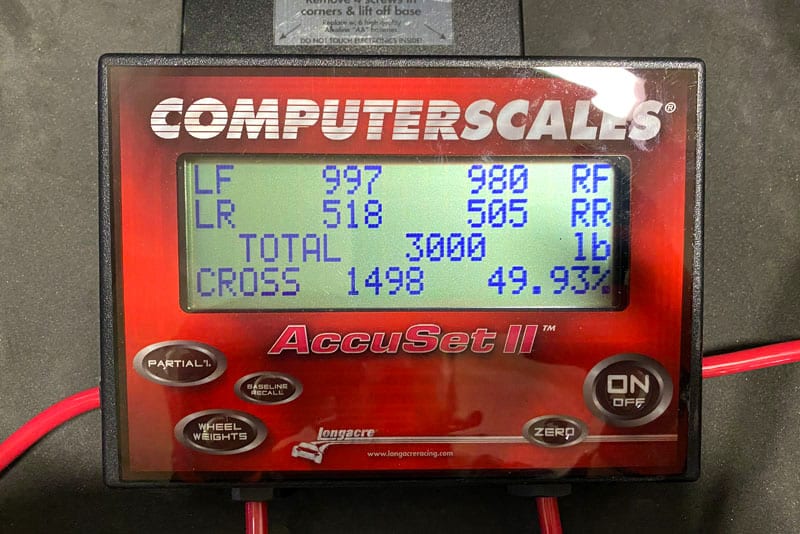
Corner weights are actually pretty damn good, but this is without my weight in the car. Adding me to the equation would throw that off a good amount. Either we have a baseline that we can compare to later once the car is back to 100% with AWD.
Now this may not be a perfect back-to-back test but it’s something…which is better than nothing. At the time of weigh-in, the Speed3 has an 8-point cage, composite driver seat and basic reclining aftermarket passenger seat, harnesses for both, stripped interior for everything behind the driver.
The components that are changing for the AWD swap:
- Transmission: MS3 to MS6
- Rear Subframe: MS3 to CX7
- Fuel Tank: OEM Fuel Tank to a Radium 10gal Fuel Cell w/Surge Tank built-in
- Rear Suspension: Changing from outboard OEM style to inboard cantilever style
- Rear Tires/Wheels: Going from a 17×9+45 w/255/40 tire to a 16×8+38 w/255/50 tire
- Rear Crashbar: Removing the OEM crashbar for a custom tubular crashbar with parachute mount
The components that are being added for the AWD swap:
- Transfer Case from Mazdaspeed 6
- Mid-Drive Shaft connecting the T-Case to the Differential
- Rear Differential from Mazdaspeed 6 and CX7. (We will discuss this more in a later blog.)
- Rear Axles
- Firewall Structure to separate the Radium Fuel Cell from the driver compartment
Alright so let’s talk about some of these components that are changing. Firstly is the fuel system. Currently, I am running a dual fuel system featuring the CorkSport Fender Fuel Cell with E98 in it feeding the port injection system and the stock fuel tank with an E48 blend in it.
While this kit has taken me to 650+whp with the CorkSport CST6 Turbo and nearly 900 WHP with a larger turbo and fuel pump…it’s time to really focus the build to a more dedicated racing fuel system.
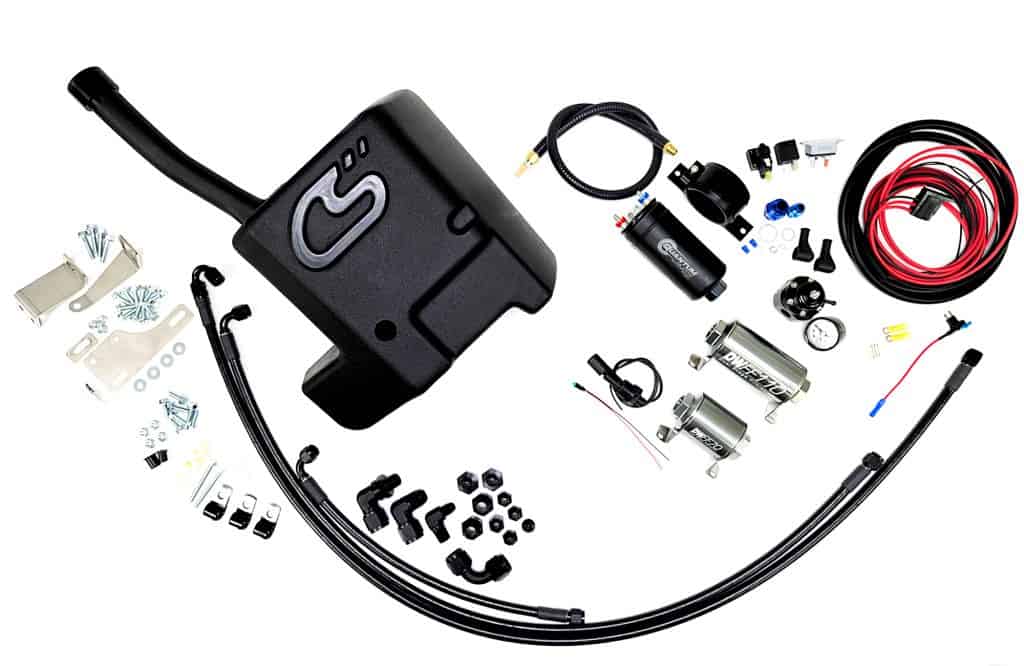
Enter the Radium “FCST” System; this is a full standalone fuel system that is FIA-certified and incorporates the 10-gallon fuel cell, an internal surge tank, and a fuel level sensor.
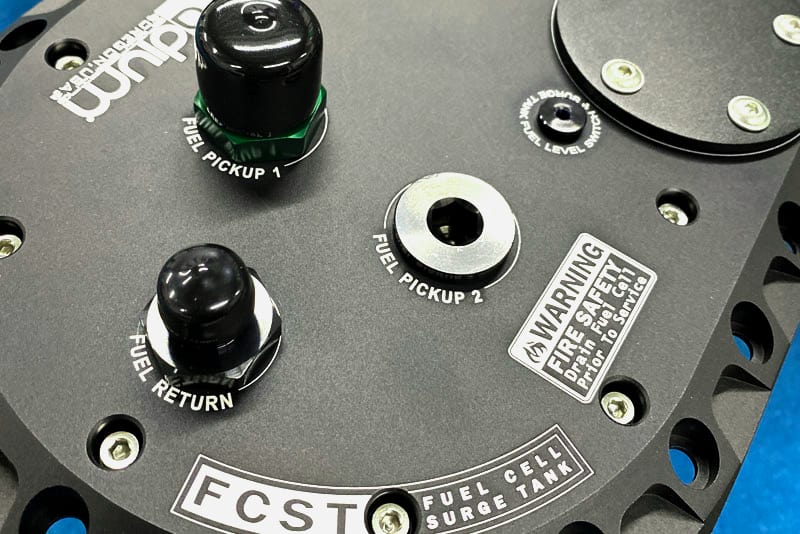
For my setup, I will be using a single 525LPH “in-tank” pump inside the fuel cell feeding the surge tank which then feeds to external pumps. This 525LPH fuel pump is mounted to the stainless steel bracket you see below inside the fuel cell.

Then the external pumps are a Quantum 044 style pump feeding the direct injection OEM fuel system and a MagnaFuel 525 gear-driven pump feeding the port injection fuel system.
So why the big change? Well, there are a few reasons really:
- With the AWD swap, I couldn’t retain the OEM fuel tank due to the mid-driveshaft so I had to find a new solution. There is some Volvo OEM fuel tank that works with some basic modifications, but this is a racecar. I did not want to retain the same limitations as OEM.
- With the power I am pushing and plan to push in the future, I need all the octane I can get so it made sense to use a single tank feeding both DI and PI fuel systems.
- Typically, in drag racing, you specifically use a small (less than 3 gallon) fuel cell in the front of the car, much like the CS Fender Fuel Cell. However, my car still sees street use, at events, and may or may not always be a drag racing-only car so I wanted a fuel cell system that could do anything I wanted now and in the future.
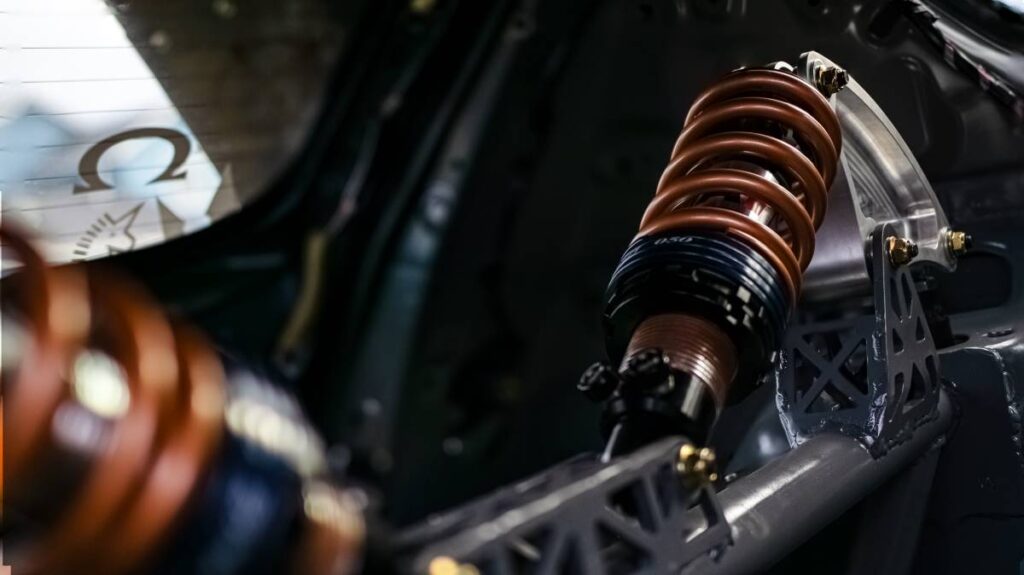
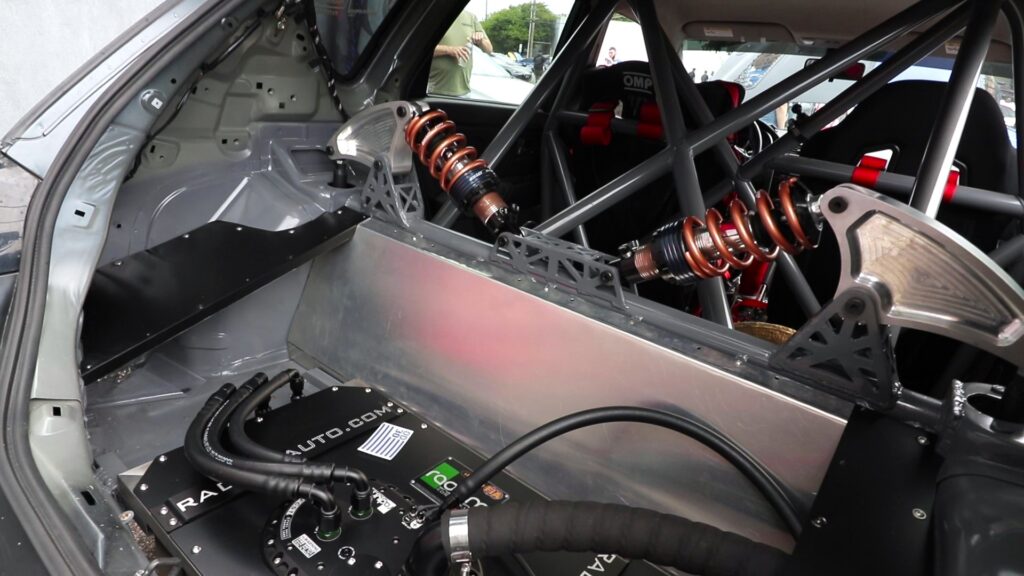
Next up is the rear suspension…this is my favorite part…except for the actual AWD of course! With the rear suspension, I am taking a much more unique approach by using an inboard mounting cantilever coilover suspension. While this seems over complicated upfront, and it is, it will also provide me with a lot of flexibility and control later when using and tuning the suspension.
But what’s wrong with the OEM suspension design?
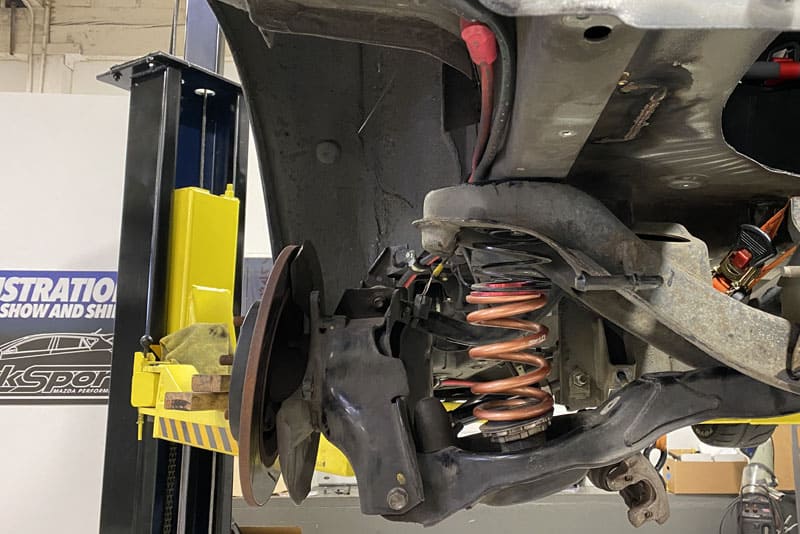
Nothing is “wrong”, it’s just not ideal. The lower control arm that supports the coil spring is very heavy, the OEM damper mount can’t be used due to the driveshaft so I will need to create a new mount elsewhere with cantilever or OEM style suspension and lastly, I want double adjustable (rebound and compression) dampers which would be more difficult and expensive to source that will work in the OEM style arrangement.
All of those factors lead me to the path of developing my own suspension setup.
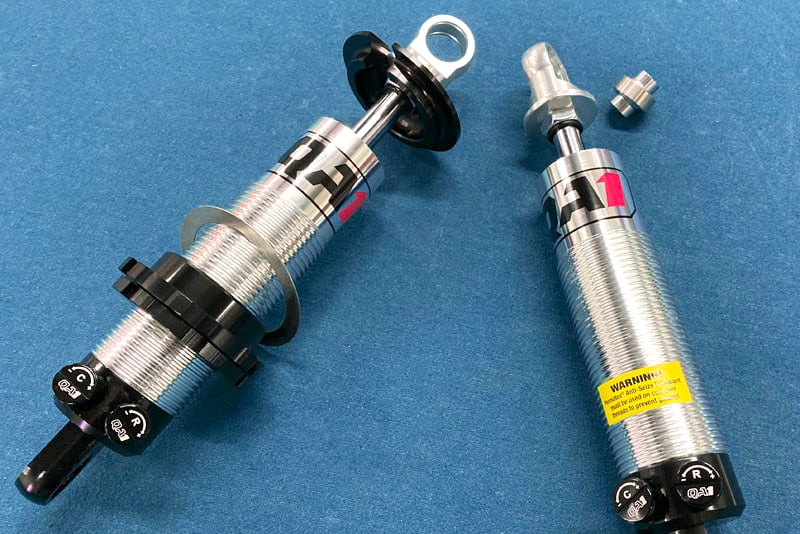
Doing some research I found QA1 dampers have great reviews, are very cost-effective, come in many different sizes/lengths, and have double adjustable options. They seem very fitting for my goals.
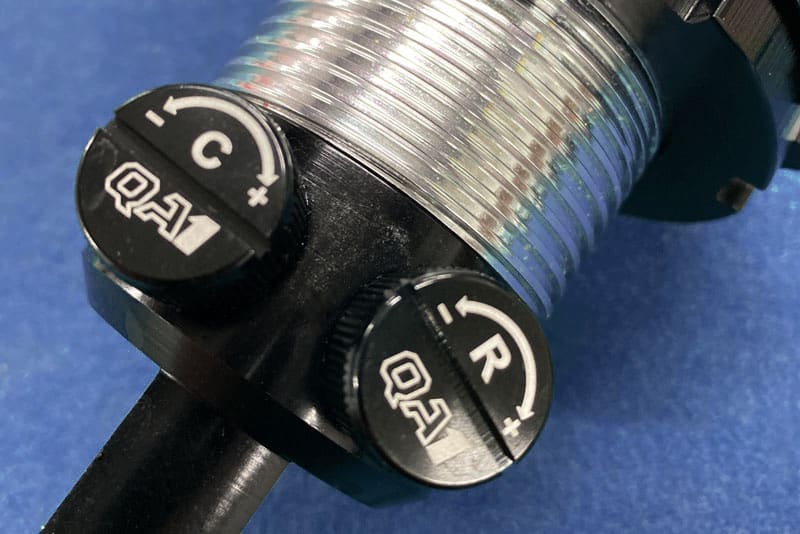
The double adjustable control is important for any type of competitive racing, but with drag racing, I had a specific need. When the car is launched from a standstill, there is an extreme amount of weight transfer happening that needs to be allowed to “transfer” to the rear but then needs to be controlled and maintained in that position.
Lastly, what is this cantilever suspension and what does it look like? Here’s a teaser of my design.
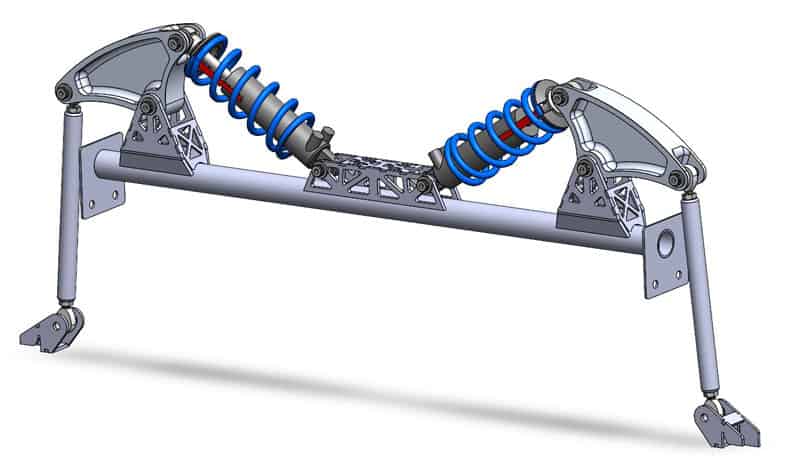
While I am planning to dig into the design around this in more details, that will have to wait til the next blog in this series. In a nutshell, the outboard suspension that the wheel and tire is connected to pushes a “push-rod” to a larger rocker arm (cantilever) that then pushes a coilover damper and spring setup. Other than the rod itself, this entire system is inside the car between the rear damper towers.
I hope you are enjoying this series about the AWD Swap Mazdaspeed3, stay tuned for more blogs to come!
You can also find updates on my IG @halfmilespeed3, the CorkSport 7th Gear Membership, and on mazdaspeeds.org.
https://mazdaspeeds.org/index.php?threads/awd-speed-3-project-halfmilespeed3.15154/
Thanks for tuning in!
Connect with us:
You may also like: