2010 MS3 – Best Way to Get 40+ HP Without Becoming an Amputee, Divorcee, or Both

I recently received an email asking which CS part combinations would be the best way to achieve a 40+ horsepower gain in the 2010+ MazdaSpeed 3 without breaking the bank, or having your significant other make you call and cancel your order.

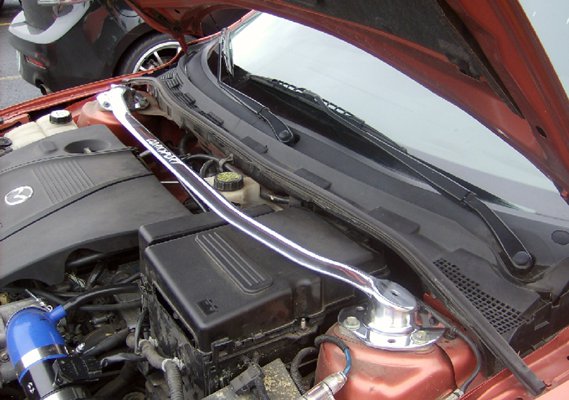
Your new MS3 breathes just like you do. Maximizing the intake of air and freeing up the expulsion of used gasses (exhaust) will help your vehicle breath better, and go faster.

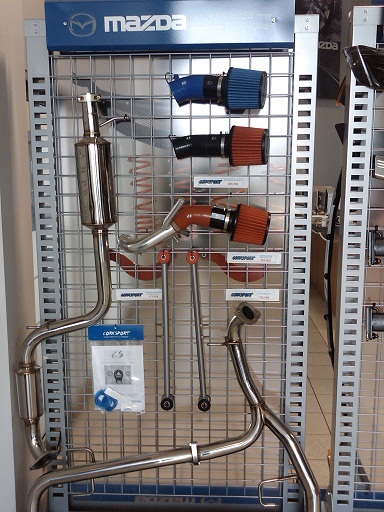
On the intake side of things, you can get our Short Ram Intake which includes our mandrel bent turbo inlet pipe and custom designed MAF housing and silicone coupler. This will free-up flow into the turbo and allow your MS3 to breath deeper. The average gains seen here are 10-15 hp.

For exhaling, you want to expel all those used gasses as quick as possible. With the CS turbo-back exhaust, you are reducing the back-pressure and allowing your MS3 to utilize the potential of its turbo. The kit comes with Corksport’s full 80mm catback dual exhaust, racepipe, and downpipe. This setup will give the average MS3 owner 28-31 hp at the wheels for just over $1,000 for all 3 parts.

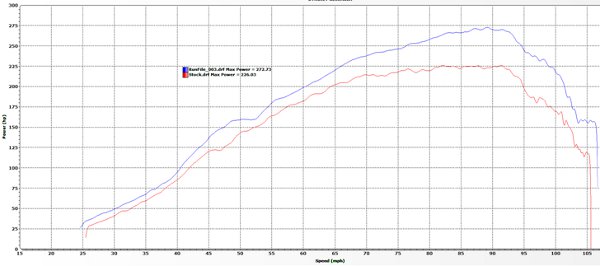
Shown below is our 2010 Mazdaspeed 3 with the CorkSport Short Ram Intake & Turbo-back exhaust compared to our car completely stock. The before number is 226 hp and came out to 272 with the SRI and Turbo-back exhaust. That is a 46 hp increase to the wheels with two products.

This is my suggestion on the easiest and cheapest way to gain 40 hp at the wheels. If you have a different/better way to do this using CS products, I would love to hear your comments.

For those of you on more of a budget, may I suggest just the Short Ram Intake  and racepipe , for an increase in wheel hp of upper 20’s to lower 30’s.

Any more questions feel free to shoot me an email.

Jake

Tools: Revisited

One question I get a lot is “Can I install this part?” My answer: “Do you have the right tools to do the job?” Depending on the part you are installing just about anyone can get the job done with the directions we supply, a basic idea of how the job works and the right set of tools. Looking back at a previous blog we did about tools, I thought I would add on a bit and tell you about what tools I would start with.

At my previous job, my tools paid the bills so it was a must to have the right tools for the job. There is a big difference between quality tools and the cheap set of ratchets and wrenches you find in the plastic cases at most auto parts stores. I have broken the gears in a number of cheap ratchets and rounded off bolts because the wrench is just not quite the size it says it is. I have always been a fan of Craftsman tools for a few reasons, but mainly because you can just take it back to the store when you break one and get it replaced with no issues. Snap-On has the same policies, but unless you can get the guy in the truck to come by your house you’re going to have to hunt one down to exchange the tools you need.

A basic set of tools is always a good thing to have around the garage. Tools will save you time and save you money. If you don’t have the right tools for the job it’s going to make the job very frustrating and hard to complete. Buying a good quality tool set to start with is a good idea if you want to start working on your car yourself. With a vast majority of cars, even domestics, using metric bolts you can save some money buying an all metric tool kit. I am not saying you need to spend thousands of dollars on a Snap-On kit or Craftsman Pro kit, but they do make good starter sets that will come with just about everything you will need to do normal jobs on your car.

Chris

Troubleshooting

Troubleshooting problems in a car can be a daunting task for some people. I got a reminder of how interesting it can be to chase down a problem and find a solution. The situation came up recently where our project 2010 MazdaSpeed 3 had a problem with the keyless entry system. The remotes would not operate the door locks and you could not start the car normally with the push button start. You would have to hold the remote close to the start button or use the key from the remote to activate the system so the start button would work. The outside push button door locks would not work either. The whole car acted like the security system had been activated as the stereo would not work as well.

The first step I took was to check out the owner’s manual. If there is a manual or users guide to the part you have installed, or a service book for your car this can be very helpful for finding the place to start your investigation. The MazdaSpeed 3 was flashing the red light above where the key goes when the clutch was engaged. When depressing the clutch pedal in the MazdaSpeed 3 the system checks to see if a remote is in close proximity and allows the car to turn on which prompted the red light. After going through the alarm section and keyless entry areas the solution for the problem I had the only solution was to take it to the dealer according to the owner’s manual.

Not being a big fan of hauling the car to the dealer. I did a quick check through the fuses related to the keyless entry system to see if something had blown out causing the problem. I could not find a blown fuse in the system for the security system, stereo, or Bose equipment. The MazdaSpeed 3 had been jump started a week prior so my next thought was maybe the logic units for the alarm got knocked out of whack. So I disconnected the negative battery cable from the car and hit the brake likes to drain the power from the system. After a minute I got everything connected back up and gave it another try. Still nothing responded the way it should.

It was getting later into the evening at this point so I was going to give the owners manual one more shot to see if there was something I had missed. I reached up and hit the map light which I found was not working. I hit the interior manual light switch and nothing there either. When the lights did turn on it set off a memory of an experience I had in the past in my 2001 MP3. Sometimes the interior circuits like the lights are connected into other interior systems since the lights are always live. This was the case with the MP3 where the factory stereo was not working but the fuse was good. The power feed for the memory was tied into the interior lights which had blown a fuse causing the stereo to not power up. I found the section with the fuses in the MazdaSpeed 3 owner’s manual which pointed me to the fuse box in the engine bay. Sure enough the 15 amp fuse for the interior lights was blown. I popped in a new fuse and hopped back in the car. I hit the start switch and car fired up like it should with the stereo working.

One person’s theory:

“The actual cause of the fuse being blown was one of our product engineers was checking out the visor light bulbs to see if there was a part we could supply which would work in that location. The fuse for the lights was tripped during the work which was not noticed since the car was not running and it was daytime. It wasn’t until the next day when a different person tried to move the vehicle that we noticed the problem.”

Another person’s (a person implicated in the above theory) theory:

“It was related to the dead battery and jumping the car.”

No matter what caused it, in the end the problem was pretty small and it took about 30 minutes to figure out. Remember if something electrical isn’t working, check those fuses.

Derrick

OMG A GIRL WORKING ON A CAR!

Today we have a blog written by guest blogger, and resident shop-mother to all us man-children here at CorkSport, Kelly:

For years I have taken grief for being in the “industry” and having almost zero time under the hood. I have never needed to get dirty; there has always been a willing boy to do the work for me. All I have ever had to do is purchase the part, bat my eyelashes, and bring some beer, or occasionally hand my keys over for a test fitment of prototype parts. That’s all about to change; I have decided its time take charge and install a part. I mean, really how hard can it be? I’ve watched from the sidelines for years, I know how an engine works and it major components. I have a better than basic understanding of cars and how performance parts work. This should be a piece of cake… right?

My first undertaking is the installation of the CorkSport Front Strut Bar for my Mazda 3. Per our website it should take me 15 minutes and will tighten up the front end a bit. I choose this part for obvious reasons, one it’s quick to install and two it looks easy enough, which should boost my confidence for future projects.

Cross your fingers…

Day of the project:

After putting the project off for several months, I was secretly hoping that someone would take pity on me and just take care of it while they were in there doing other stuff; or just get so annoyed while I searched for tools that they would take over and do it for me. No such luck, I’m on my own with limited supervision.

I had assembled all my needed parts including my helper/supervisor, Chris, read the instructions, and I’m ready to install. Step one: Open the hood and figure out where the damn thing goes. Step two: Attempt to bust lose top bolts and realize that this is a little harder than I had anticipated. Those suckers are on there tight. Step three: Earn the mechanic’s badge of honor; I cut my hand and found out everyone else in the building has the same injury, plus a few more. Step four: Put the bar in, easy enough, it just dropped right into place. Step five: Put top bolts back in, FYI 14-20 ft. lb. of torque still really has no meaning to me beyond tighten the bolts down super tight. Step six: Test drive! Easy part, just don’t forget to close the hood first! Step seven: Check work and done. Then take grief from the boys for taking 30 minutes to install the part that should have only taken 15 minutes. Whatever, I was being careful.

One more important thing, ladies, that is not mentioned in the install instructions. Men put their tools away, believe it or not. They may not be able to hit the toilet or the laundry bin, but they get a little saucy if their tools do not return to the toolbox clean and in the exact same spot that you took them from. They can leave their tools all over the shop, but you can’t, apparently.

Overall it wasn’t the hardest thing I have ever done, I did get my hands dirty, and wounded, but I’ll live. Next time I’ll wear gloves. I have no doubt in my mind that I will be able to install the CorkSport Motor Mounts.

How hard can it be to pull five bolts and put a urethane bushing in?

– Kelly

CorkSport and Mazda Dealers

Here’s the story, CorkSport is looking for Mazda dealers willing to sell our products directly to you. We have several already who are great, and are more than willing to sell our products.

For example, we have a dealer in Canada that regularly sell our products and has them on display in their showroom:

Chambly Mazda In Chambly, QC does a great job representing CorkSport brand parts. We encourage you to check them out if you are near them.

If you know of any dealers that are kind to customers with aftermarket parts, we would like to hear from you. What’s in it for you? Well, you can take a first hand look at our parts before you buy them and then get the dealer to install them! Plus, if they have the parts in stock, you get it the same day.

So if you know of a ‘mod’ friendly dealer near you, let us know and we will do our best to get them to carry CorkSport brand parts!

Chris