The Rear End Drivetrain – Mazdaspeed 3 AWD Swap ( Part 5)

Welcome to part 5 of the Mazdaspeed3 AWD Swap (sorry for the delay; things got really busy for a bit)! This blog covers the rear-end drivetrain and the huge modification that makes it all work.  

There are a lot of images and explanations of those images so you can see and understand the differences between the Mazdaspeed 6 and CX7 rear drivetrain.    

What is the Rear Differential

Jumping right into it, let’s identify what the rear differential is. The rear differential transfers power from the transfer case via a PTO/driveshaft, through the ring and pinion, out to the axles, and then to the wheels and tires.

Mazdaspeed 3 AWD Rear Differential Swap Comparison Mazdaspeed vs CX7
CX-7 vs Mazdaspeed Differential Comparison

However, as with many modern AWD systems in compact cars, there is a clutch mechanism between the PTO/driveshaft and the differential. This clutch mechanism controls the percentage of engine torque transferred to the rear tires.

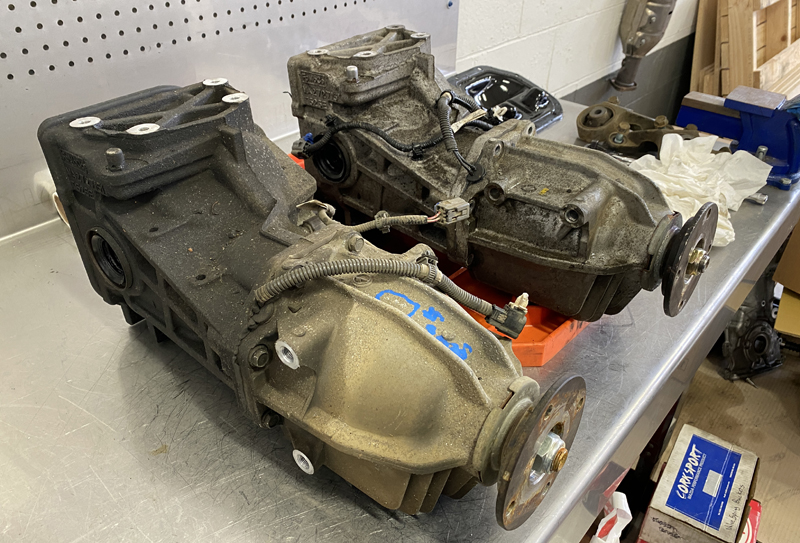
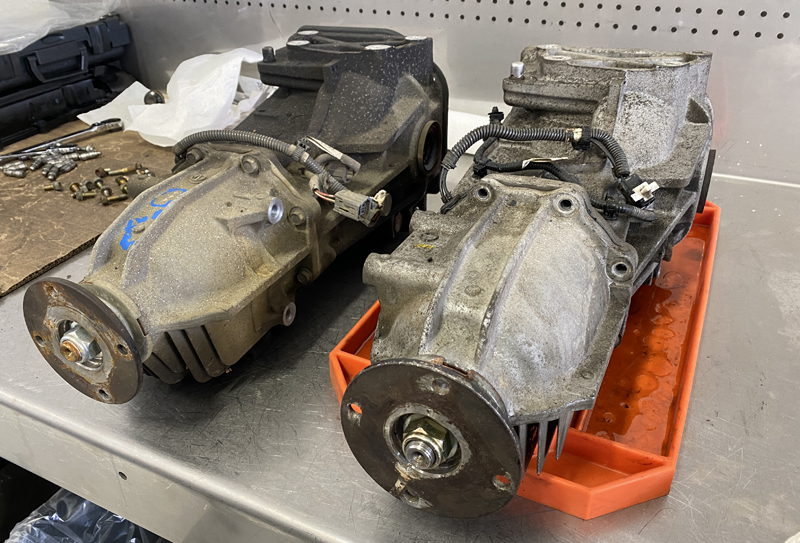
In the diagram below, we’ve identified the two major sections of the differential assembly. The line demonstrates the connection point between the two sections. The rear section is the gear housing, and the front is the clutch housing.

Differential Gear Housing and clutch housing diagram

Now that you understand the differential assembly. Let’s identify the difference between Mazdaspeed 6 and CX7. There are two major differences.

Differences In Differential

The first difference is the clutch housing mounting points for the front subframe mounting brackets. In the image below, you will see two mounting points with threaded holes on the right side of the differential, while the other differential does not have those mounting points.

The CX7 differential is on the left, and the Speed 6 is on the right. The CX7 on the left)has TWO front mounting points whereas, the Speed 6 only has a ONE mount. While this may not be a big deal for a daily driver with modest power levels, it’s a huge advantage for a racecar with nearly 900whp.  

Comparison of CX7 and Mazdaspeed 6 differential side by side
Left to Right: CX-7 and Mazdaspeed Differential

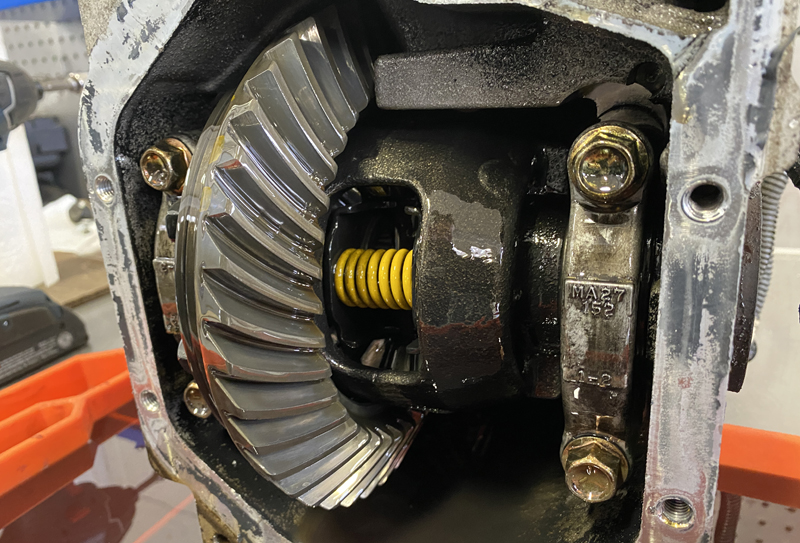
Moving to the inside of the gear housings, the CX7 uses an open differential setup, vs the Mazdaspeed 6, uses a Mazda proprietary LSD (limited slip differential). The LSD is more desirable because it will provide better power distribution to both rear tires vs the open differential.

Fun Fact: the Mazda-developed LSD uses “friction cone washers” sandwiched between the spider gears and differential carrier housing to create the limited slip effect. As load is applied through the spider gears, the increased load presses the spider gears against the friction washer, which makes this a very street-friendly and progressive type of LSD. Check it out below. 

Mazdaspeed limited slip differential

So here we are at a point where we need to use the CX7 differential because it has the ideal two-mounting front section, and we have a CX7 subframe, so…duh, but we want the rear LSD for better power distribution.

Time to split these differentials in half and see if we can swap things around. 

Mazdaspeed 3 AWD Differential Swap separated
Rear Differential Separated

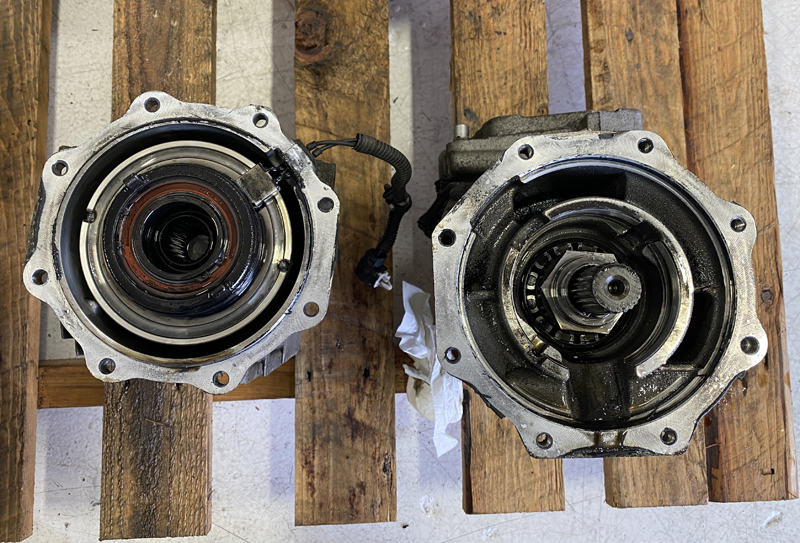
Splitting them in half to separate the clutch housing and gear housing, we can see a splined connection that interlocks the two halves.

Mazdaspeed 6 Rear Differential Gear Housing

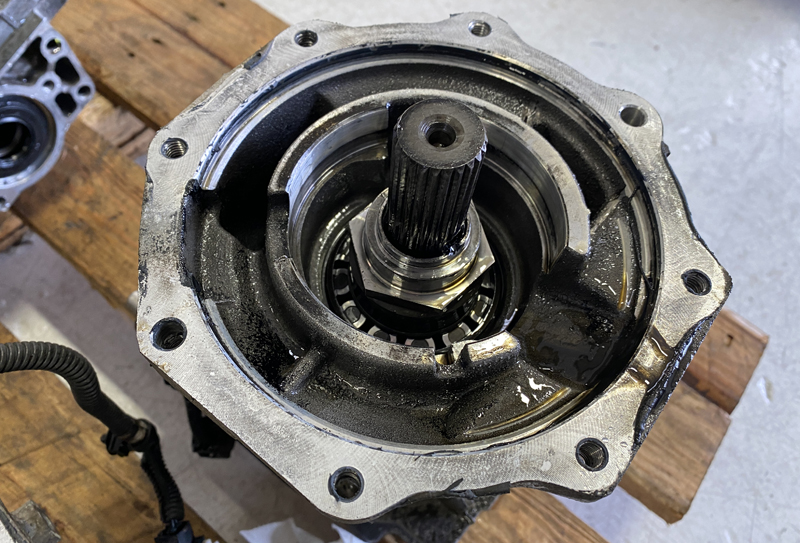
On the gear housing side, the pinion gears are retained by an internal nut, which is good because splitting the assemblies did not affect the pre-load on the bearings.

Mazdaspeed 6 Rear Differential Clutch Housing

Let’s look at the clutch housing side. The clutch pack is retained by the external nut on the driveshaft flange; again, splitting the assemblies did not affect any bearing pre-load.

Things are looking great!  And with that, we assembled the CX7 clutch housings with the Speed6 gear housings without issues!  

Now to review: if you are doing this swap, you will NEED a CX7 rear differential assembly, but you DO NOT NEED a speed6 rear differential assembly. We only did that to learn and to get the LSD. You can use the CX7 as is because the gear ratio is the same, and the LSD is not required. 

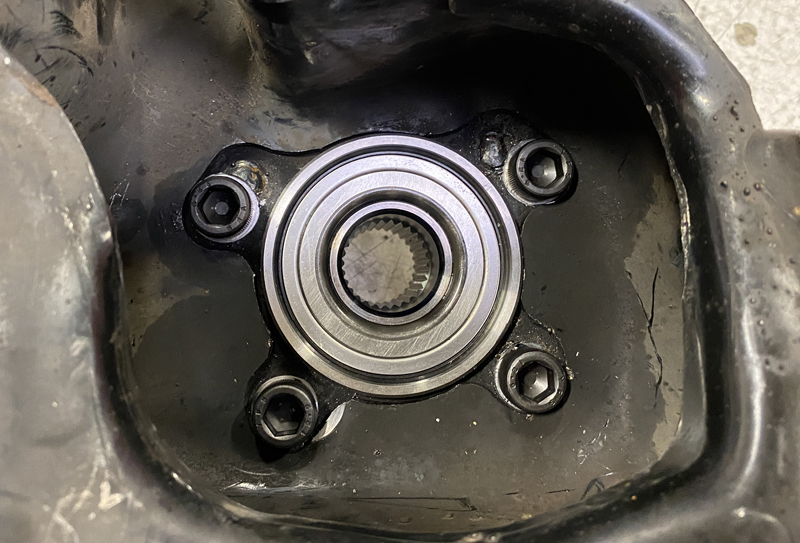
Next up are the suspension trailing arms; when using the OEM Speed3 suspension, the trailing arms need to be modified to use the OEM CX7 wheel bearings.

Modifying the Trail Arms of the Mazdaspeed

Mazdaspeed 3 trailing arm plate
Mazdaspeed 3 Trailing Arm Plate

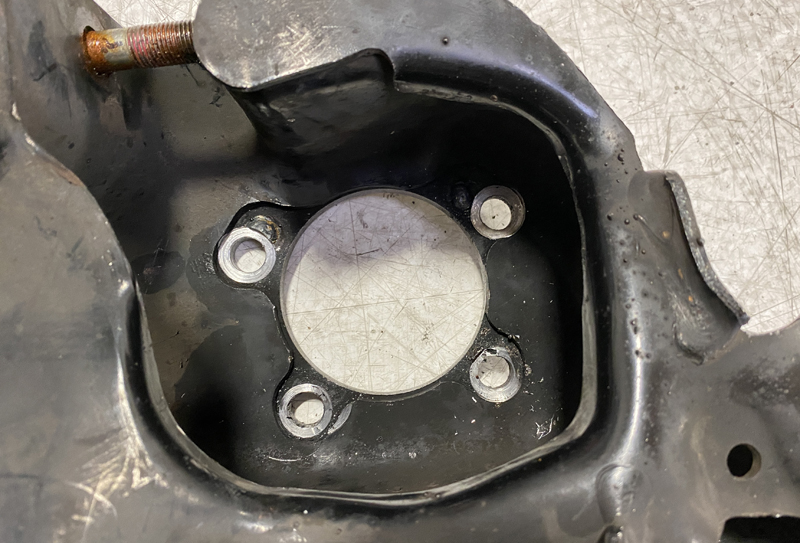
The OEM trailing arm has a beefy steel plate welded to the stamped steel structure. While the bolt and center holes look correct, they are slightly different in bore and location.

Mazdaspeed 3 trailing arm showing fitment
Mazdaspeed Trailing Arm

To make the Mazdaspeed 3 trailing arm work, modification was needed via welding the original bolt holes shut and then redrilling the holes in the correct bolt pattern for the CX7 wheel bearing.  Along with that, the center bore diameter had to be increased slightly as well.  

New Welded Holes for the Mazdaspeed 
 fitting cx7 bearings
New Welded Holes for the Mazdaspeed
Fitment of the Rear Trailing Arms & CX7 Wheel Bearing

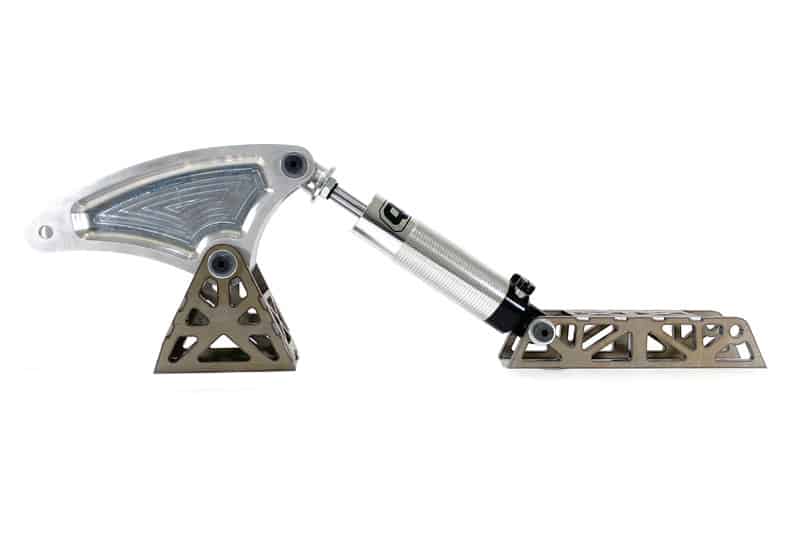
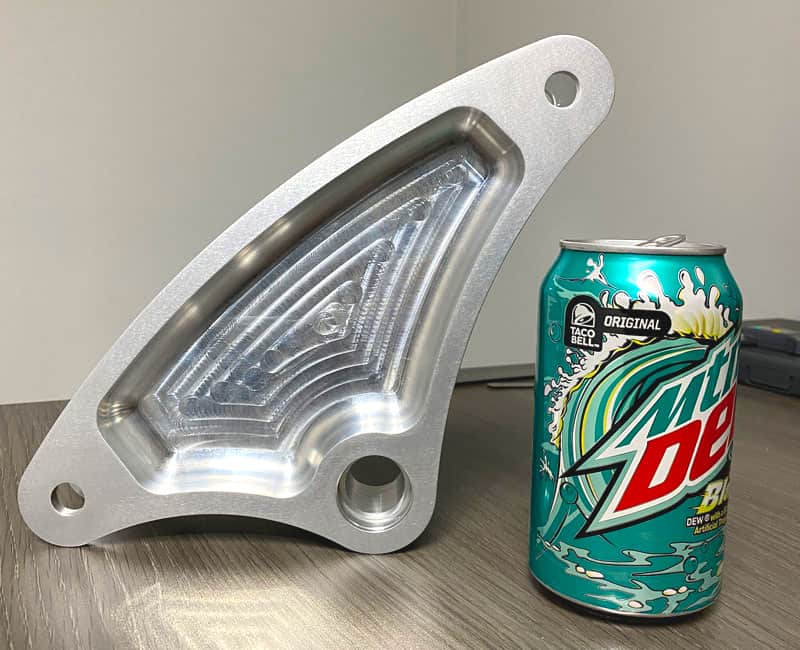
Modifying the rear trailing arms is only 1 of 3 major fabrication projects needed for the AWD swap.  The others are building a Rear Motor Mount (which I designed a badass billet one for) and the center driveshaft mounting plate which I also designed.  

Now, with the trailing arms and wheel bearings in place, we can finally figure out the rear axle lengths. Checking both the Speed 6 and CX7 rear OEM axles, I found they use the same wheel bearing and differential inputs, which is great. However, The lengths are not the same.

Mazdaspeed 6 Differential Spline Length
Mazda CX-7 Differential Spline Length

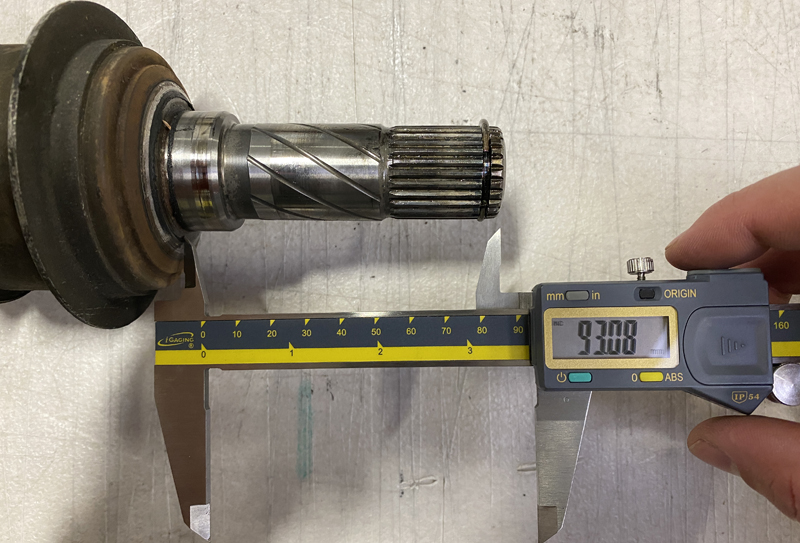
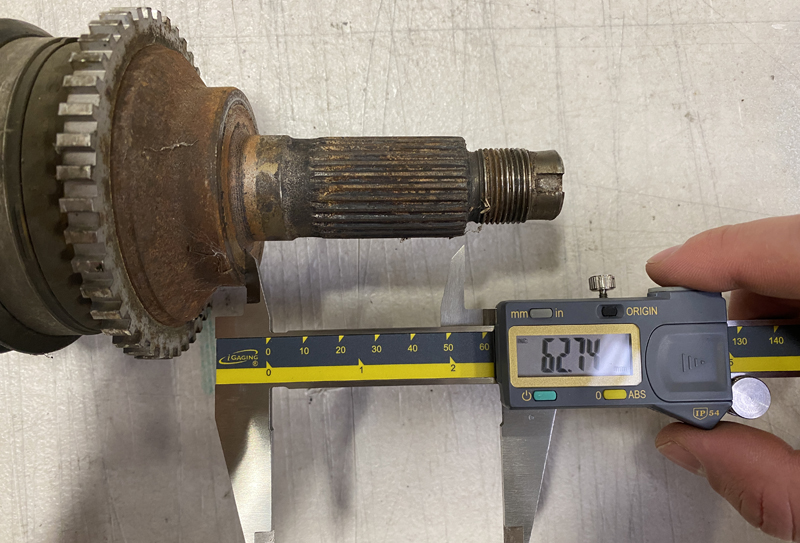
Unfortunately, in test fitting the Speed 6 and CX7, we found that both needed to be shorter for the Speed 3 application. With that fact, the cost is a lot more expensive for anyone swapping because of the needed custom rear axles.

I was personally going to get custom rear axles either way due to the power levels and use of the Halfmilespeed3, but it’s not a requirement. 

Rear Custom Axles for the Mazdaspeed 3
700WHP Rated Custom Rear Axles

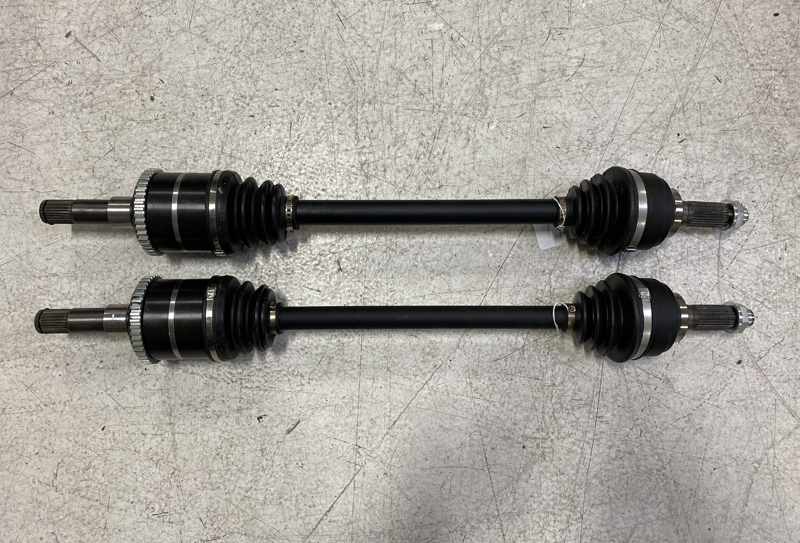
Fast forward many weeks, and we have a set of custom-length 700WHP-rated rear axles to compliment the front DSS 5.9 axles.

Rear Custom Axles installed on the 2007-2009 Mazdaspeed 3
Mazdaspeed 3 Rear Axles installed

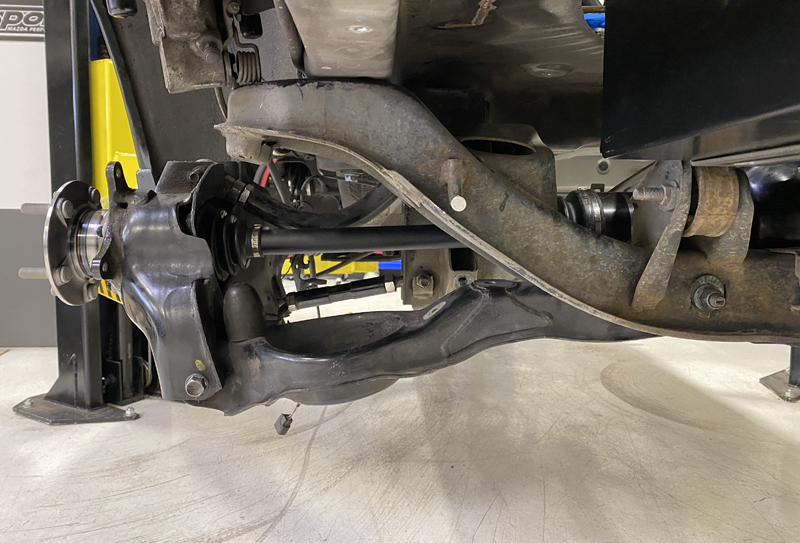
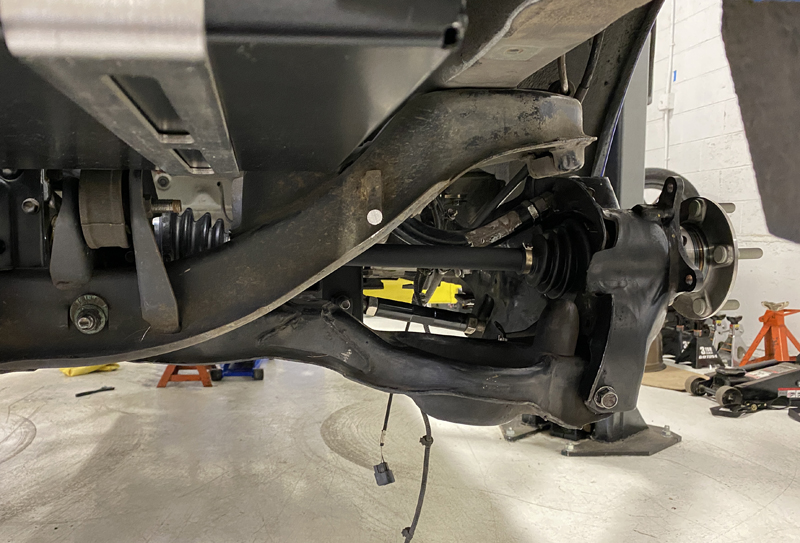
All bolted in and looking great!  While doing this I learned a few things and realized that one of my assumptions was wrong. 

  1. The front axles work and don’t work from the MS3.  The driver front MS3 axles will interface perfectly with the Mazdaspeed6 transmission.  However, the inboard CV housing/spline section for the passenger side front will need to be replaced/modified to work with the speed6 intermediate shaft.  
  2. The rear ABS sensor for the Mazdaspeed3 will not work with a Speed6-style ABS trigger wheel. They use a much different and more modern magnetic trigger wheel incorporated in the rear ABS sensor for the Mazdaspeed3 will not work with a Speed6-style ABS trigger wheel. They use a much different and more modern magnetic trigger wheel incorporated inside the wheel bearings…which we don’t have when using the CX7 wheel bearings. This has led me to develop custom ABS trigger wheels to work with the OEM Mazdaspeed 3 sensor. More on that later.

Alright, that wraps up the rear drivetrain setup.  There are plenty more huge milestones to overcome, which are coming up in this multi-part blog series! 

I hope you are enjoying this series about the Mazdaspeed 3 AWD Swap. Stay tuned for more blogs to come!

You can also find updates on my IG @halfmilespeed3, the CorkSport 7th Gear Membership, and on mazdaspeeds.org.

Thanks for tuning in!

-Barett @ CS

Connect with us

You may also like

Stay up-to-date on the latest news and product updates from CorkSport.

* indicates required

How To Build A 900 Mazdaspeed 3 AWD Swap – Rocker Arm Suspension (Part 4)

Welcome to part 4 of the Mazdaspeed3 AWD Swap! If you missed the previous posts, you can catch the Intro, (Part 2), and Part 3.   This blog will cover the rear suspension design, specifically the rocker arms, and how we came to the size, shape, and overall design.  This will get technical with numbers, angles, and CAD models.

Before we get into the technical jargon, let’s cover the “what” with rocker arm suspension.  

Mazdaspeed 3 AWD Swap Rocker Arm Suspension

Let’s break down this diagram as it is 100% not OEM for the Mazdaspeed 3:

  • Rocker Arm:  This is the keystone of the suspension design and does all the work.  The rocker arm connects the push rod and the damper to transfer suspension force at a different angle.  The rocker arms can also go by a few names: rocker arm, bell crank, cantilever, and pivot arm, to name a few.  
  • Push Rod: This is a simple rod with spherical rod ends on each end.  This connects the OEM suspension to the rocker arm.  The push rod is in a similar location as the OEM suspension. 
  • Suspension Mounting Bracket: This is the mounting point for the push rod to the OEM suspension trailing arm. This must be added because the OEM damper mount is below the now-new axle shaft. 
  • Coilover/Damper: This is an off-the-shelf damper that can have a coil spring installed on it.  It features independent rebound and compression damping adjustability.  
  • Cross Member: This is the cross member that is welded between the chassis shock towers in the car to support the new rocker arm suspension.  

Here you can see the design tack welded in the car.  This should help you understand how the design fits and is used in the car itself.

Mazdaspeed AWD Suspension Corss Member Tacked
Mazdaspeed AWD Suspension Push Rod Mount

Now that we have a basic understanding of this rocker arm-style suspension let’s get into some more details!

First, let’s talk about suspension and the forces they deal with.   Gravity pushes you and your car down to the ground, and road imperfections (bumps, potholes, unlevel surfaces) try to push you and your car up/down/all around while driving.  If vehicles did not have suspension and instead the wheels were rigidly attached to the vehicle chassis, we would have all sorts of issues.  Comfort, control, and tractions are the big concerns, amongst many others.

The suspension’s job is to soak up and move with many road imperfections like bumps, potholes, and unlevel surfaces.  Every time your tire goes over a bump or pothole, it moves up or down, resulting in a force transferred into the suspension.

Check out this quick illustration to see the rocker arm suspension in motion:

As the tire moves up/down, you can see that the rocker arm pivots and transfers that motion into the coilover/damper.

Now let’s break down those forces a bit more.  The rocker arm allows us to change the angle of the forces transferred to a new angle that is easier for us to deal with. Instead of being required to have a coilover/damper in a vertical suspension down around the tire (like OEM), I can now change the angle so I can put the coilover/damper in a position that is much easier to deal with. 

Rocker Arm Suspension Mazdaspeed  Swap Forces
Rocker Arm Suspension Mazdaspeed Swap Forces

The rocker arm has two major features about it. 

  1. The angle change of transferred forces, as we just discussed.  This is mainly to help with “positioning” the suspension components. 
  2. The rocker arm lengths allow us to define the “motion ratio” of the suspension.  Looking at the diagram, you can see a blue line and a green line.  These effective rocker arm lengths affect the suspension and result in a motion ratio.  
    1. The resulting ratio is 1:0.7 meaning the damper compresses 70% of the amount that the wheel moves up/down.
    2. The wheel/tire has a maximum range of 5.55 inches of travel, while the damper has a maximum travel of 3.875 inches.  

Designing the rocker arm with this 1:0.7 motion ratio allowed me to use a smaller, lighter damper design with limited travel and still get the desired wheel suspension travel I needed.  We use a stiffer spring to compensate for the extra leverage of the motion ratio.  

Motion ratios in suspension are common.  For example, the Mazdaspeed 3 suspension has a unique motion ratio in the front (1:0.98) and rear (1:0.71) from our calculations.  These numbers are typical of the style of suspension found in many commuter cars these days.  

Now that we understand the forces and the intent with the rocker am…we have to design its shape and size to do the job.  Angles are the tricky parts of the rocker arm design.  Defining the angles (and thus shape) comes down to understanding the push rod input angles and the desired damper output angles while in motion. 

Rocker Arm Suspension Mazdaspeed AWD Swap Angles

When we say “angles,” we are talking about the red arrows in the above diagram.  These red arrows are the angles between the rocker arm and the push rod, as well as the rocker arm and the damper.  Ideally, these angles are always 90 degrees through the entire motion you see in the GIF, but that is not physically possible, so we had to find the correct balance of angles while in motion.  

A whole lot of math encompasses this, but the upcoming diagrams will help break it down to a very understandable level for everyone!  We are breaking it down to the three major suspension travel points: droop, bump and ride height.  

First, we are going to look at the angles for the push rod in Bump, Ride Height, and Droop. 

  • Bump is when the suspension is fully compressed.
  • Ride Height is when the car is sitting stationary (static). 
  • Droop is when the suspension is fully decompressed.  Image your car sitting on jack stands with the tires hanging in the air. 
Mazdaspeed 3 AWD Rocker Arm Angle Bump Pushrod

In full bump, the push rod angle to the rocker arm decreases to 67 degrees which is 23 degrees off the “ideal” 90. 

Mazdaspeed 3 AWD Rocker Arm Angle Ride Height Pushrod

Then looking at ride height as the suspension moves downward from full bump.  The damper-to-rocker arm angle decreases to 82 degrees which is 8 degrees off the “ideal” 90.

Mazdaspeed 3 AWD Rocker Arm Angle Droop Push Rod

Lastly, with the suspension traveling to full droop.  The push rod to rocker arm angle increases to 117.5 degrees which is 27.5 degrees off the “ideal” 90. 

What does this mean?   This is great, actually!  Ride height is where the suspension will function most of the time, and that is only 5 degrees off the ideal 90-degree angle.  When the car is launched in a drag race, the suspension is going to compress, and that angle will decrease, passing through the ideal 90-degree angle and further.  This is precisely the balance we are looking for with the rocker arm design.  To keep it functioning most of the time as close to 90 degrees as possible.

Ok, let’s look at the angles from the damper side of the rocker arm. 

Mazdaspeed 3 AWD Rocker Arm Angle Bump Damper

In full bump, the damper angle to the rocker arm increases to 111.5 degrees which is 21.5 degrees off the “ideal” 90. 

Mazdaspeed 3 AWD Rocker Arm Angle Ride Height Damper

Then looking at ride height as the suspension moves downward from the full bump.  The damper-to-rocker arm angle decreases to 82 degrees which is 8 degrees off the “ideal” 90.

Mazdaspeed 3 AWD Rocker Angle Droop Damper

With the suspension traveling to full droop, the damper-to-rocker arm angle decreases to 62 degrees which is 28 degrees off the “ideal” 90. 

Again we have the damper near the “ideal” 90-degree angle at ride height and then pass through the 90-degree angle zone when the suspension compresses at launch.  Again, the balanced angles we are trying to design for so the suspension function in the “ideal” angle range most of the time.  

Why are the angles so important?  The further you get from the “ideal” 90-degree angle, the more non-linear the suspension acts.  When the suspension acts in a linear function, it is tunable and predictable to drive.  If it is non-linear, then it makes tuning and use much more difficult…this results in inconsistent launching and driving, which is not good in a racing environment.

Mazdaspeed AWD Swap Racecar Suspension

This seems like a lot of work…why do it? 

A few reasons, really: 

  • Moving to the rocker arm design gave me a lot of control over how I set up my Mazdaspeed for racing
  • It also gave me the ability to use readily available off-the-shelf dampers.  This allowed me to get double adjustable dampers (rebound and compressor) for a very cost-effective price. 
  • The CX7 AWD swap rear axle shafts did not allow me to use the OEM dampers anyways. 
  • This design moves more of the suspension component’s weight to “sprung mass” which is better. 
  • I love the challenge of designing a suspension system like this, and this was a great opportunity!

Before we wrap things up, note the rocker arms are 6061-T6 billet and are massive!  We knew they were big, but it didn’t really sink in until we saw them firsthand.  

Rocker Arm Size Comparison
Rocker Arm Size Comparison 2

Alright, that wraps up the rocker arm suspension design, a huge novelty for the build.  There are plenty more huge milestones to overcome, and those are coming up in this multi-part blog series!

I hope you are enjoying this series about the AWD Swap Mazdaspeed3, stay tuned for more blogs to come!

You can also find updates on my IG @halfmilespeed3, the CorkSport 7th Gear Membership, and on mazdaspeeds.org.

Thanks for tuning in!

-Barett @ CS

Connect with us:

Stay up-to-date on the latest news and product updates from CorkSport.

* indicates required

You may also like: