Tired of your yellow looking interior and license plate lights? Tired of searching the internet for each bulb individually? CorkSport now has the answer.
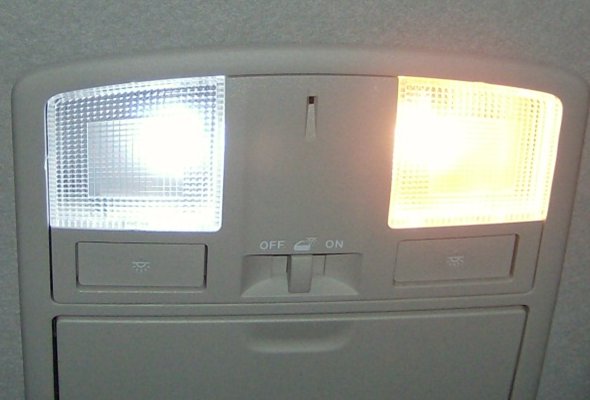
Soon to be released will be a kit which includes the dome light, driver and passenger reading lights, the trunk light, and both rear license plate lights. All of these lights will be a very cool white light with a hint of blue. The photo shows the stock yellow incandescent bulb on the right, with the CorkSport LED light kit installed on the left.
I personally have these in my vehicle and would never switch back from LED. The main advantages to the LED kit will be less power draw, a cool white light, and a bulb life that will outlast the vehicle.
The kit will include installation instructions as well as customer support should you have any questions. The projected retail will be right around $35 for the entire kit.
If this kit is as popular as I am hoping, I plan on expanding the kit to offer turn signal, brake, and backup lights for an additional cost. I am still working on getting the bulbs to include resistors so the blinkers flash normally without the need for a new relay or inline resistor.
If you want a kit for a different Mazda vehicle, just shoot me an email and I will work on getting a kit setup and released for your vehicle.
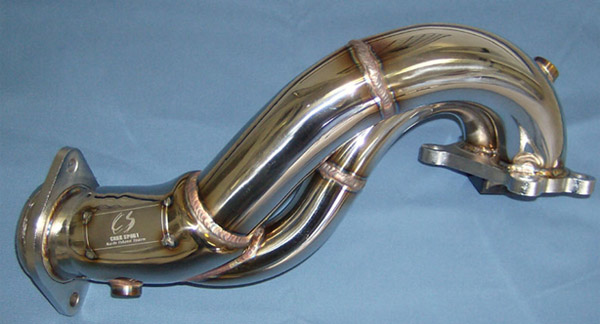
It’s released! The downpipe for the 2010 Mazdaspeed 3 is on our shelves and ready to ship out. First off lets cover the obvious questions, why install a downpipe? When installing an aftermarket down pipe several things happen. First the turbo charger requires less effort to quickly spin up due to the removal of the catalyst, so boost will happen at a lower RPM. Secondly, with less restriction and back pressure the turbo will be able to quickly expel more exhaust gases, thus raising the boost and increasing power across the vehicles entire power band.
The CorkSport Mazdaspeed 3 Power Series Downpipe gives you faster turbo spool up which results in a larger power band. Gains in power have been up to 21 wheel horse power when installed on an otherwise stock Mazdaspeed 3.
The downpipes on the 1st Gen MS3 have historically been a bit of a puzzle to work around however our designs are able to avoid throwing a check engine light on first generation DISI equipped vehicles. Other manufacturers of downpipes are hit and miss depending on the manufacturer, with some throwing the occasional random CEL for slow response time and others being more pervasive.
The 2010 models are a bit more elusive and harder to pinpoint the ideal sweet spot for the secondary oxygen sensor that will not throw a check engine light. We are however actively working on resolving the CEL and if successful we hope to offer a retro fit kit for previously purchased downpipes.
If you have any questions about the 2010 MS3 downpipe feel free to shoot us an email or give us a call. We’ve got several more things coming down the pipe so stay tuned.
Today’s blog entry is written by a guest blogger: Travis! If you’ve ever ordered anything from us then odds are Travis assembled it, packed it, double checked it, triple checked it, sealed it, and shipped it to you!
I checked the online flyer for my local region to find out the weekend schedule for March 27 and 28. You can get on SCCA.com and then search by selecting “Find your region”. The season began with practice on Saturday and Race #1 on Sunday. Our class, DSP, would race in the afternoon both days. There are morning and afternoon sessions, each with 2 run groups (1 group works the track while the other runs and vice versa). We found out that Saturday is open practice, anyone can run morning or afternoon session and everyone gets 6 runs each session. The weather was great Saturday and we learned a lot, since both of us come from Drag Racing backgrounds. Sunday was rainy off and on but tons of fun and the previous days coaching and practice had us off to a good start.
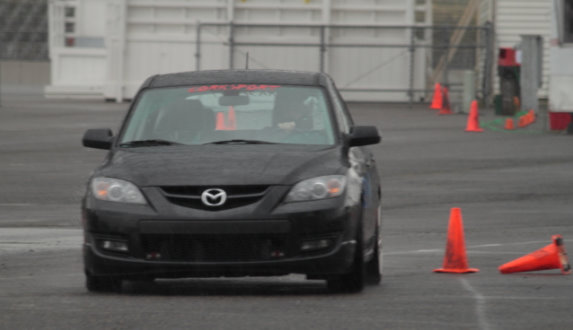
Now before I go on with the weekend recap, I’d like to explain what got Chris and Me to this point. Both of us have raced, mainly drag, and are at least familiar with spirited driving and some technique. A big problem for many people who take up auto racing is that a learning curve can easily resemble a rising cost curve when exploring the possibilities various venues offer. “Pay to Play”, is not an unfamiliar adage, but fun is not always overshadowed by unexpected costs, damage or mental suffering. As some people know Corksport has in the past run a ’99 Protégé at Woodburn and PIR but getting bugs sorted out has been generally been time consuming and occasionally expensive. It was decided that Autocross/Solo was more novice and budget friendly. When things go wrong in Drag Racing it tends to make things explode in a huge, expensive way. I would provide the car, my 2007 Mazdaspeed 3 GT, and CorkSport would contribute some parts, a pair of drivers and entry fees. A perfect match. I’ll give racing costs and car details in a later post.
I signed Chris and I up for SCCA and used the online rule book to find a class the car would fit in. I had read some forum posts in the past and had a pretty good idea what class we would end up in. No surprise, the car would be in DSP (D Street Prepared), not terribly desirable for a couple of novices but oh well, we would not go blindly into this new endeavor. I contacted a friend who has been racing for many years and got him to agree to some personal coaching for the practice day on Saturday. A few extra hours after work to prep the car and Chris and I are ready for the season to begin.
I’ll post details on fees and expenses along with the cars setup and, of course, the results of our first weekend next time.
– Travis
CorkSport Goes Autocrossing September 13th, 2018Derrick Ambrose
We have some good things brewing here at CorkSport in the product development arena. We’re working on the release of some new products that are currently in our development pipeline. Below are a few products that we’ll be releasing soon as well as a snapshot of our current approved projects that are in the works. If you don’t have your favorite project listed on here, we may still be working on it, but if there is something you’d like to see, feel free to email us: gr******@*******rt.com.
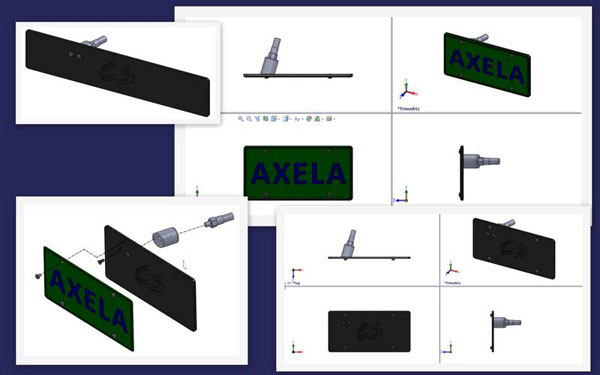
Using the factory tow hook mounting boss and a CNC machined, black anodized billet aluminum backing plate complete with a ghosted CorkSport ‘CS’ logo, this license plate relocation bracket allows you to avoid being hassled by Johnny Law while not blocking the flow of your radiator or front mount intercooler. Offset to the driver side with a factory fascia contouring angle, these brackets are the nicest on the market with a simple yet effective design that even looks nice if you’ve got the plate off of the car.
Have comments and questions about this product? Feel free to email me at gr******@*******rt.com for further input. One customer we have (who at this time of press hasn’t answered my email asking to use his name -which I would love to) had an excellent suggestion to provide a replacement cover for the tow hook access panel, and we’re already working with our composites shop to dial something in as an added option to the package.
Look forward to this product coming near the end of the month. Photos below show initial design using ‘AXELA’ license plate to demonstrate assembly. No more rotation of your plate frame. Integrated threaded bosses in the 1/4″ thick backing plate for an easy two handed installation. Two piece billet design allows potential to swap out for JDM or European backing plates in the future.
Want to throw in your 2 cents toward future upgrades and revisions to the product? Leave us your comments in this quick online product development survey.
2004-2009 Mazda3 2.3l Power Series Short Ram Intake System
We have had a lot of success lately with our configurable intake systems for the 2010 Mazda3 and 2007-2010 MZR 2.3 DISI powered MS3, MS6 and CX-7 and we have our customers to thank for that. With all of the added buzz around our intakes, a number of 1st Gen MZ3 as well as MZ6 owners have asked about a Power Series Intake for their vehicles. So we prototyped a new silicone coupler design that interfaces well with the MZ3 and MZ6 vehicles, clearing the battery box vent in the MZ3 and providing additional hood clearance in the MZ6.
So far we’re on the cusp of being able to release the 1st Gen MZ3 systems -probably around the end of the month. I’ll be testing out the system on a 1st Gen MZ6 this week thanks to one of our local friends who has been a customer of ours for years of Mazda ownership.
We are still looking for a 2010 MZ6 in the PDX/Vancouver, WA area as our last contact for a rental car has come up short in the last few weeks and we’re really eager to get the development finished on that product and get it to market. So if you’ve got a 2010 MZ6 and are in the market for a short ram intake, drop me an email at gr******@*******rt.com and we’ll get it hooked up for you.
2010 Mazdaspeed3 Cat Back Exhaust.
We just finished some revisions to production testing for the CatBack Exhuast on the shop’s 2010 Mazdaspeed3 and will have those available in early May. Dual 90mm tailpipes finish off a twin resonated system with full 3″ straight through exhaust for maximum performance and our signature aggressive sound.
2010 Mazdaspeed3 Front Mount Intercooler
We’re finishing up the test fit of our 2010 Mazdaspeed3 FMIC this week and then doing some dyno pulls to catalog the results. We are also revising the configurations of our FMIC, offering a bare bones FMIC kit at an aggressive price point, FMIC with Top-Mount Ram Airbox, as well as options for full anodizing of the entire system and optional inclusion of the ATP Boost Cut Killer that was included with all of our previous intercoolers (as anyone with a FMIC and TurboBack Exhaust can tell you, this addition is usually the item that pushes you right up to the point of boost cut, and being able to run that additional couple of PSI adds up to a lot of power, especially when you throw a tune on the vehicle for a good margin of safety.
2010 MS3 Cold Air Box
We’ve got this charted for June 2010, had to do a few updates to the design in an attempt to clear HKS SSQV BOV’s. Just finishing up the redesign and should be able to make a mold shortly thereafter.
FC RX-7 S4 & S5 CorkSport Silicone Radiator Hoses
Multi-layer silicone coolant hoses withstand immense pressures and seal superbly. Add a set of four T-Bolt Band clamps and you’re ensured the best performance. With a black outside and a blue flourosilicone liner, these lines won’t burst under pressure and they won’t burst your bank account either.
There’s my update for now. We’ve got a couple more things coming down the pipe, but these are the furthest along.
It’s easy to lose sight of ‘Performance’ during the daily grind of developing and selling performance parts. This means different things to different people, I understand. To Travis (Shipping) and Chris (Sales) this means getting involved in Autocross/Solo. Both of them are new to this form of motorsports, but both are veterans of sanctioned drag racing. How will that translate to quick turns on asphalt parking lots? Stay tuned during the upcoming season to find out. Or even better, get involved and join us!
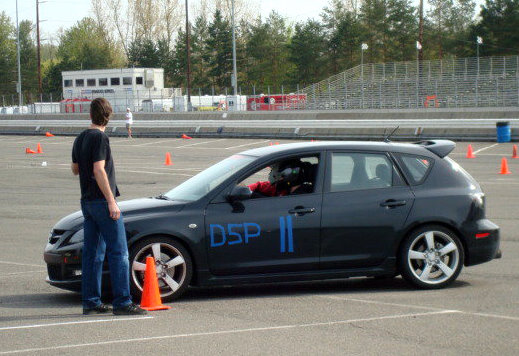
Below is their planned schedule. They decided to take turns running a 2007 Mazdaspeed3 loaded with CS parts.
Practice Day Saturday, March 27th – PIR North Paddock
Event #1 Sunday, March 28th – PIR North Paddock, $25
Novice School Saturday, April 24th- PIR South Paddock (Pre-registration is required.), $50.
Event #2 Sunday, April 25th- PIR South Paddock, $25
Intermediate School Saturday, June 12th, Packwood, WA (Pre-registration is required)
Event #3 Sunday, June 13th – Packwood, WA, $25
Event #4 Saturday, July 10th – Packwood, WA, $25
Event #5 Sunday, July 11th, – Packwood, WA, $25
Event #6 Saturday, August 21st – Packwood, WA, $25
Event #7 Sunday, August 22nd – Packwood, WA, $25
Event #8 Saturday, September 18th – PIR South Paddock, $25
Event #9 Sunday, September 19th – PIR South Paddock, $25
The plan is to make each PIR event, the novice school and at least 1 Packwood weekend event. The car will likely be classed in DSP, details still to be worked out.
We’ll post a blog introducing the car, Travis & Chris, and progress so far after their first event later this month.
Do any of you guys autocross your cars? Let us know what you think.
Taking it to the Track October 18th, 2023Derrick Ambrose