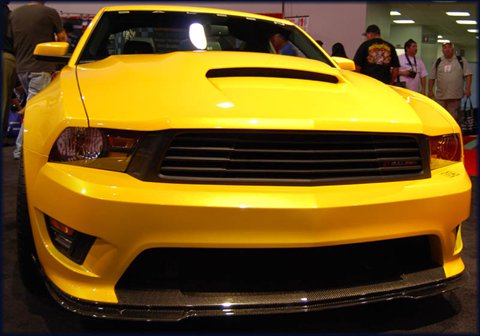
I had three 3 days to take in SEMA this year. I estimate that I probably I walked around 40 miles (it felt that way by Thursday afternoon at least). The aisles were busier this year with people and exhibitors when compared to 2009. The most common vehicles shown at SEMA were Camaros and Mustangs, new and old, tons of them everywhere.
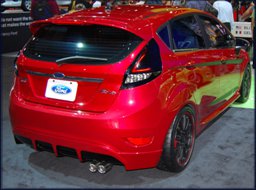
The vehicle which I think had the strongest showing besides the usual muscle cars was the Ford Fiesta. I saw at least 15 or these cars which had been modified in one way or another with various themes. I expect to see more and more of these on the road over the next few years. Most of the themes shown on the Fiesta were more lifestyle oriented over sheer performance. Ford did have some trick rally ready parts available for the Fiesta if you wanted to go off road your car.
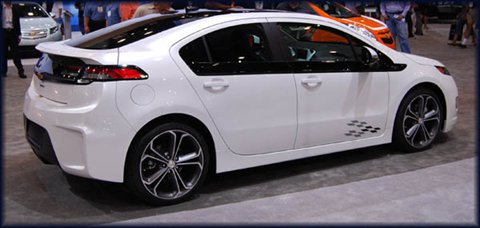
One car I expected to see more of was the Chevy Volt. I saw only one, and that was in the Chevy booth. For a car which GM has been touting for 3 years you would expect a few pre-production cars to be seen around the show. My thought is they are pulling another GM move and it will be several more years until they finally get the car into production. The car looks great in person even though I would never own one.
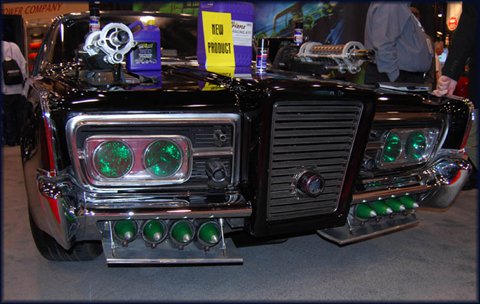
Weird item of the show was the Green Hornet car for the upcoming movie. The car was in the Royal Purple booth. It made for an odd combo of missiles, machine guns and lubricants.
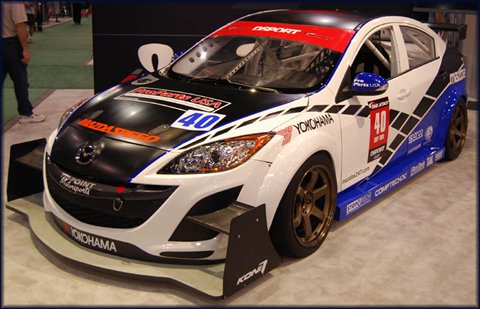
I was disappointed this year though with the showing of Mazdas, I was expecting more. There was not one Mazdaspeed 3 or any other Mazdaspeed Mazda at the show. There were two nice Mazda 3s in the Mazdaspeed booth, one time attack car which started life as a world challenge car and a great concept vehicle turbocharged Mazda 3 sedan which was also shown at last years SEMA show.
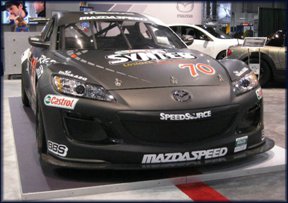
Also shown in the Mazdaspeed booth was a Rolex 24 hour winning RX8 with a devious body scheme. The left side and the rear was the FXDD car and the other side of the car was in the Castrol Dark Grey.
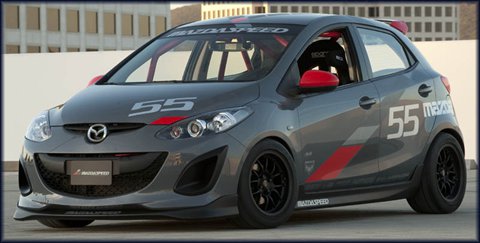
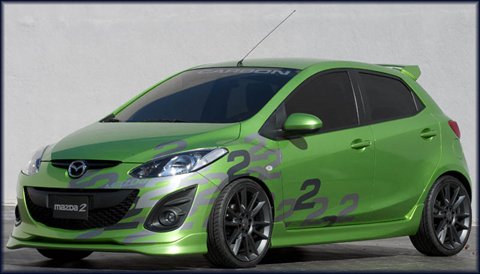
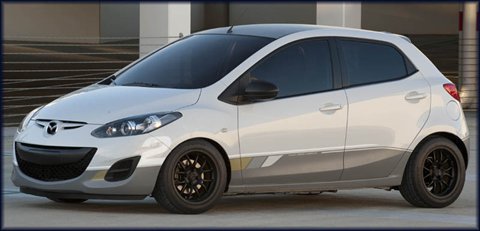
There were four Mazda 2s at the show. Two were in the Mazda booth, one in the H&R suspension booth and the 4th in the booth across from the Mazdaspeed booth. All of the Mazda 2s at the show were equipped with European bumpers and two had the European market lighting. The lip kits on several of the cars are designed for the euro bumpers so they do not work with North American market vehicles but they do look good. I spoke with the company who produced the kits and they are working on them for North American cars. The roll cage and race car prep on the grey Mazda 2 was done by AWR racing out of California and it looked good. It makes me want to tear out the interior of my car and go racing.
If I was to compare the show overall to last year it was better. There were plenty of new ideas, great looking cars, and people to meet with all week. Maybe next year we can see more Mazdas at the show.
Returning to us this week is previous guest blogger Kelly:
I thought I had squelched the discussion but apparently installing the CorkSport front strut bar on my Mazda 3 wasn’t enough to get the boys off my back. My point of view: “Why install a part when I have the boys to do it for me?” has failed. I’ve spent my entire driving career successfully avoiding getting involved. My tried and true method has carried me far, why would I want to rock the boat? I can take the grief; it’s only talk, right? Yeah right. You boys, once you get your meat hooks in, there is no stopping the you. Now it’s personal.
I first thought CorkSport Cooling Panel, easy enough, but I don’t have sedan. (Jake, product engineer god, I need a panel please.)
CorkSport Motor Mount Inserts? No… I have an automatic and a small child, and don’t want the car to vibrate that much.
Install the CorkSport SRI? Fortunately it’s on the car already. Plus, I read the instructions, way out of my league.
I finally settled on the CorkSport LED Kit– now there is something I can get behind and I don’t even have to open the engine bay, hurrah!
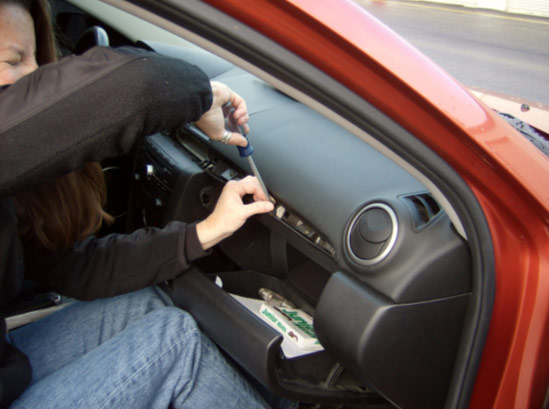
Step one: read the instructions. They look pretty straightforward. I briefly thought about taking the part home and giving it a try, but opted to stay here at CS. My reasoning was two fold- one, it’s the rainy season in the great Northwest and two, if I get in to trouble, someone can save my bacon.
The install: Per the instructions it should only take me 20-30 minutes in boy time. In girl time it took 45 minutes and I successfully installed every bulb backwards. Great.
I was totally stressed about pulling the map light out at the start of the project, come to find out that is the easy part. When I had to climb in my trunk for the trunk light and the license plates bulbs it got interesting, but I got it done without help. Then came the glove box light, lets just say things got a little hairy. I got the trim off easy enough and headed back inside to get a Philips screwdriver when Chris, aka Boy Wonder intervened. First just to get the correct screw driver, then he opted to follow me out to the parking lot to see how everything was going, knowing full well what was coming next…pulling the glove box out. I think he decided to help before I was having him order new clips and possibly fix the mess. Thank the manufacturer above, because I had no clue and it was quite a bit harder than I expected. Chris points me in the right direction and gave a helping hand, then took pictures that I’m sure he’ll hold against me in the future.
Overall the majority of the installation was easy. The glove box was a little harder than expected, but I’m glad I did it, the bulb was burnt out anyway. If you’re new to the performance part game this is an easy part to start with and it looks fabulous when you’re done.
– Kelly
Anything You Can Do, I Can Do… Also? November 5th, 2010Derrick Ambrose
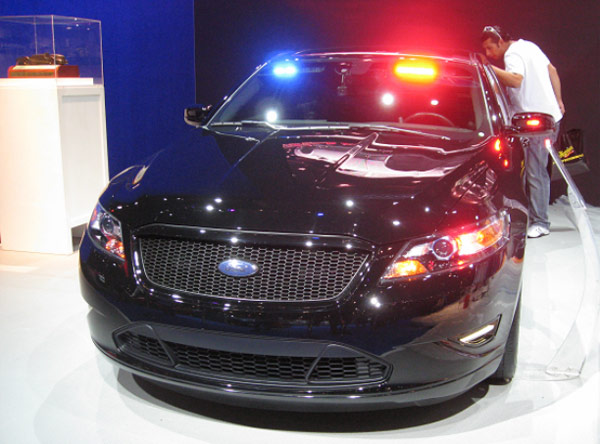
Being a product development engineer at CorkSport has many perks, but the latest one was a chance to go to SEMA (Specialty Equipment Manufacturers Association) in Las Vegas. The weeklong event is the culmination of a year long process that thousands of companies have put into various vehicles and aftermarket parts. There was everything from smaller companies showcasing a new line of off-road vehicles, to Ford’s new police vehicle (long overdue).
The part that the majority of the public does not know is the education side of things. Being a member of SEMA allows us to go to seminars that are specifically geared towards helping smaller businesses (like CorkSport) evolve. These seminars are put on by successful people in the industry (usually a panel of experts in the related field). They had everything from how to make a viral video, to industry trends and what car manufacturers and planning for the future. This helps us get a head start on continuing to make quality products at an affordable price.
The other side of things that you may not realize about SEMA is the networking side of things. I know this is true for me, and most likely for a lot of you as well: the majority of the people I communitate with for various parts, hardware, equipment, etc, I never actually meet in person, rather only via email or phone. SEMA is a great chance to put a face to a name and get to know the person I am doing business with a little better.
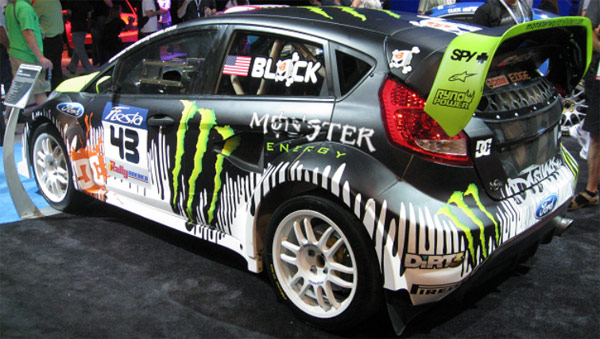
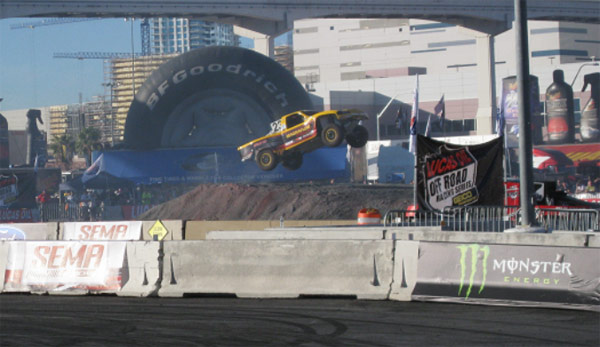
I was also able to squeeze in a little non-work related fun such as getting to sit in the actual car Ken Block used in the Gymkhana 3 video and watch some trophy trucks race around the parking lot.
I will end with a couple very helpful hints for any future SEMA goers. Wear comfortable shoes! This is a must. I’m guessing I walked a minimum of a marathon in two and a half days. My second tip is to bring a backpack. You will get lots of little lanyards and posters and a backpack is much easier to walk with a place to store them. Finally, bring lots of water. The heat and walking around will dehydrate you and paying $3 for little 12oz bottles can get expensive.
Today we’ve got a guest blog by a group guys who are die-hard racers. It’s a bit long, but it’s a very interesting read about doing much with very little, and the adventures involved in budget racing. Without further ado, I give you… Team Pony Express!
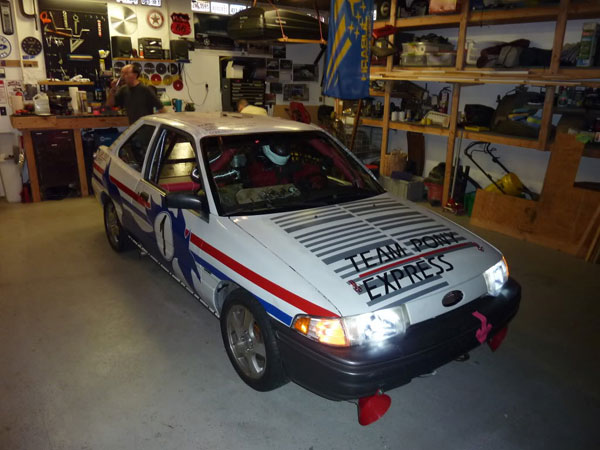
Team Pony Express is a group of friends who have gotten together to build a crapcan race car. Our steed? A 1991 Ford Escort. But not just any Ford Escort – this is the Pony edition, in which Ford did Colin Chapman proud and “added lightness.” They took out the radio, removed the power steering, and allow all 88 churning hamsters of the 1.9 liter four to do their work on the remaining 2,491 lbs. In short, it’s the GT3 RS of Ford Escorts, but Ford made the very un-Porsche-like decision to charge less for it.
Our particular car was once Aaron’s treasured turbocharged beast, but blew the diff out the side of the transmission housing and the poor Pony was left to collect moss in the yard.
We watched in envy as the rest of the country got to enjoy the crapcantastic 24 Hours of LeMons, and we lamented the fact that the closest they came to us in the Pacific Northwest was the Arse-Freeze-a-Palooza at Thunderhill in California. Then, last Halloween, we saw the light: a new series, the ChumpCar World Series, with more or less the same rules! And they would have TWO races in our neck of the woods! We started putting a team together from the ranks of our Subaru-driving brethren, and began the search for a car. After scouring Craigslist and eBay for a while, we realized an ideal first race-car was right in our back yard. Or more specifically, in Aaron’s back yard, aka the Pony Corral.
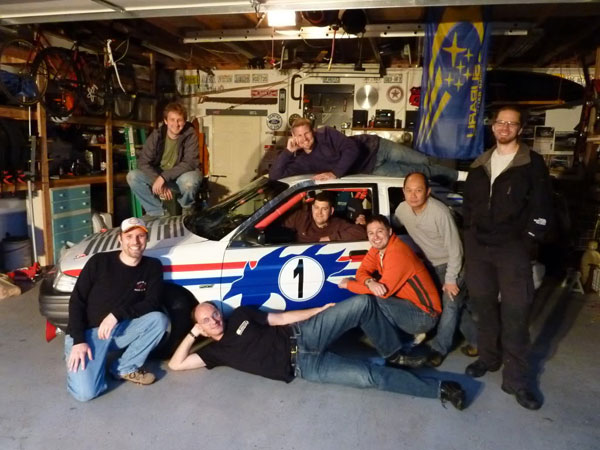
Our team consists of Aaron, the Pony Corral Proprietor; Kyle, our crew chief and resident Escort expert; David, the team photographer; Tommy, who’s in charge of our torpedoes when he’s not autocrossing; Ryan, a pro at removing sound-deadening material while everyone else eats and drinks beer; Nate, Destroyer of Clutches; Nick, finder of all things free; and myself, Zach. I’m writing this blog, I guess.
Our motley crew
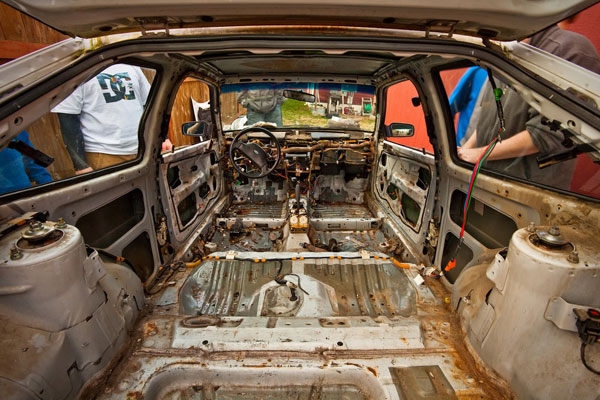
Out of this motley crew, Team Pony Express was born. Our first workdays involved removing the engine and transmission and tearing out all the unnecessary interior bits in the Pony. We unbolted and ripped out seats, dashboard, and interior trim, then attacked the sound-deadening with a hammer and dry ice. It took hours of work, but eventually we transformed a fully functional street car into a gutted, engine-less hulk.
The newly gutted Pony
After examining the suspension and brakes, we decided it would be a good idea to get some spare parts. Our Escort experts mentioned that the Escort wagons had larger rear drum brakes, so we sought out a wagon for a parts car. We found a running example in Seattle for $200, and Aaron brought it back to the Corral. We descended on the car like a plague of metal-munching locusts, and removed the front and rear suspension and brakes, as well as the motor. Then we thoroughly vandalized the car and put it on the street for the hulk hauler to take away.
Next order of business was to seam weld the car, install the brakes from the wagon, and install the larger 13.2-gallon Escort GT fuel tank we’d acquired from the junkyard. We had a 2.0L SOHC motor from a 2002 Ford Escort, so we swapped over the accessories from the 1.9L, hooked up the 5-speed, and slid it into the car. We ordered a roll cage and welded it into the car. We relocated the battery to a sealed box in the passenger compartment, and added an extra pair of tail lights in the rear hatch area. Then, we thought, we were ready to start the car.
While all of this work took place we lost our shifter bushings. Knowing that the OEM 20 year old bushings would still be sloppy if we did find them we got in contact with Corksport and got our hands on a set of Bronze Oil Bushings. What a difference! The shifts are much more accurate and smooth. They will also take the abuse that we are going to be giving them at the race track.
We were wrong. The fuel pump whirred, and the starter turned, but the engine never caught, and the garage was filled with the pungent aroma of gasoline. Apparently the heat of welding the cage in had melted the plastic fuel lines! Another junkyard run was in order. We also wanted to upgrade the Pony’s stock headlights to some brighter HIDs, but didn’t want to be the obnoxious guys running HIDs in stock reflector housings. Luckily I had my stock Legacy projector units sitting at home in the garage. They’ll accept an H7 HID retrofit, and we’ll get a much better pattern than the Pony’s reflectors. After JB welding them into place in the Pony housings, we’ve got much better output.
Super night-vision mode
Having upgraded the headlights and installed the new fuel lines, we were set to fire up the Pony. The kill switch and gauges were set, the electrical systems seemed to work, and we turned the ignition. It caught the first time, fired up, and settled into an awesome-sounding lumpy idle. After a few seconds of running, Aaron said, “I’ll try the kill switch!” He flipped it off…and the motor skipped a beat and kept on going. Uh oh. He turned the ignition off, and that killed it. Then we noticed that some of the alternator wiring had melted. The electrical boys were back to work, and thought they had it figured out. The wiring problem, yes. The kill switch, not so much.
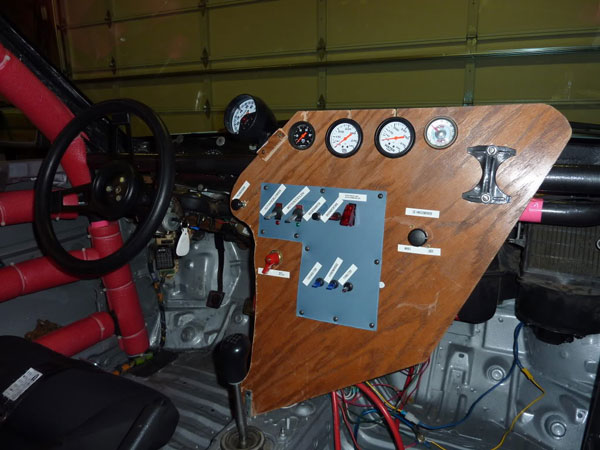
Our next workday saw the tires, Dunlop Direzza DZ101s, installed on the car on our gorgeous Acura “Fat Five” wheels ($100 on Craigslist). We’re hoping the DZ101s will hold up well in the cold and potentially wet weather we expect in Portland. We also bled the brakes, worked on some of our secret underbody aero, finished the majority of the wiring, mounted the OEM gauge cluster, installed our custom “cram air” scoop and sheetmetal airbox, and labeled the switches on our beautiful wood control panel.
Our magnificent switch panel
By late September, the car had made a few shakedown runs on the road, and we decided to give it a real challenge. Five of our seven drivers accompanied the Pony to Pacific Grand Prix, just outside Pacific Raceways, for a full day of lapping on the .8 mile outdoor kart track. We shared the track with all kinds of high-performance cars, including a Lamborghini Gallardo and an Ariel Atom, and in total we racked up almost 3 hours of track time. The Pony was a hoot to thrash around PGP, even playfully kicking up a wheel going around some of the corners, though we did a number on the front Dunlops. The only issue with the car was a slow oil leak from the dipstick tube, which we stopped with…paper towels. Hey, it worked for the day!
Through all of this, our steed was looking a bit…bland, clad as she was in her original white. One of our final work days remedied this, as we busted out the rollers and painted on a pair of blue and red racing stripes and some postal barcodes on the hood and the side skirts. We also finished painting the car’s interior, painted our “inner body aero,” replaced a stub axle that had a torn boot, cleaned the MAF and IAT sensors, gapped the spark plugs, fixed the dipstick leak, adjusted a sticky rear brake, added a volt meter, cleaned up the wiring for the instrument panel, and made sure the defroster would run all of the HVAC system’s hot air into the windshield.
Finally, a few weeks later, we had our final workday, where we added our awesome enormous vinyl pony graphics and numbers, retouched some paint, and fashioned some very high-tech funnel-and-dryer vent brake ducts. After we finished work on the car, the drivers suited up in their full race gear and we spent nearly an hour practicing pit stops, with each team member rotating through driving, fueling, holding the extinguisher, windshield washing, and assisting the driver change. We had our stops down to under 3:30, which is perfect since ChumpCar rules require that we stop for 5 minutes if we add fuel to the car.
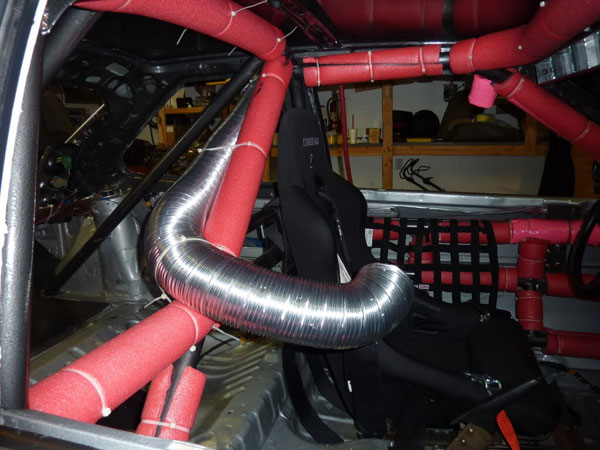
One last “mini” build day saw the Pony gain some LEDs in the wheel wells; a fresh air tube for the driver; the last bits of vinyl on the roof and hood; cornering lights; and a one-inch raise in ride height (achieved by adding washers to the top of the struts, above the springs), which should improve the suspension geometry.
Freshest… Air… Ever…
Our big day is only days away, and the ChumpCar field had better watch out – we may not have the fastest car in the field, but we’re sure as hell gunning for the engineering and theme prizes! We’ll be racing for 18 hours in Portland, OR at Portland international Raceway’s 2 mile road course.
-Team Pony Express
Make Way for the Pony Express October 29th, 2010Derrick Ambrose
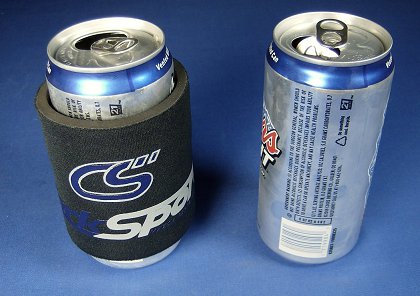
Being that I usually post about new parts coming out, I thought I would change it up a little and blog about something different. We are finally rolling out some SWAG with our new logo on it here at CorkSport and one of my favorites is the slap-on can koozie. It features our new logo screen printed on a fabric layered over neoprene. It also utilizes two of the old slap bracelets that some of you may remember, so it will fit various sizes of cans and bottles. However, it does not come with installation instructions or telephone technical support.
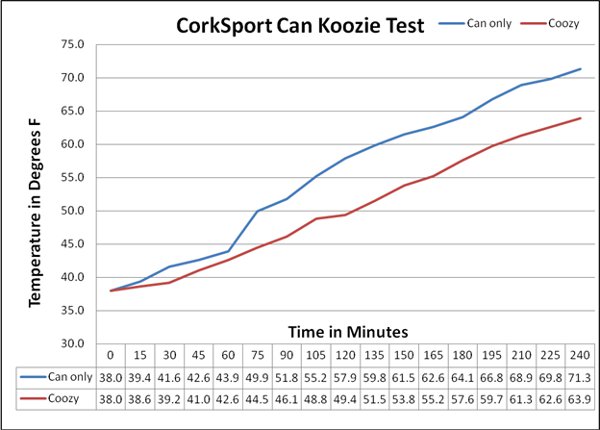
Being an engineer, I tried to come up with a way to still get some useful data out of this post. I came up with a comparison of two typical domestic beers straight out of the fridge: one in our new can koozie and one without. The picture below shows my two test victims (opened to simulate someone who is actually drinking a beer).
For four hours, I took temperature readings of each beer every 15 minutes. The ambient temperature in my office was about 73 degrees F and the fridge remains roughly constant at 38 degrees. As you can see, both beers start out at 38 degrees (the temperature of the fridge) and remain fairly similar to one another for the first hour. However, from hours 1-4, the can in the koozie stayed roughly 7-9 degrees cooler. This may not sound like a lot, but you have to take into account that it also keeps your hand from warming up the beer as well (I did not test for that, but it may be a good excuse to retest).
In the end, the CorkSport slap-on can koozie did its job and I had an excuse to drink beer at work, albeit 71.3 & 63.9 degree beer after staring at untouched open beers for four hours.