Project MX-3
Welcome to the home of the original CorkSport Mazda Performance project car: Project MX-3!
We have begun the Cork Sport MX-3 project car. We have many extensive modifications on tap for our project car. Over $10000 in parts already available on the market and a few products we are developing will be installed. (Read more...)
Installation Of CLUTCHNET Clutch Set

As you can see from the pictures this is a nice looking clutch set. This is the clutch set we recommend for street use. There are double spline pressure plates and other styles of clutch disks available for racing use. This clutch will improve your shifts dramatically over the stock setup. The clutch pedal feels just like stock but the clutch hooks up much better. The tires spin shifting into second gear now on our project car. (Read more...)
Installation Of MAZDASPEED Front Nose and Side Skirts
Mazdaspeed Front Nose:

The Mazdaspeed (MS) front nose is made from Fiberglass. It comes primed in white and ready to paint. There are two mesh grilles integrated with the fiberglass to protect the radiator and AC condensor. There are several advantages to installing this nose. The extra ducts in front of the tires can be utilized in a variety of ways: (Read more...)

Above is the graph from our three dyno runs. Below is the state of the car at each dyno test. (Read more...)
Installation of Front Strut Tower Bar:

The Fast front strut bar is quite easy to install. As you can see from this picture it fits an A/C equipped car great. Installation of just the front bar without the rear will gives the MX-3 more pronounced understeer. We recommend installing both at the same time. (Read more...)
Installation of Hurricane Header:

These headers came from Hurricane with everything you see in the picture. We had to make numerous modifications to them for successfull installation into Project MX-3. The Dyno showed a modest gain throughout most of the powerband with the strongest increase at over 6000 RPM. (Read more...)
Installation of CorkSport Gauge Face Set

We installed a set of our custom guage faces. They come in a kit which includes 3 faces, 1 needle puller, and installation instructions. The installation process will take at least 2 hours (subsequent installations are much quicker). This upgrade is fairly difficult due to the calibration of the needles. We devised two methods of recalibrating the needles: (Read more...)
Project MX-3

Finally we had the original Mazdaspeed front nose and side skirts painted to match the factory Raspberry Metallic paint. The GTR style wing was installed and painted by the shop. We have come to the conclusion that it is basically impossible to install this spoiler perfectly. The design is bad. It fits the car ok and looks great but does not fit well. Some shops have installed this spoiler with the factory rear hatch garnish installed while others have not. Which way is correct? Who knows? (Read more...)

Above is the graph from three dyno runs. Below is the state of the car at each dyno test. (Read more...)

The wheels are Versus Moderno's. They are made by Rays Engineering. The same people that make the high quality Volk Racing line of wheels. They fit great on ProjectMx3 with a 42mm offset. The wheels came with hub-centric rings, lug nuts, and air stem with "Rays" stem caps. (Read more...)

Fresh Air Intake
During our dyno tests of ProjectMx3 we have noticed that significant power is lost when we close the hood. The open filter system sucks in hot air from the engine bay and reduces power output by 10 HP on our project car. (Read more...)
Intro
10-20-98We have begun the Cork Sport MX-3 project car. We have many extensive modifications on tap for our project car. Over $10000 in parts already available on the market and a few products we are developing will be installed. (Read more...)
Project MX-3 - STEP 1
Installation Of CLUTCHNET Clutch Set

As you can see from the pictures this is a nice looking clutch set. This is the clutch set we recommend for street use. There are double spline pressure plates and other styles of clutch disks available for racing use. This clutch will improve your shifts dramatically over the stock setup. The clutch pedal feels just like stock but the clutch hooks up much better. The tires spin shifting into second gear now on our project car. (Read more...)
Project MX-3 - STEP 2
Installation Of MAZDASPEED Front Nose and Side Skirts
Mazdaspeed Front Nose:
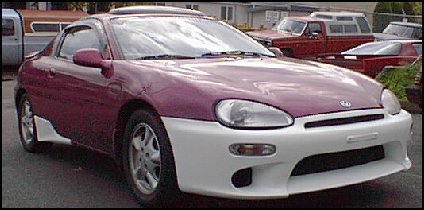
The Mazdaspeed (MS) front nose is made from Fiberglass. It comes primed in white and ready to paint. There are two mesh grilles integrated with the fiberglass to protect the radiator and AC condensor. There are several advantages to installing this nose. The extra ducts in front of the tires can be utilized in a variety of ways: (Read more...)
Project MX-3 - DYNO 1

Above is the graph from our three dyno runs. Below is the state of the car at each dyno test. (Read more...)
Project MX-3 - STEP 3
Installation of Front Strut Tower Bar:

The Fast front strut bar is quite easy to install. As you can see from this picture it fits an A/C equipped car great. Installation of just the front bar without the rear will gives the MX-3 more pronounced understeer. We recommend installing both at the same time. (Read more...)
Project MX-3 - STEP 4
Installation of Hurricane Header:

These headers came from Hurricane with everything you see in the picture. We had to make numerous modifications to them for successfull installation into Project MX-3. The Dyno showed a modest gain throughout most of the powerband with the strongest increase at over 6000 RPM. (Read more...)
Project MX-3 - STEP 5
Installation of CorkSport Gauge Face Set

We installed a set of our custom guage faces. They come in a kit which includes 3 faces, 1 needle puller, and installation instructions. The installation process will take at least 2 hours (subsequent installations are much quicker). This upgrade is fairly difficult due to the calibration of the needles. We devised two methods of recalibrating the needles: (Read more...)
Project MX-3 - STEP 6
Project MX-3
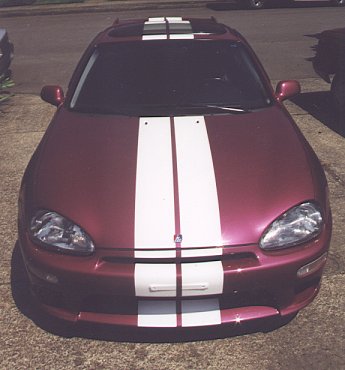
Finally we had the original Mazdaspeed front nose and side skirts painted to match the factory Raspberry Metallic paint. The GTR style wing was installed and painted by the shop. We have come to the conclusion that it is basically impossible to install this spoiler perfectly. The design is bad. It fits the car ok and looks great but does not fit well. Some shops have installed this spoiler with the factory rear hatch garnish installed while others have not. Which way is correct? Who knows? (Read more...)
Project MX-3 - DYNO 2

Above is the graph from three dyno runs. Below is the state of the car at each dyno test. (Read more...)
Project MX-3 - STEP 8

The wheels are Versus Moderno's. They are made by Rays Engineering. The same people that make the high quality Volk Racing line of wheels. They fit great on ProjectMx3 with a 42mm offset. The wheels came with hub-centric rings, lug nuts, and air stem with "Rays" stem caps. (Read more...)
Project MX-3 - STEP 9

Fresh Air Intake
During our dyno tests of ProjectMx3 we have noticed that significant power is lost when we close the hood. The open filter system sucks in hot air from the engine bay and reduces power output by 10 HP on our project car. (Read more...)