CorkSport Mazdaspeed3 13 Inch Big Brake Kit

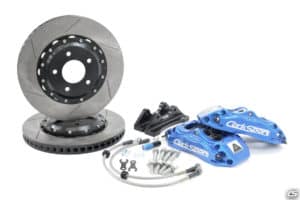
Even More Stopping Power for your Mazdaspeed 3

In our drive to make more power, we often forget about adding measures to keep us safe at the greater speeds we are achieving. The CorkSport Big Brake Caliper Kit is a great place to start, however, if you wish you could stop even faster say hello to the CorkSport 13-inch Big Brake Kit. Designed for serious stopping power, it includes 13” directional rotors, powder-coated 4-piston calipers, upgraded pads, and everything you need to install it on your Mazdaspeed3.

Read on for a breakdown of all the components
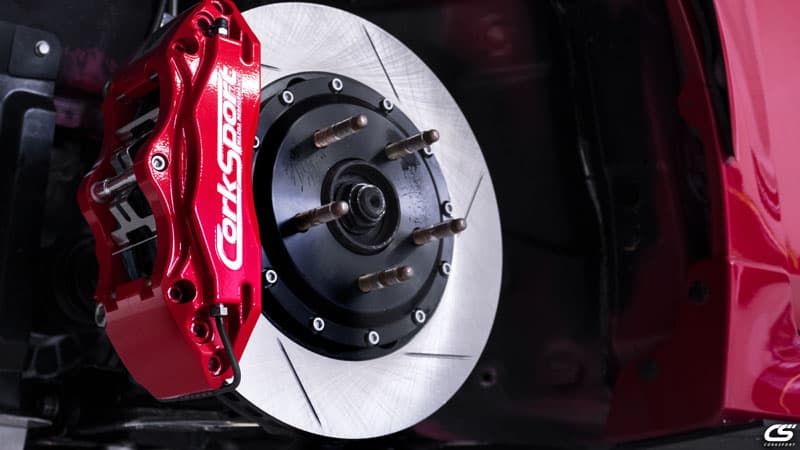
Mazdaspeed 3 Big Brake Kit in Blue

Rotors

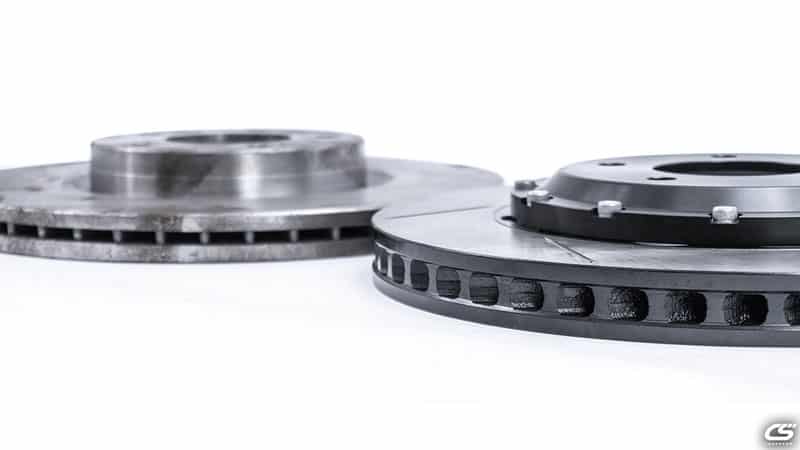
The rotors have been designed to provide optimal stopping power while minimizing noise for street use. The upgrade to 13-inch diameter rotors provides greater braking torque for an equivalent braking force (like how a longer wrench makes it easier to loosen a tight bolt). The larger diameter combined with an increased thickness of 28mm (vs 25mm for OE) provides better cooling as there is a larger mass to reject heat into.

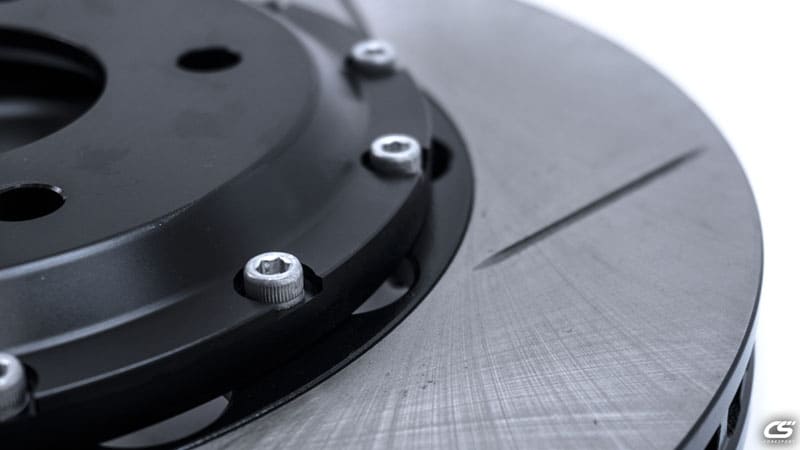
In addition, slots were added to the friction surface to help sweep away any debris, brake dust, or gases that can otherwise affect your braking characteristics. We avoided drilling the rotors as holes decrease your total friction area and increase the chance that the rotor will crack. By moving to a two-piece design, we were able to decrease the overall weight of the rotor and by making the center section out of aluminum, it can help dissipate heat from the rest of the rotor better. Semi-Floating mounting between the inner and outer sections allows for a quieter rotor vs having a full-floating center section.

Finally, the vanes in the rotor are atypical; these vanes are the “fins” that connect the inside and outside of the rotor. By using curved vanes instead of the typical straight vanes, the rotor becomes directional and has to be used on a specific side of the vehicle; however, it also provides more efficient cooling. When the rotor turns, the curved vanes draw air through the center of the rotor and out through the edge, providing greater airflow than a straight vane and thus better cooling. There is another bonus to heat dissipation as the curved vanes have a larger surface area that will come in contact with air than an equivalent number of straight vanes.
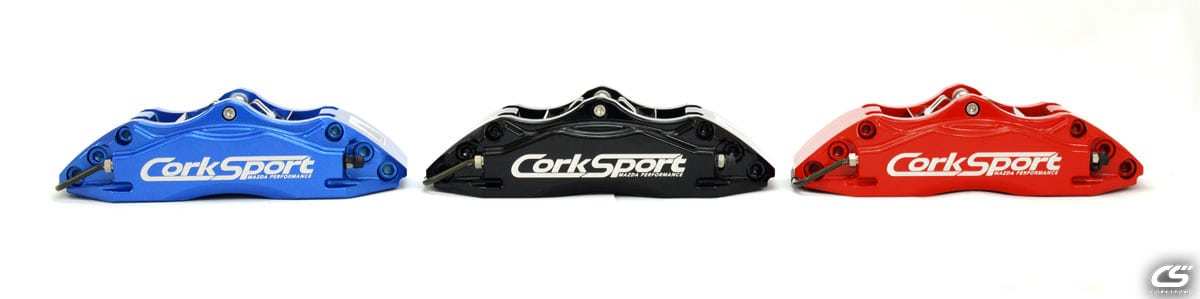
Calipers

Forged aluminum, four-piston performance calipers are included with the kit in a choice of powder-coated blue, red, or black.

Although each piston is individually smaller in diameter than the single OE caliper piston, the total surface area is increased so the braking force at a specific brake pressure is increased. A larger piston surface area means larger brake pads can be used as well. You also get more even braking force on each side of the rotor due to the opposed piston design. This encourages even pad wear, even rotor wear, and consistent braking characteristics.

The pistons themselves were specifically chosen for optimum braking endurance and reliability. They are staggered in size, with the pistons on the leading edge being slightly smaller than the trailing edge pistons. This is another protection for even pad wear. Each piston is made completely out of stainless steel for its low conductive heat transfer. What this means is that the pistons themselves will transfer less heat to the brake fluid than an aluminum or steel piston, decreasing the chances of overheating brake fluid.

Pads

Street performance brake pads are included with the kit that bridges the gap between Mazdaspeed3 street and trackpads. They are larger and a more aggressive compound than the pads included with the CorkSport MS3 Big Brake Caliper Kit but are not full trackpad. They will produce less dust and noise than a trackpad but still need to be warmed up for optimum performance. Should you need new pads or want to change to a different pad, you have a bunch of options from G-Lock, Carbotech, EBC, Hawk, and various other manufacturers.

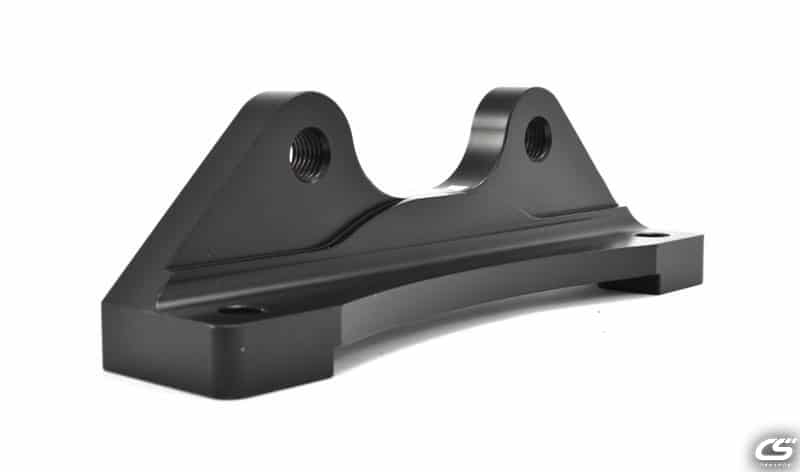
Lines, Brackets, and Hardware

The rest of the CorkSport 13-inch BBK is composed of exactly what you need to properly and safely install the kit on your Mazdaspeed3. Stainless steel brake lines are included to remove any risk of a soft brake pedal and ensure the calipers are operating optimally. High-strength steel brackets properly position the four-piston calipers on the new rotors using the OE bracket locations. All components are locked down using Grade 12.9 hardware with a corrosion-resistant coating for lasting durability.

Mazdaspeed 3 Big Brake Bracket
Mazdaspeed 3 Bracket for the Big Brake Kit

The CorkSport Mazdaspeed 3 13” Big Brake Kit has everything you need to keep you safe at increased horsepower levels. If you’re looking for more than the stock brakes have to offer, let the CS Mazdaspeed3 BBK be a part of your build.

You may also like

You may also like

What to do During Racing Off-Season

Racing season is officially over. What do you do when it's the off-season?

The conclusion of the SCCA runoffs came in late September and the NASA western conference is all wrapped up. We’re approaching a horribly sad time of the year for us folk in the north: the racing off-season. Here in Washington, it gets a little bit colder and a whole lot wetter. The days get shorter and the racecars get put into the garages. Except for rally, that stuff goes on all year round because they’re bosses. But all in all, the season dies down.

I personally like to take this time to work on all those little projects I’ve been putting off during the summer months. That engine you were going to rebuild or those quarter panels you said you would paint and fix.

For the enthusiast, the off-season is a good time to bring your ride back up to where you want it to be. For the racer, the off-season is a great time to sit down, plan, and make a strategy for the up-and-coming season. It’s a good time to think about your goals for next year and plan out what races you wish to attend.

As much as I love racing, you still need to make good memories with friends and family that put up with your hobbies. So slow down and enjoy the holidays. Spend time with your friends and family because when summer rolls back around, your best friend becomes your steering wheel. And yes, those are chestnuts roasting on an open fire.

Take the off-season of racing to appreciate your family and plan your next season.
Photo Credit: gallery.asiaforest.org

So guys, what do you like to do in the off-season when you’re not driving the racecar as much? What plans do you have this winter? Share them with us and maybe I can try something new.

Cheers,

Vincent

Prototypes, R & D, and the New MX-5: A Day at the Track

I bet you know this already, but we’re very excited about the new Mazda MX-5 and really, what’s not to be excited about! The ND MX-5 is sleek, sexy, efficient, modern, and an absolute blast through the apex.

untitled-322

Here at the CorkSport HQ, we’ve been working on a handful of awesome products and even had our first prototypes before we even had the car to test them on. But the wait is over. With prototypes in one hand and keys in the other, there was only one thing needed….Portland International Raceway. Oh, and for good measure we brought in Kenton Koch, of Kenton Koch Racing, to put our MX-5 and prototypes through their paces. Here’s how the day went.

untitled-3

The morning was a cool 55 degrees, but the CS team was buzzing with excitement. First session of the day was about to start, so Kenton was sent out with OEM springs and the CS front and rear swaybars in their softest setting. A couple laps later, Kenton came to the pits with concern for the rear suspension. Too our surprise, the coins of the RSB had bent, rendering the RSB useless. This was a real bummer, but a failed part in testing is a great day for warranty. Luckily, we were able to set the RSB to the stiffest setting to continue testing. Back to the track he went.

untitled-106

Kenton was able to finish the session without issue and returned to the pits with more feedback than we could absorb. He loved the car, but the springs were just too soft and the FSB needed a stiffer setting. Great! This is exactly the feedback we wanted to hear! For the next session, Kenton went out in an employee’s club edition to get a baseline feel of the OEM swaybars. In the meantime, the CS team swapped the springs out with our 35% stiffer springs.

untitled-324

Session three: launch edition MX-5 with 35% stiffer springs and the swaybars on the stiffest settings. Kenton came into the pits around the halfway mark and requested we move the FSB back to the softest setting. The session ended and Kenton returned to the pits with even more feedback! In the first half of the session, he was fighting a lot of understeer which is what merited the FSB adjustment. In the second half of the session, the understeer was much improved, but was still the most prevalent driving characteristic. We had another set of springs that were only 20% stiffer, so we installed them in the front and sent him out for the next session.

untitled-308

This was the ticket! Kenton stayed on track for the whole session this time. He was very happy with the car’s balance and had complete control of understeer/oversteer with just a small amount of throttle modulation. This was great news! For the final session, we adjusted the FSB back to the stiffest setting. This would tell us if the swaybars were a good compliment to the springs. Another session went by and again Kenton was very happy. The stiffer setting on the FSB pushed the car’s balance a little more towards understeer. This is great because understeer is typically much easier and safer for a novice driver to control, but the FSB also had the adjustability to put the car at a balanced state. More experienced drivers will appreciate this.

We wrapped up the day extremely satisfied with our results. We had a failure, we had many successes, and we learned a lot about the new MX-5. We can confidently say that the CorkSport MX-5 components are track tested and designed with the customer in mind. Look for swaybars, springs, and endlinks in the near future!

untitled-331

Barett Strecker-01

Journey to the Perfect Race Car

For those of you who don’t know me, or frankly have no idea who I am, I’m Vincent and I’m part of the CorkSport team. If there’s one thing you should know about Vincent, it’s that he likes to race.

Start racing with the help of CorkSport.

I’m a huge fan of sports car racing and pretty much anything that includes four wheels, an engine, and high speeds. Another thing you should know is that I’m still fairly new to the Pacific Northwest. I moved up here almost 10 months ago to work for the great Mazda company, CorkSport. In an effort to spread my wings and make my way to Vancouver, some sacrifices had to be made. The biggest was selling my race car.

Discover Vincent's journey to his new race car with the help of CorkSport.

I’ve been lucky to have owned a few good Mazdas and some other cars. I’ve been even luckier to have been able to compete with these cars, including my import drag racing Mitsubishi Eclipse and my HPDE Mazdaspeed Protege. But when I moved, they had to stay behind and find a new home. So I was left lonely. Alone, sad, and with a desire to get back on the circuit, I went on the hunt to find a new race car to compete with. Of course until I get my hands on a third generation Mazdaspeed 3. Lucky for me, I didn’t have to go far. Literally not far at all. I’m talking two desks over to our co-owner and fellow racer Mr. Derrick Ambrose, or as I like to call him Mr. Derrick. We’re polite here at CorkSport.

Tucked away in the back of his garage was a familiar face to anyone who has been around CorkSport over the years. That familiar face was a 1999 Mazda Protege with a little P5 front end action.

Vincen't new CorkSport powered race car.

The old CS drag car was a little aged, a little dirty, and begging for a new life. Needless to say, I found myself my new race car. She had already been gutted and caged so the hard parts were done. With a new engine and transmission, it was in a good state to get finished up. Just a few odds and ends here and there and possibly a fresh wrap, and then she will be good to get on the track in no time.

I still haven’t decided what class of sports car racing I want to compete in. I’m thinking simple like PTE in NASA or maybe H-production in SCCA. What entry level club racing appeals to you guys the most?

Cheers,

Vincent

Because Racecar

As some of you have read of the last few years I really like the Mazda 2. Before it was released in the US I had written several blog posts on my thoughts. When we picked up the first Mazda 2 delivered in the US we set out to develop a range of parts for the 2. We have also had a chance to drive 2 in autocross events and down lots of winding roads.

Once you get to the point of completing the parts you need developed on a shop car what happens next? In the case of the CorkSport Mazda 2 you turn it into a B-Spec racecar. Why would you want to do that to a new car I am sure some of you are asking? If you have read the blog about my participation in the SCCA driving school you know that I am working towards my alter ego race car driving dream and the B-Spec racecar gives a good way to approach this being cost effective.

This leads us back to the CorkSport Mazda 2. To make it a B-Spec racer requires some work. Make that a lot of work. The first thing to building the car is to install a roll cage which is it probably one of the most time consuming parts of the job. First you start off with your stock interior and take it out.

Once you finish up that easy task you need to remove all of the sound deadener Mazda installed in the chassis. There are two methods to do this. #1 is with an air chisel and being very careful to not punch a hole through the floor of your car and #2 use dry ice. The dry ice method is something I had not done before but it sounded easy enough. That and if you have left over dry ice a plastic 2 liter bottles can be lots of fun. Check out the video below of me using the dry ice to remove the sound deadener.

If I can offer a tip while doing this is to get 2-3 blocks of the dry ice so you can have several sections cooling down and keep working so you do not have to stock between the freezing of the sound deadener.

Once you completely remove of the insulation you get to start on the roll cage. This takes time and precision to get done. If you have never done this work before, I strongly recommend taking it to a professional to get done. The materials, welds, and design all need to meet the specifications of the racing sanctioning body you will be participating with. In this case we used the specs from the SCCA GCR (General Competition Rules) which are accepted by other road racing sanctioning bodies.

We went with a nascar style door bars to give the driver more space in case there is a side impact and a bit of an angle for easier entry into the car while climbing over the cage.

After all of the hard work is done with the cage getting installed you need to paint it. We wanted the color to match the exterior so we ordered up several cans of the 38P paint code color from an online supplier and got to work. After taping up the interior to limit overspray we got to work with the color and the clear coat. The finished product looks good. The picture below shows the rear section painted with the base coat.

The final product looks great and matches well with the exterior paint of the 2.

Once the paint had dried we got to work installing the safety gear for the car. We went with a set of Sparco 6 point harnesses and a Sparco Circuit Seat.

Mounting the harnesses takes some planning. After getting a good idea of where we were going to mount the seat we got to work on the mounting points for the harness. In the Mazda 2 there is only 1 factory bolt location that we could use for the lap belt. The other side of the factory seat belt mounts to the original seat. The rules require you to have a 4 inch square backing plate for the harness on the back side of the car body to make sure the anchor points for the bolts do not tear through if you are involved in a wreck. We had to do this in three locations on the 2, one for the lap belt on the tunnel side and the two for the sub belt. After planning the hole locations and making sure there was no interference (make sure when you are drilling hole into your car you look at the other side of the panel) parts on the bottom of the 2 which there was since the brake lines and fuel lines pass under the drivers seat, we got to work with drilling the holes and mounting the eyelets. The actual installation of the harnesses is easy, they simple snap onto the mounting eyes and feeding the harness around the cage bar behind the seat.

The seat is a 1 piece FIA approved bucket which is a side mount style. With the Mazda 2 being out on the market for a short time we found there were no mounting brackets available which meant we got to build them ourselves. Thankfully this is a pretty straightforward task in the Mazda 2. After sourcing some inch and a quarter steel we pressed the shapes we needed and mounted up the seat. We set the seat up so there is a slight bend in the drivers legs when the pedals are pulley depressed. This allows you to have leverage and keep a comfortable seated position when driving. We also mounted the seat as low as we could and still give the driver good visibility of the track. A lower position means lower center of gravity in the car and the best handling of the car.

This is where we are at for the moment with the 2. I will be updating the build in the next few weeks to show the final result of the car.

Derrick-